
To add more functionality for your Magento 2 powered store, modifying the core files of the platform is a bad approach. So, in order to extend the current or add new functionalities in Magento 2, the best approach is to create a custom module and use Magento 2 Helper which gives you one of the best opportunities to override core files and pre-defined functions of the Magento 2 platform.
What is Magento 2 Helper?
The Magento 2 helper is the class which is used for adding functionalities to several features and can be used anywhere in the entire website. They are created as Singleton (single instances of objects) which can be called in controllers, views, models, templates etc.
So today in this guide, I am going to teach you how to use Magento 2 helper.
Let’s assume that you have to show account login and register links along with the Add to Cart button to your guest users.
Let’s start by creating a custom Magento 2 module!
Create Magento 2 Custom Module
Add module.xml file in app/code/Magenticians/Mymodule/etc and copy the following code in it:
<?xml version="1.0"?>
            <config xmlns:xsi="http://www.w3.org/2001/XMLSchema-instance" xsi:noNamespaceSchemaLocation="urn:magento:framework:Module/etc/module.xsd">
                        <module name="Magenticians_Mymodule" setup_version="1.0.1">
                        </module>
            </config>
Add registration.php in app/code/Magenticians/Mymodule and copy the following code in it:
<?php
\Magento\Framework\Component\ComponentRegistrar::register(
\Magento\Framework\Component\ComponentRegistrar::MODULE,
'Magenticians_Mymodule',
__DIR__
);
Create Magento 2 Helper
Now add Data.php file in app/code/Magenticians/Mymodule/Helper and copy the following code in it:
<?php

namespace Magenticians\Mymodule\Helper;

use Magento\Framework\App\Helper\AbstractHelper;

class Data extends AbstractHelper
{
    /**
     * @var \Magento\Framework\App\Http\Context
     */
    private $httpContext;

    public function __construct(
        \Magento\Framework\App\Helper\Context $context,
        \Magento\Framework\App\Http\Context $httpContext
    )
    {
        parent::__construct($context);
        $this->httpContext = $httpContext;
    }

    public function isLoggedIn()
    {
        $isLoggedIn = $this->httpContext->getValue(\Magento\Customer\Model\Context::CONTEXT_AUTH);
        return $isLoggedIn;
    }
}
In the code (helper) above, I have created a function isLoggedIn() to get the status of logged in users.
Override addtocart.phtml
Now go to vendor/magento/module-catalog/view/frontend/templates/product/view from the root directory of your store and you will see the addtocart.phtml file. Copy the file and paste it into app/code/Magenticians/Mymodule/view/frontend/templates/catalog/product/view.
Add catalog-product.view.xml file in app/code/Magenticians/Mymodule/view/frontend/layout and copy the following code in it:
<?xml version="1.0"?>

<page xmlns:xsi="http://www.w3.org/2001/XMLSchema-instance" xsi:noNamespaceSchemaLocation="urn:magento:framework:View/Layout/etc/page_configuration.xsd">
    <body>
        <referenceBlock name="product.info.addtocart">
            <action method="setTemplate">
                <argument name="template" xsi:type="string">Magenticians_Mymodule::catalog/product/view/addtocart.phtml</argument>
            </action>
        </referenceBlock>
    </body>
</page>
I have created the above file to override the core addtocart file with our custom addtocart file.
To show the login and register option to the guest users, go to addtocart.phtml from app/code/Magenticians/Mymodule/view/frontend/templates/catalog/product/view and and copy the following code in it:
<?php

$helper = $this->helper('Magenticians\Mymodule\Helper\Data');?>
<?php if($helper->isLoggedIn()): ?>
<div class="box-tocart">
        <p><a href="<?php echo $block->getUrl('customer/account/login') ?>" title="<?php echo __('Login') ?>"><?php echo __('Login') ?></a> or <a href="<?php echo $block->getUrl('customer/account/create') ?>" title="<?php echo "Register" ?>"><?php echo "Register" ?></a></p>
</div>
<?php endif; ?>
In the above code, I have set the condition that if the user is not logged in, show the register and login links.
The final addtocart.phtml will be:
<?php

/**
 * Copyright © Magento, Inc. All rights reserved.
 * See COPYING.txt for license details.
 */
// @codingStandardsIgnoreFile
/** @var $block \Magento\Catalog\Block\Product\View */
?>

<?php

$helper = $this->helper('Magenticians\Mymodule\Helper\Data');?>

<?php if($helper->isLoggedIn()): ?>

<div class="box-tocart">
        <p><a href="<?php echo $block->getUrl('customer/account/login') ?>" title="<?php echo __('Login') ?>"><?php echo __('Login') ?></a> or <a href="<?php echo $block->getUrl('customer/account/create') ?>" title="<?php echo "Register" ?>"><?php echo "Register" ?></a></p>
</div>

<?php endif; ?>

<?php $_product = $block->getProduct(); ?>
<?php $buttonTitle = __('Add to Cart'); ?>
<?php if ($_product->isSaleable()): ?>
<div class="box-tocart">
    <div class="fieldset">
        <?php if ($block->shouldRenderQuantity()): ?>
        <div class="field qty">
            <label class="label" for="qty"><span><?= /* @escapeNotVerified */ __('Qty') ?></span></label>
            <div class="control">
                <input type="number"
                       name="qty"
                       id="qty"
                       value="<?= /* @escapeNotVerified */ $block->getProductDefaultQty() * 1 ?>"
                       title="<?= /* @escapeNotVerified */ __('Qty') ?>"
                       class="input-text qty"
                       data-validate="<?= $block->escapeHtml(json_encode($block->getQuantityValidators())) ?>"
                       />
            </div>
        </div>
        <?php endif; ?>
        <div class="actions">
            <button type="submit"
                    title="<?= /* @escapeNotVerified */ $buttonTitle ?>"
                    class="action primary tocart"
                    id="product-addtocart-button">
                <span><?= /* @escapeNotVerified */ $buttonTitle ?></span>
            </button>
            <?= $block->getChildHtml('', true) ?>
        </div>
    </div>
</div>
<?php endif; ?>
<?php if ($block->isRedirectToCartEnabled()) : ?>
<script type="text/x-magento-init">
    {
        "#product_addtocart_form": {
            "Magento_Catalog/product/view/validation": {
                "radioCheckboxClosest": ".nested"
            }
        }
    }
</script>

<?php else : ?>
<script type="text/x-magento-init">
    {
        "#product_addtocart_form": {
            "Magento_Catalog/js/validate-product": {}
        }
    }
</script>
<?php endif; ?>
Run CLI Commands
Launch SSH terminal and go to the root directory of your Magento 2 store.
Then run the following commands:
rm -rf var/di/* var/generation/* var/cache/* var/log/* var/page_cache/* var/session/* var/view_preprocessed/* pub/static/*
php bin/magento setup:upgrade
php bin/magento setup:upgrade
php bin/magento setup:static-content:deploy -f
php bin/magento cache:clean
php bin/magento cache:flush
Now go to the product page of your store and logged in as a customer, you will see the desired result:
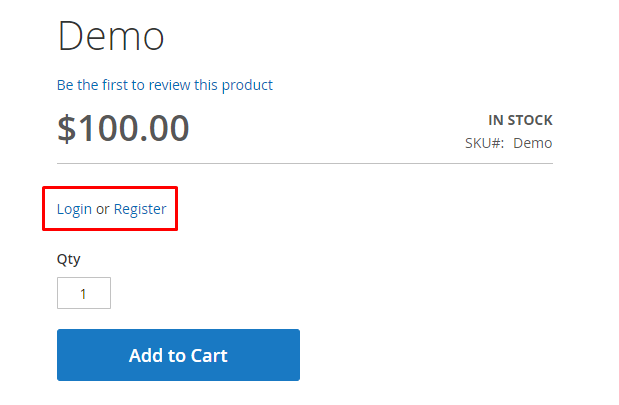
It means that Magento 2 helper has been successfully implemented.
Finding The Righteous Hosting For Magento Store?
With Cloudways, you can avail FREE SSL, Migration and much more in just a few clicks.
Wrapping Up
I have shown you an example on how to use Magento 2 helper, hence you can extend it according to your needs and requirements. However, if you still face issues in its implementation, then just drop your comment below and I’ll try to respond asap!
If you are having trouble with Helper in Magento 1.x, do see: How To Create A Magento Helper.


