Magento 2 Tutorials 
Learn How to Install Magento on AWS (Amazon Web Services)
- Syed Muneeb Ul Hasan
- March 18, 2020

According to Magento customer and market share report, the popular Content Management System (CMS), currently powers 842,618 websites. Wow, that’s a huge number. If you own an ecommerce store, or you are thinking to setup an ecommerce store, Magento should be your first choice CMS for setting up an ecommerce platform.
To begin with, we will first host Magento on Amazon Web Service (AWS) platform. You might ask why am I considering AWS to host my site when we have other hosting solutions available?
AWS Vs Other Hosting Solution
If someone of you opting shared hosting for their ecommerce store then it won’t the smart decision because performance and reliability is the major issue with shared hosting and an ecommerce store can not survive with this headache.
It’s better to be proactive and smart at the same time. We have dedicated servers where the user has complete control over the server but if any uncertainty happens with the server then there is no other hosting alternatives except that the business has to suffer.
Now we are left with a cloud solution that offers a great combination of resources including scalability, security and optimized store performance which you can’t find in other hosting solutions. When it comes to cloud solution AWS is one of the reliable solutions because AWS hosts the world’s number one ecommerce store Amazon.
Running Magento on AWS would be wiser comparatively. AWS is the world-leader in the cloud industry that offers a great number of features like security, cost-effectiveness in terms of “AWS Free Tier Plan”. Then, flexibility, scalability and many more to come with it. This blog will also explain how to setup AWS server or hosting for Magento ecommerce stores.
NOW
Let’s begin with Magento AWS hosting.
You have to follow these steps to Install Magento on AWS:
- Setup a Server on Amazon
- Install pre-requisite tools on the server, needed to run Magento
- Setup Database
- Install and configure Magento on AWS
- Easier Way to Install Magento on AWS
Up and Running with AWS Magento Hosting
Setup a Server on Amazon
Amazon Developer Console
Go to Amazon and setup an account. Now, navigate to AWS Management console. You will see the following screen:

Select EC2. Don’t worry if you can’t see it. Search it in Find Services and you will get it. Click on it. Now you will see the following screen:
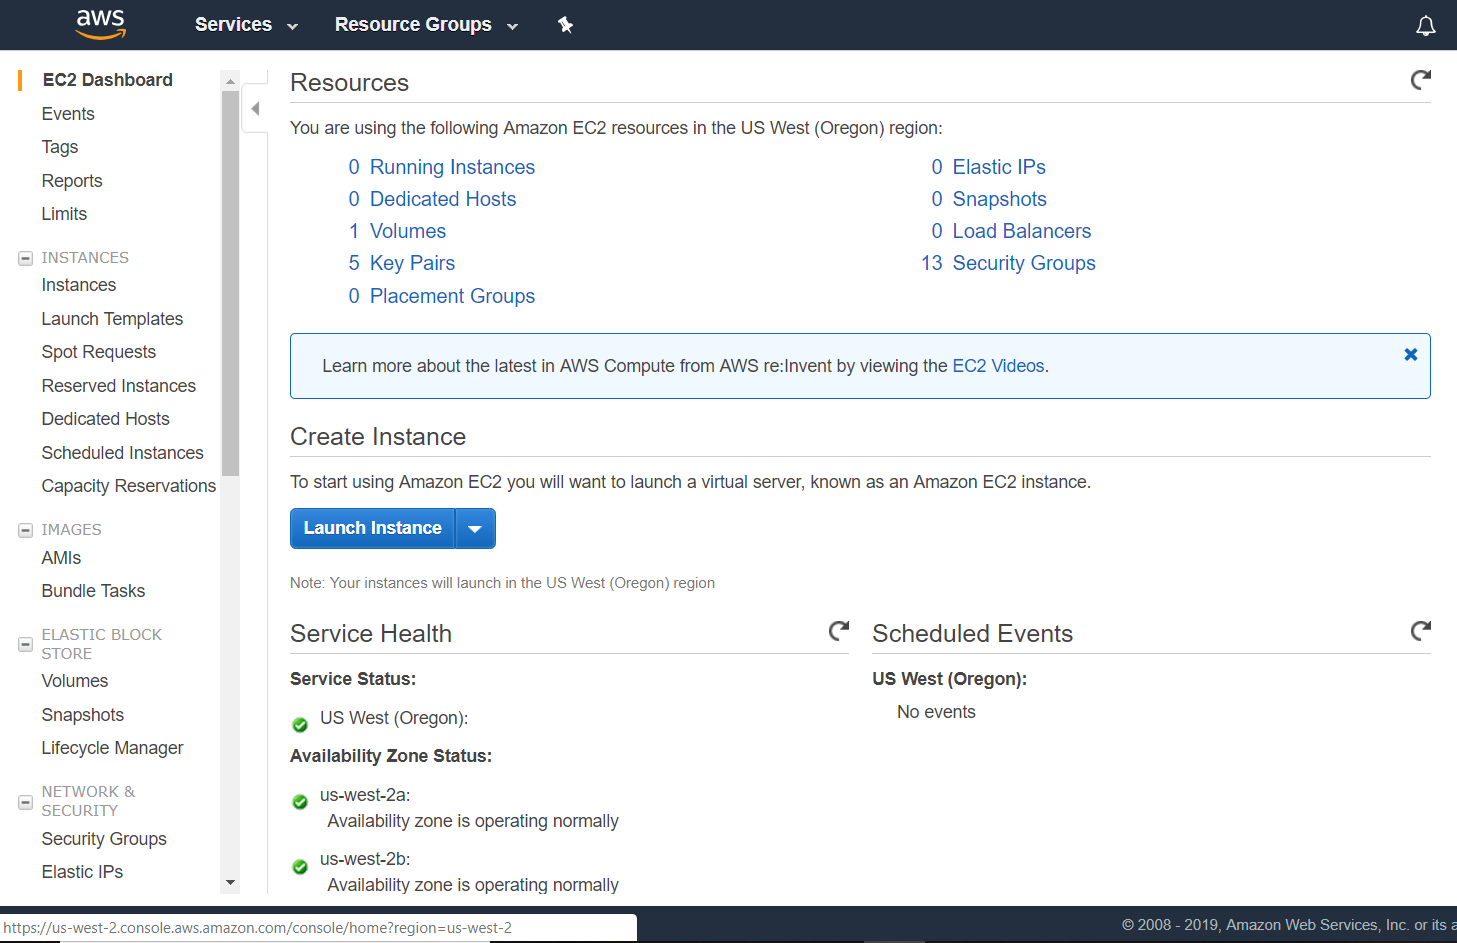
Click on Launch Instance.
Select a machine with default operating system (OS), such as Linux, Ubuntu, or Windows etc.
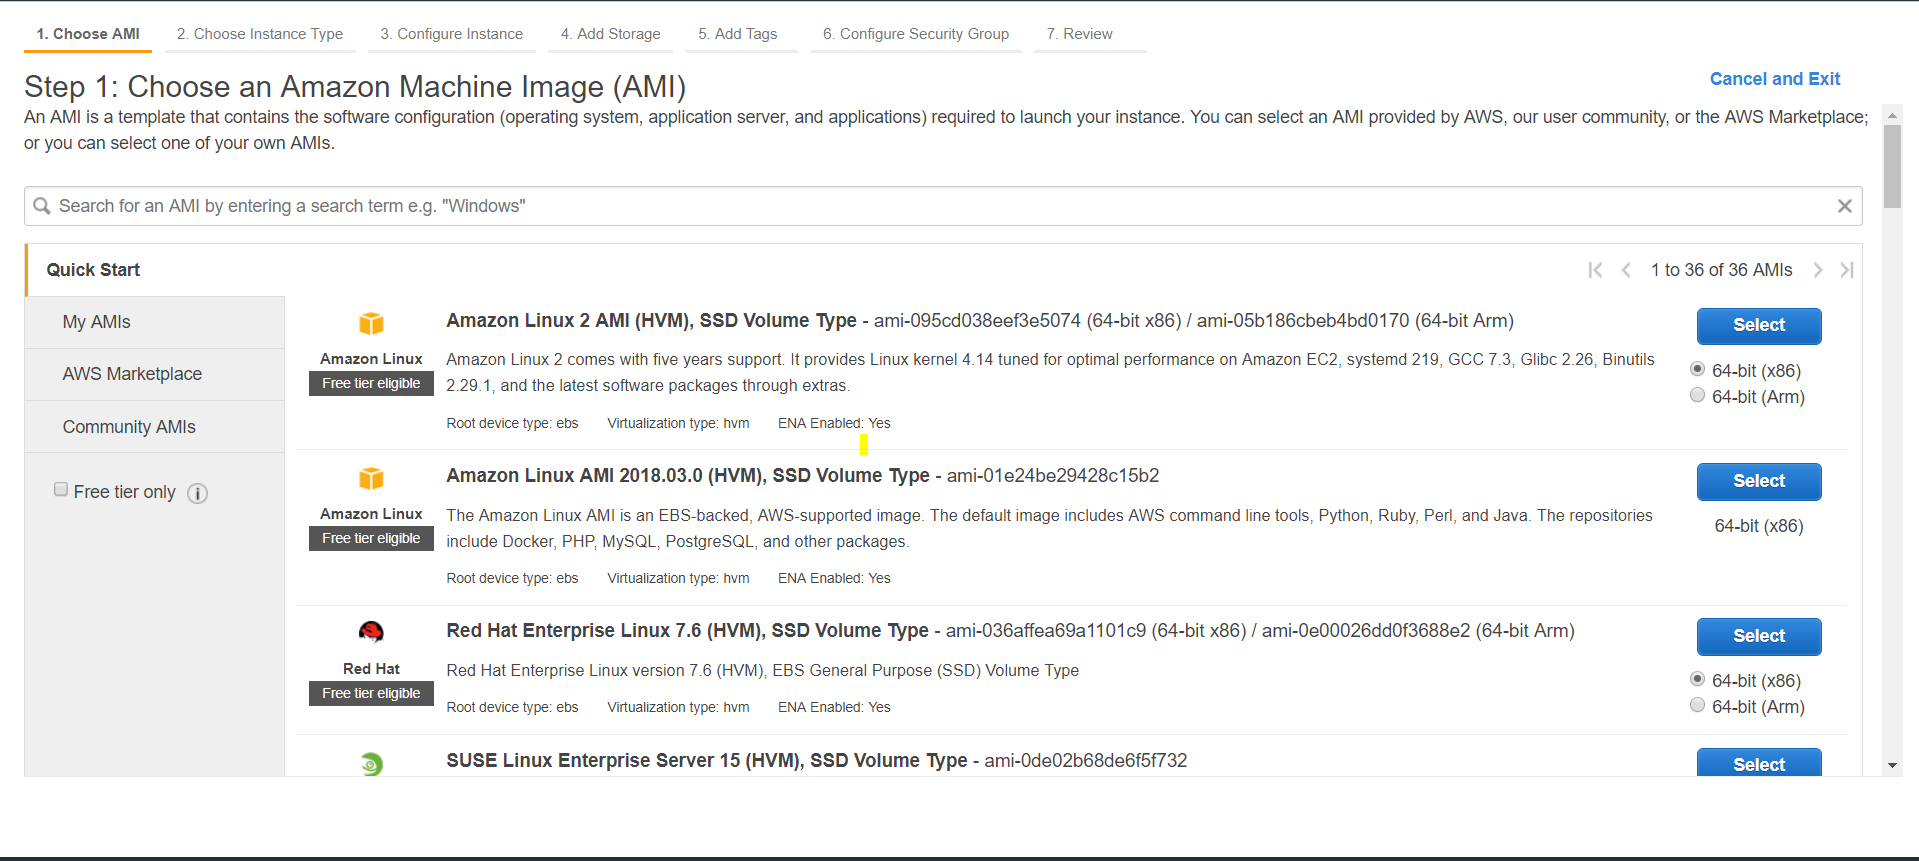
You will see the following screen. Scroll down, and you will see:
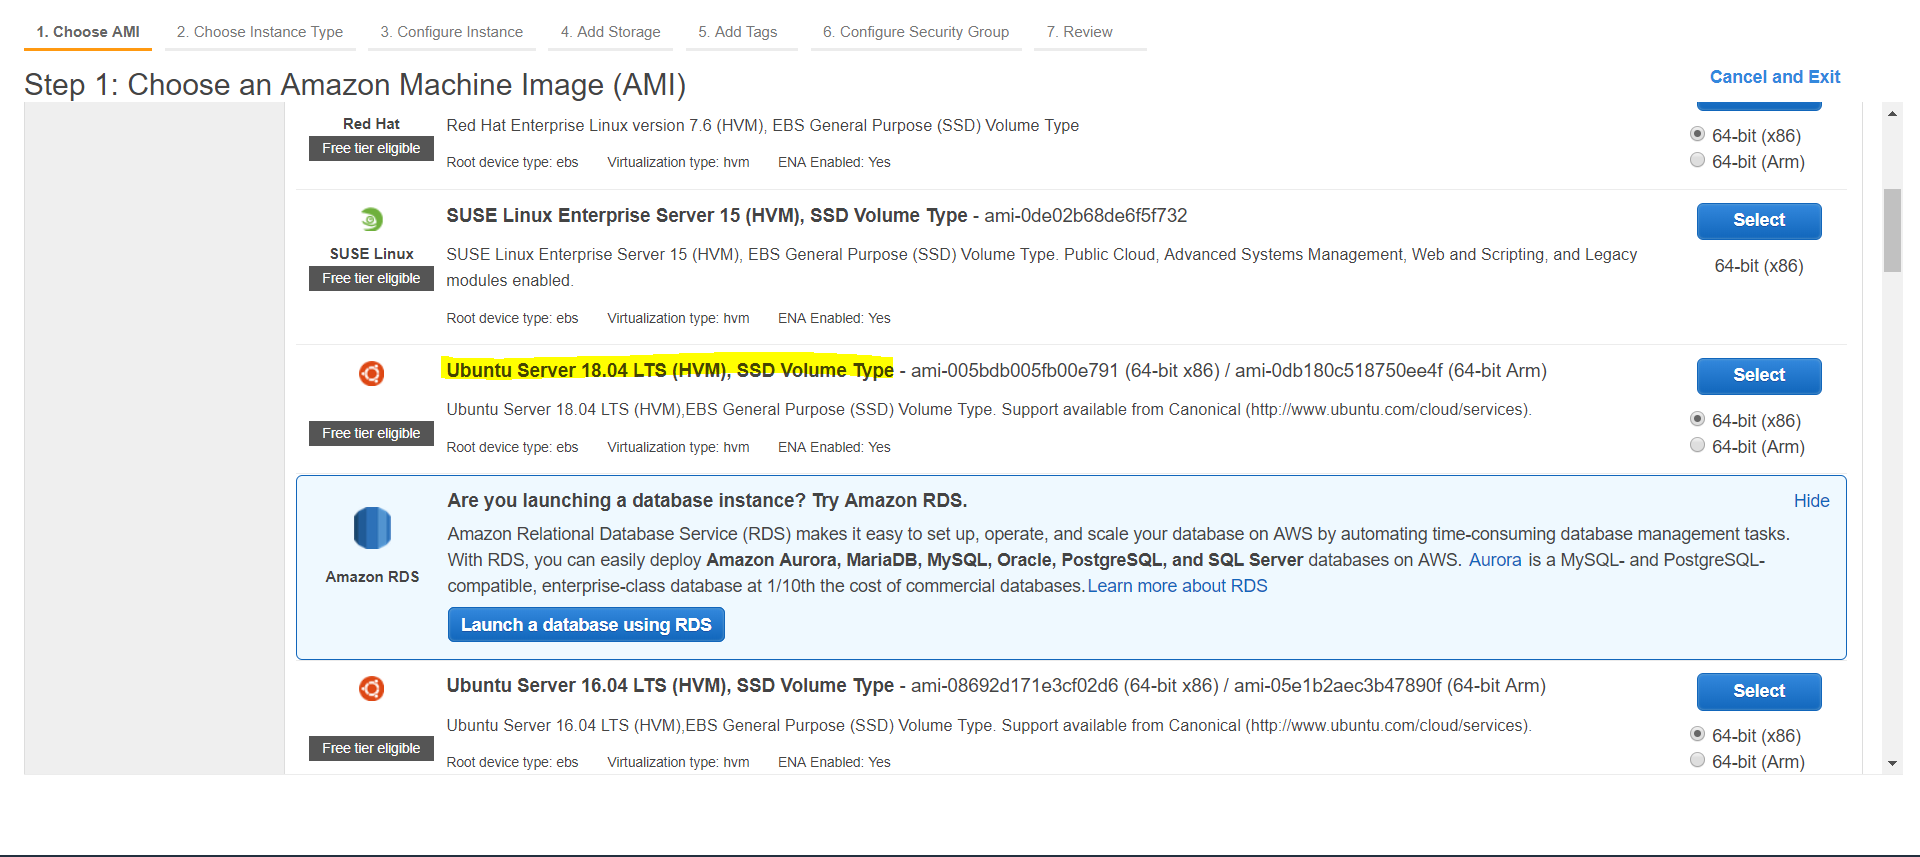
Select the Ubuntu server. Most developers tend to use Linux operating system to carry out their tasks, therefore I prefer Ubuntu. If you are a Windows user, and you want to select a Windows operating system, you are more welcome to do so. The configuration is almost identical.
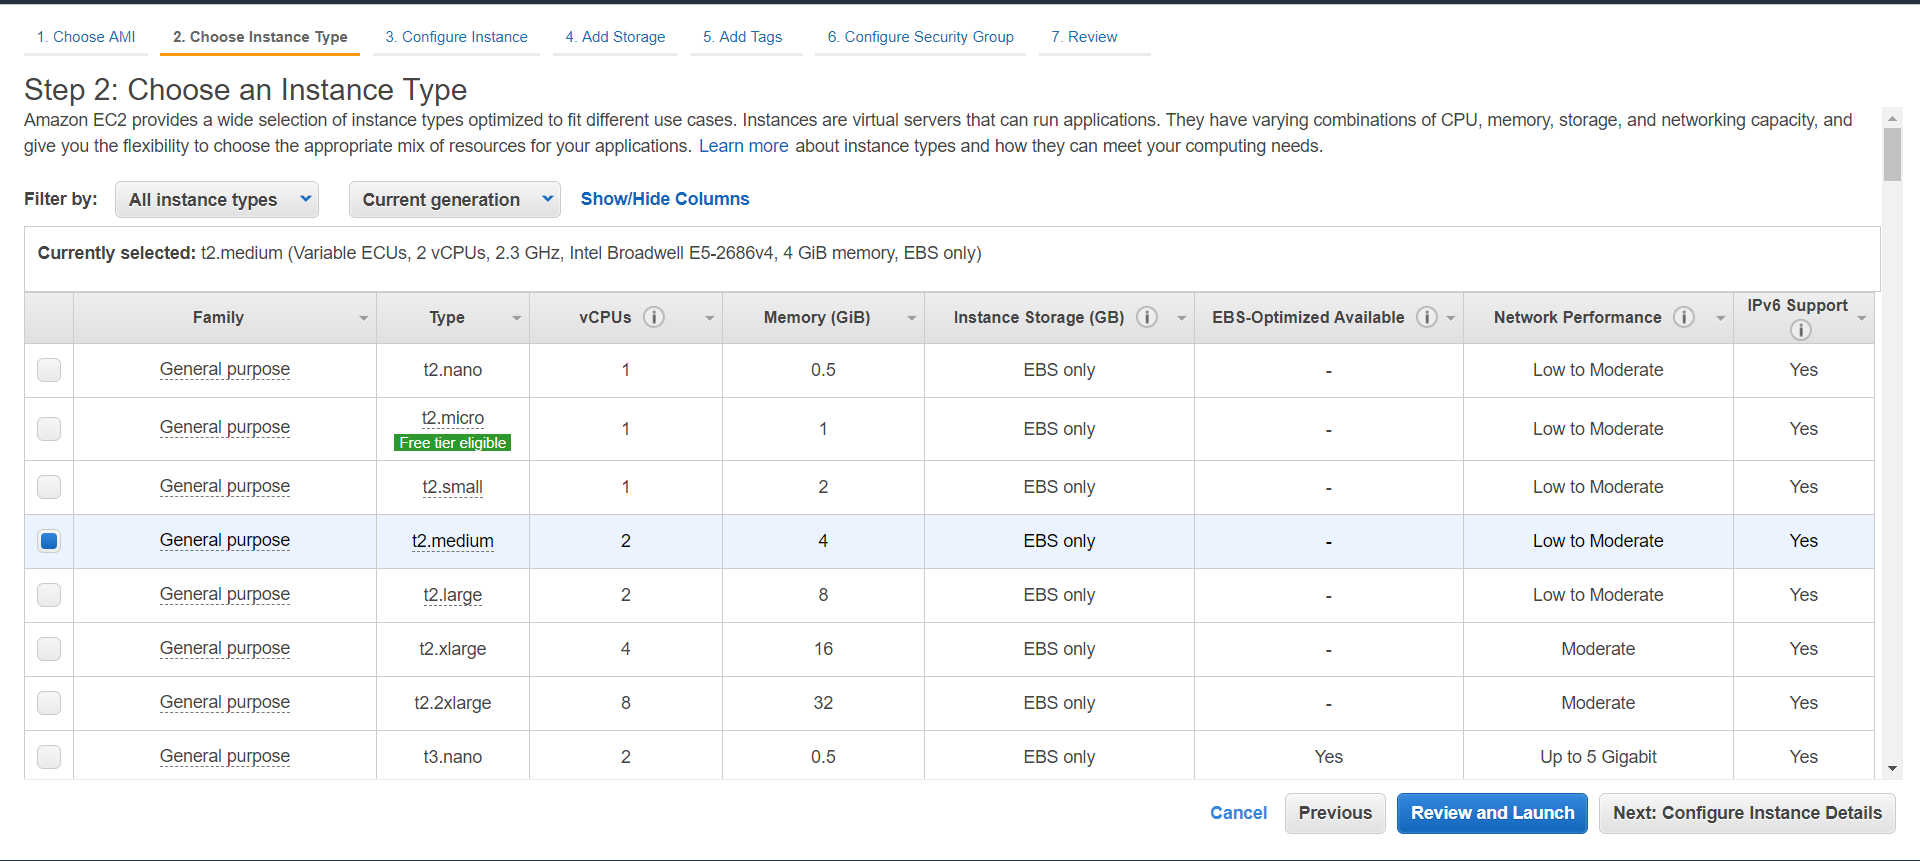
According to the official Magento 2 system requirements you need at least 2G of RAM. However, I consider and advise to have 4GB RAM. Just to be on safe side, if you want to debug or execute a block of code, you probably won’t want to exhaust your RAM . Therefore, you must:
Select Type t2 medium
Click on Configure Instance Details. Now you will see:
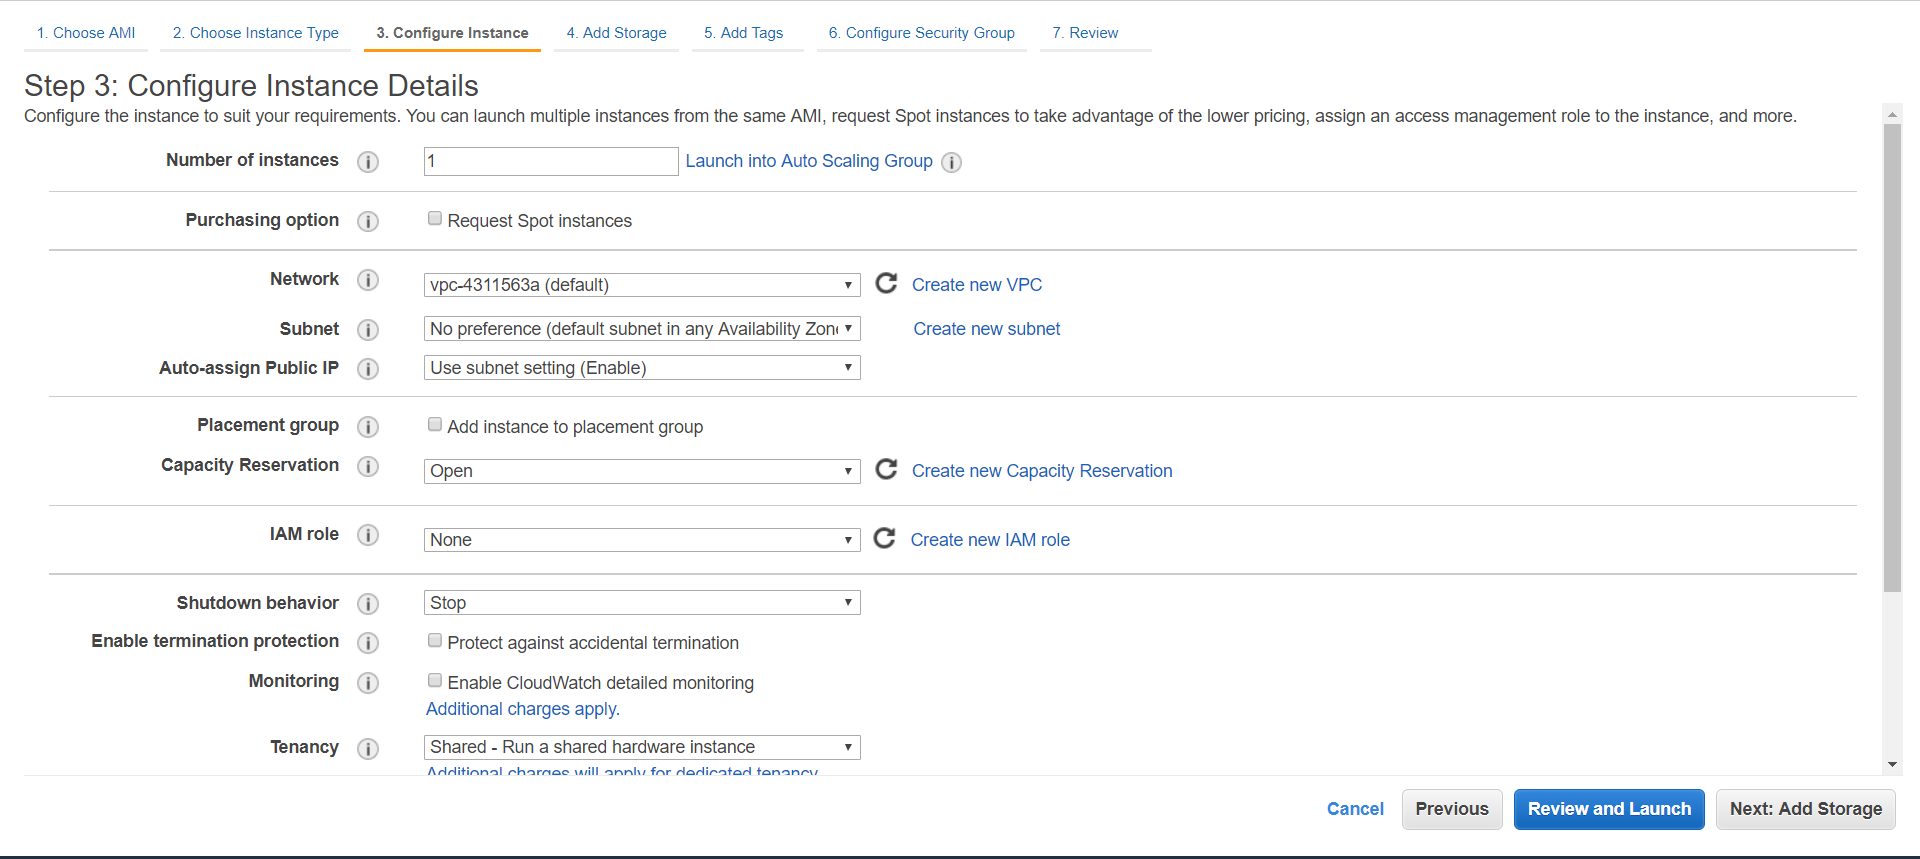
You can configure your machine (i.e. instance). Since, there is nothing much to do, proceed ahead with add storage.
Now, the system will ask you to add storage. By default, the storage size is enough, but if you want to increase, then just increase the size.
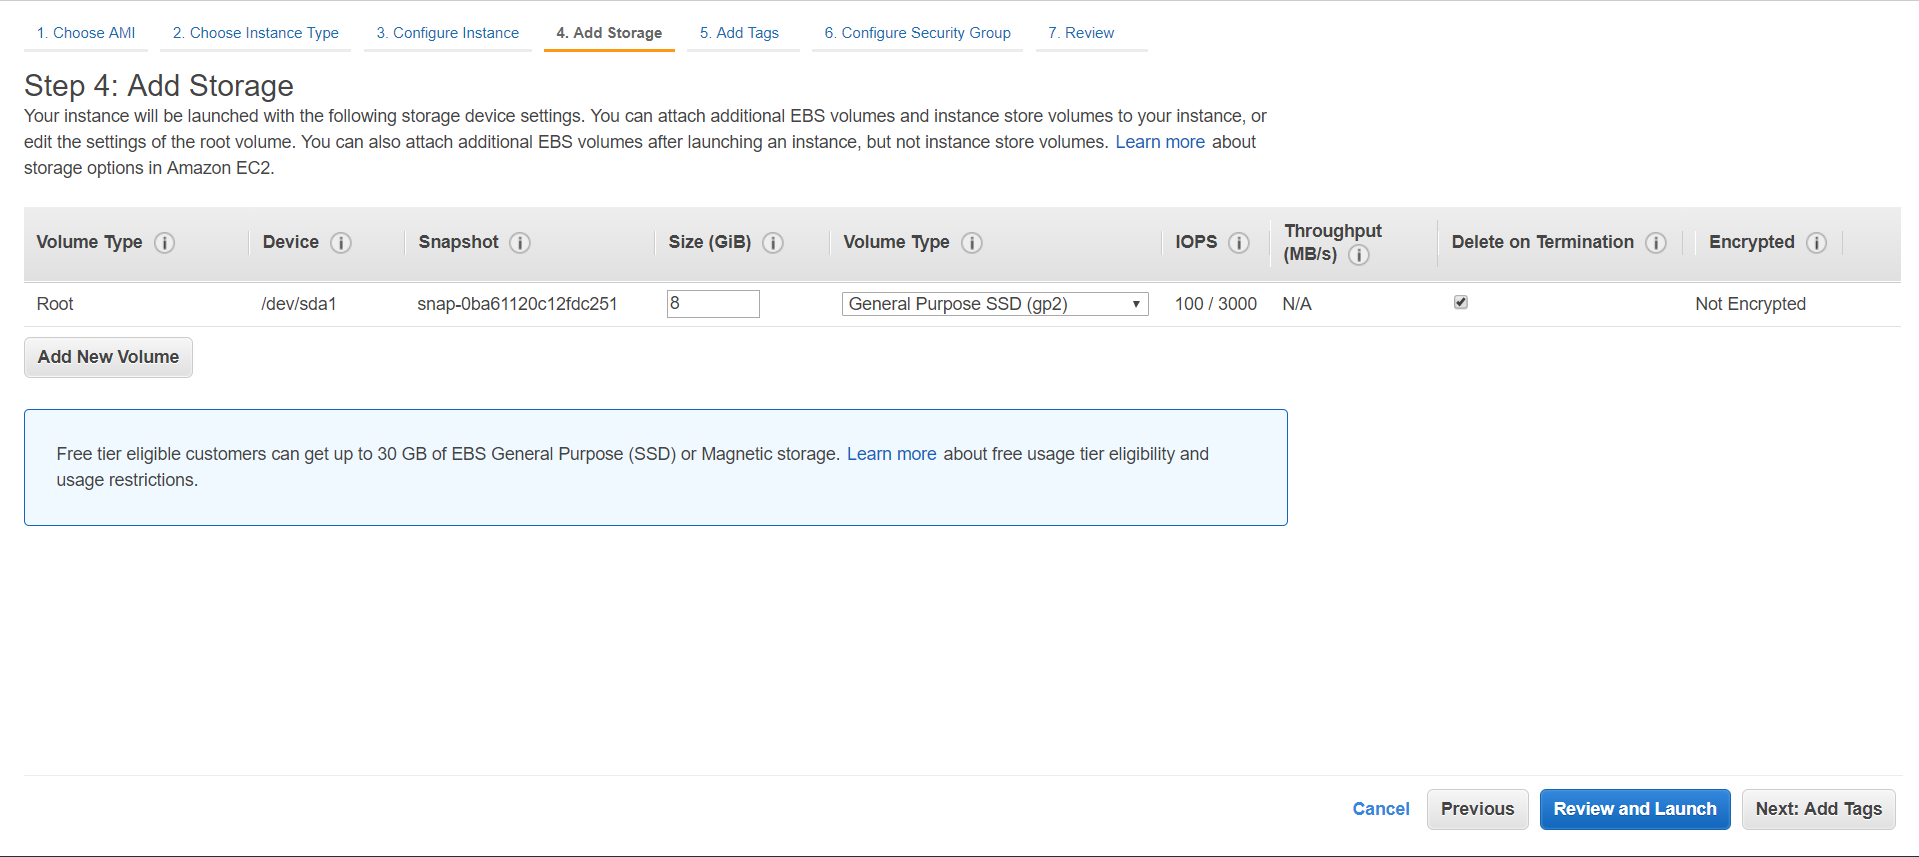
Once you complete the process, it time to click on Add Tags.
For now, we don’t need any tags, therefore, click on configure security group button. This is important.
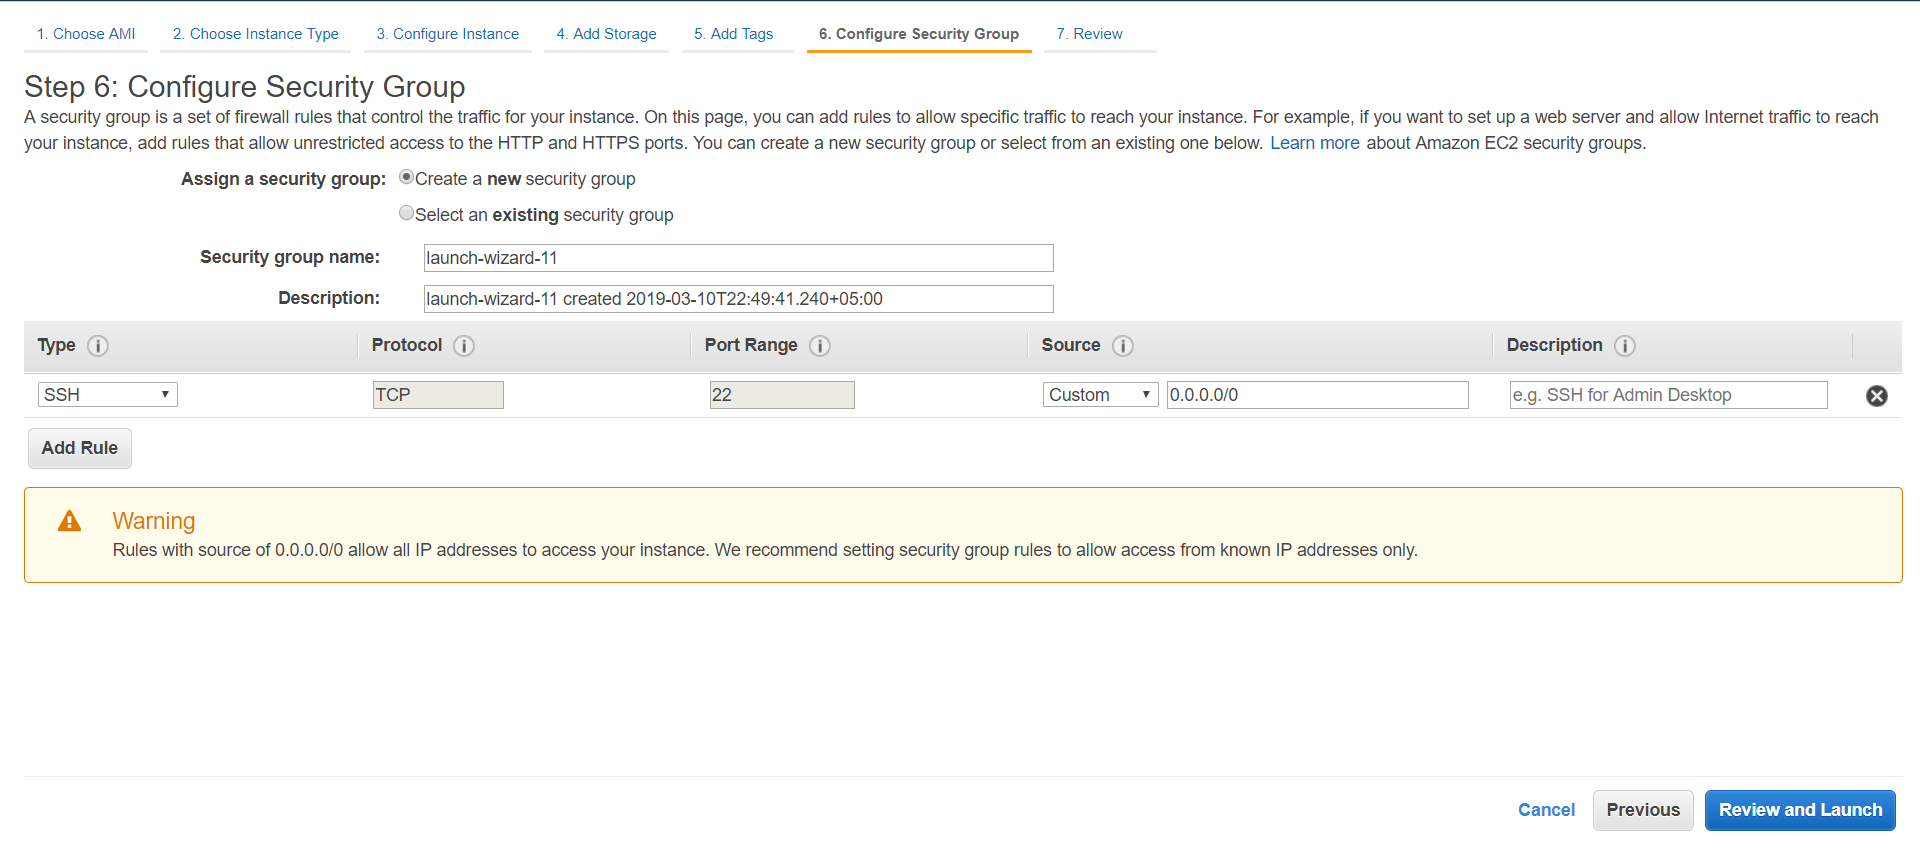
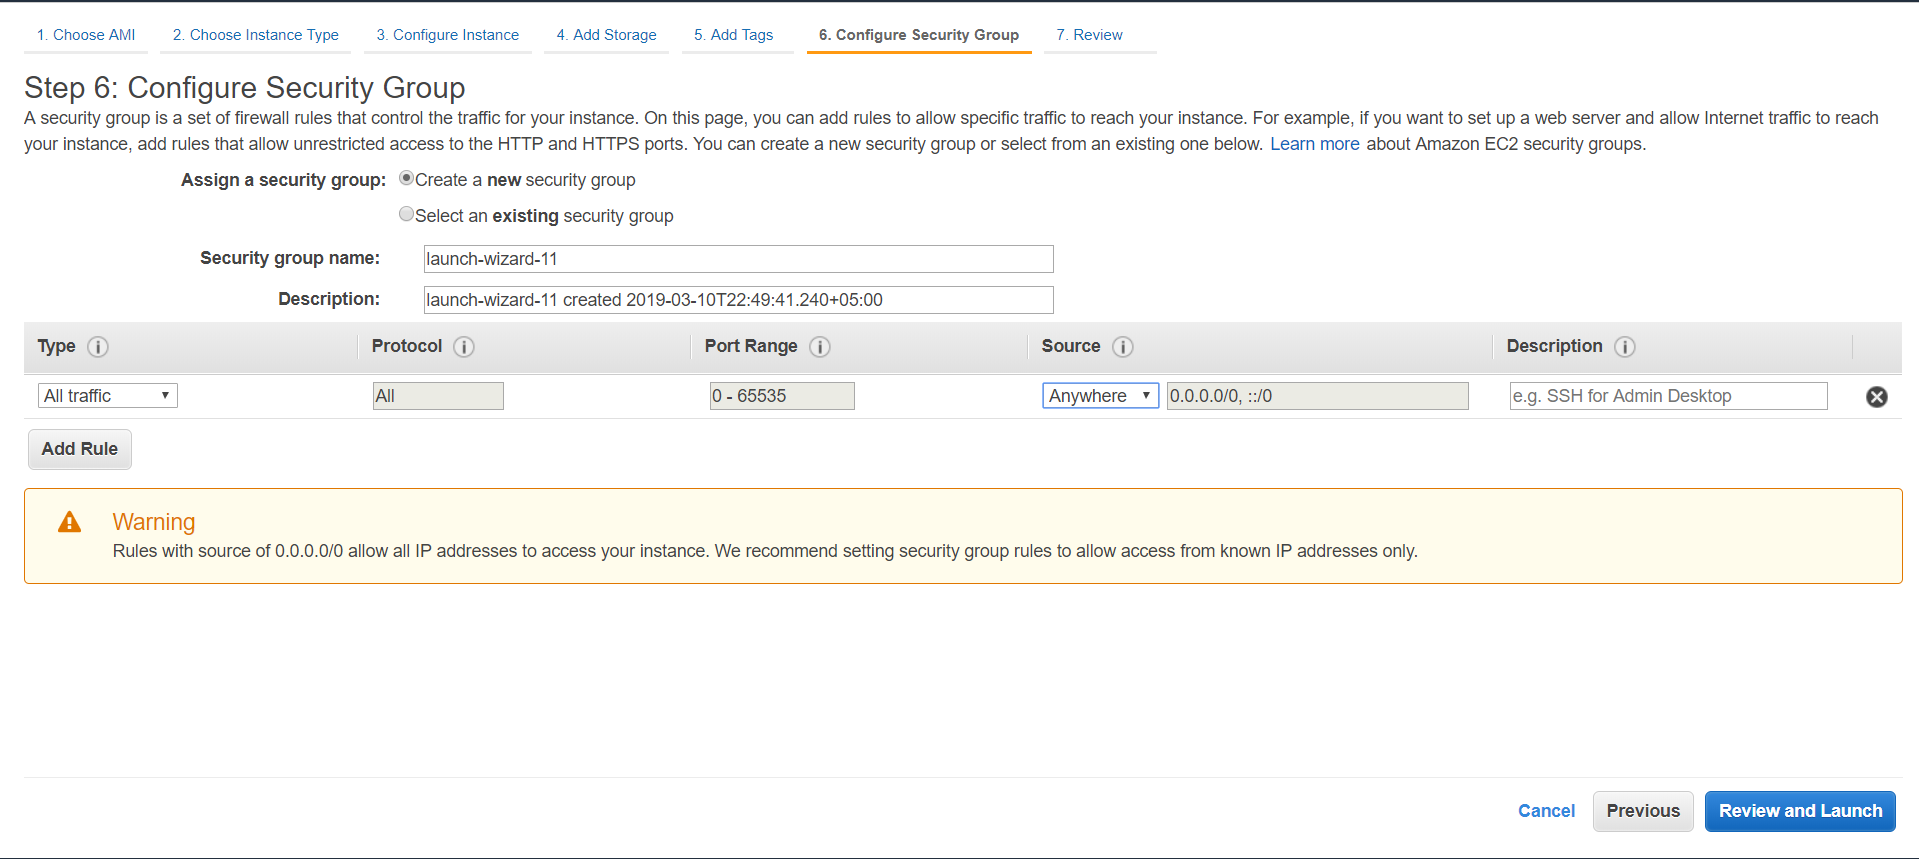
Now, you can add rules about which people from across the globe will access your server. Do they have to follow a protocol to reach to a server? For now, I am making my server accessible to all traffic. Later, we can put security rules. Navigate to Type and select All traffic. In the source, click anywhere. It should look like this:
Click review and launch. Then you will have the opportunity to review your configuration again. Click Launch. You will see the following prompt.
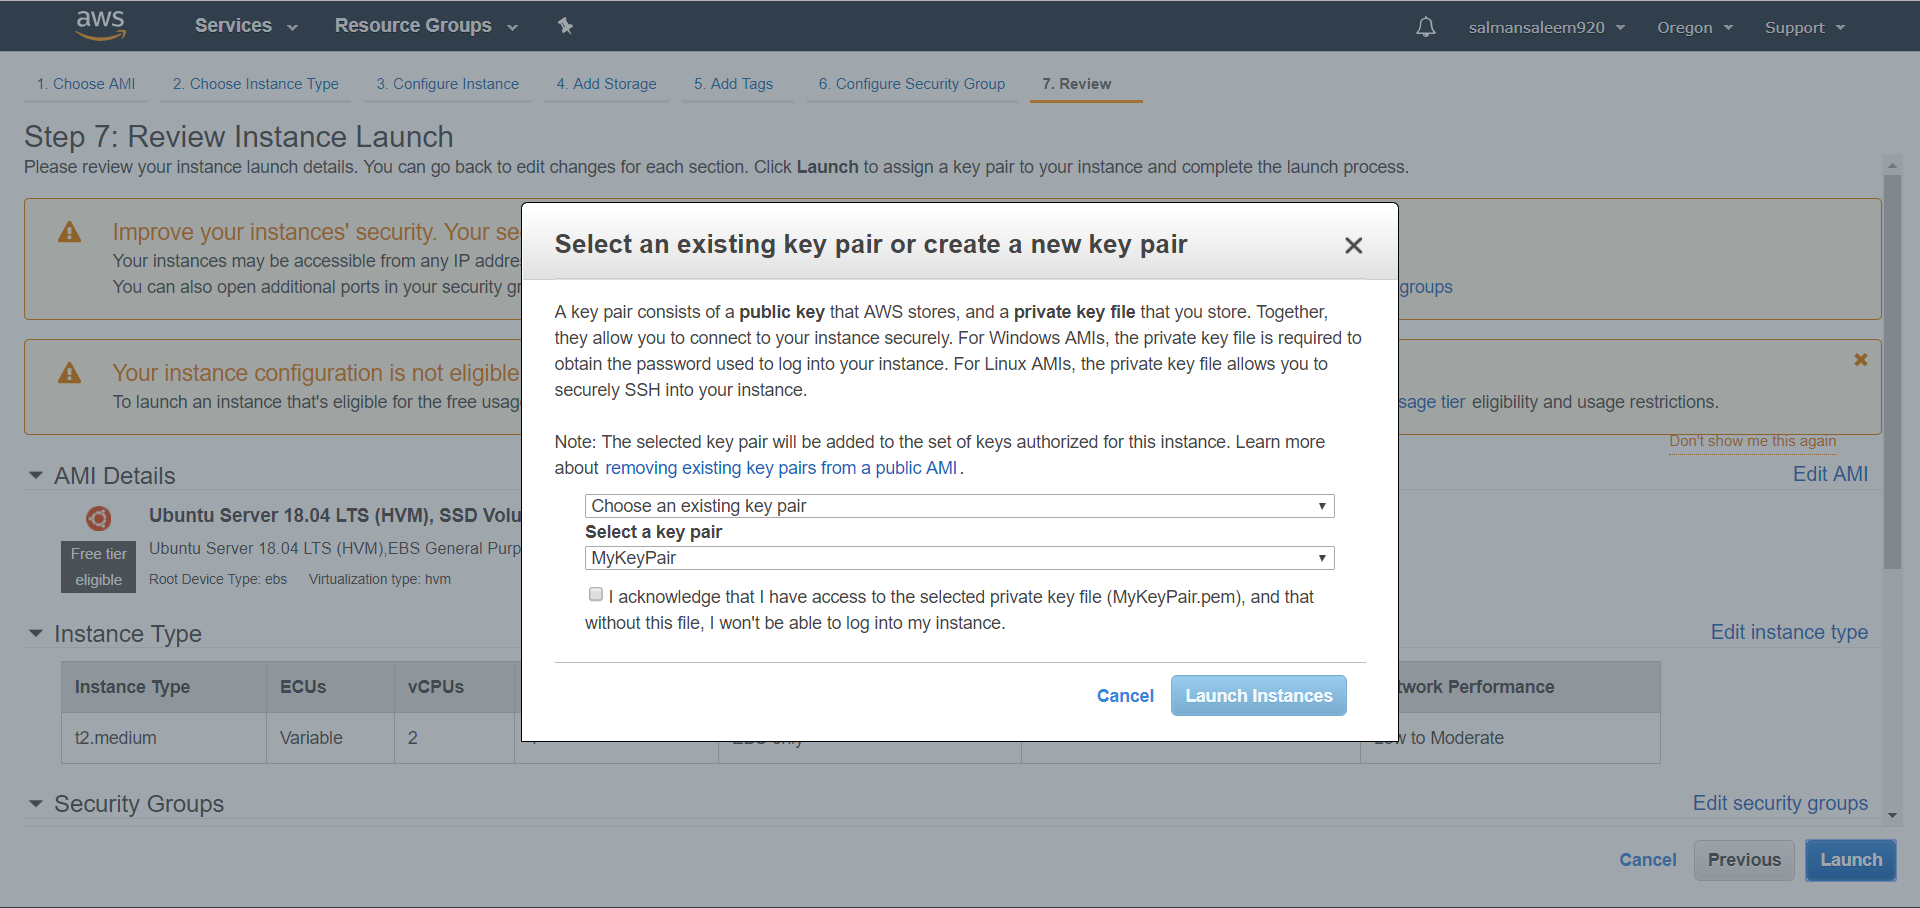
So Here, instead of choosing an existing key pair, select a new key pair and give it a name.
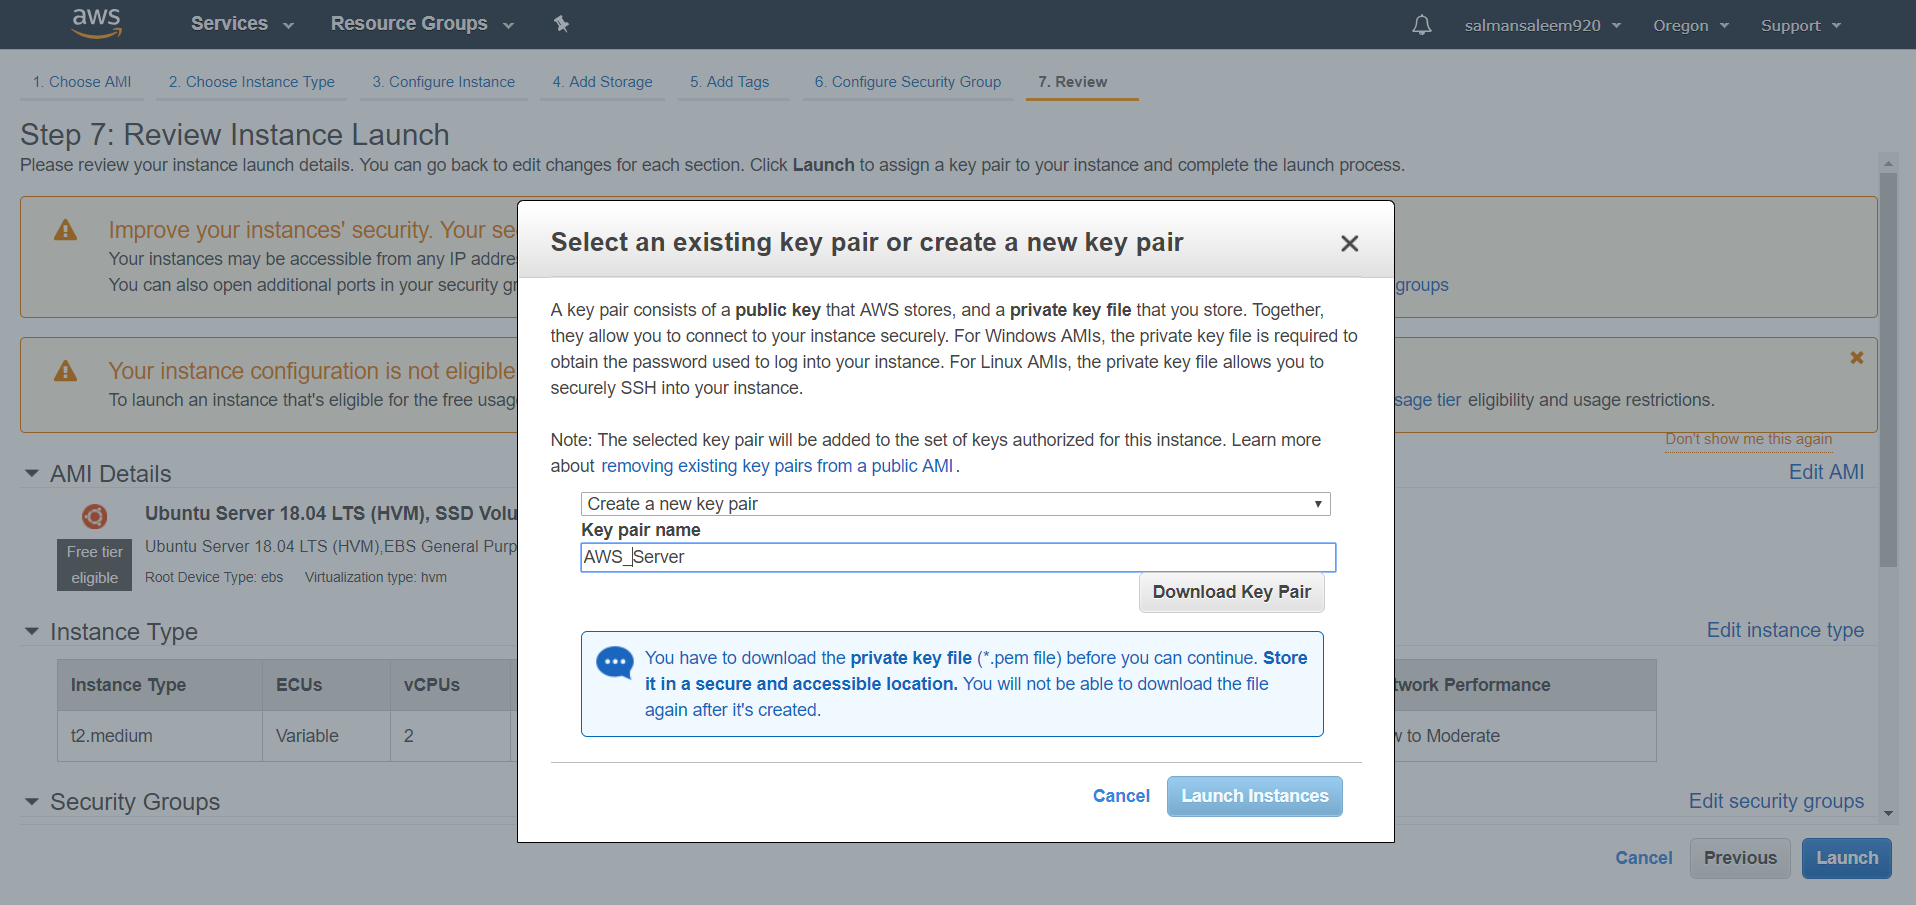
You might be wondering what is a key pair? In simple words, its a key which lets you connect to your server machine securely. It consists of a public key that AWS stores, and a private key file that you store. Together, they allow you to connect to your instance securely. For Windows AMIs, you must use the private key file to obtain the login password for your instance. For Linux AMIs, the private key file allows you to login to your instance with active SSH.
Download the key pair and keep it secure, as without it, you won’t be able to access your server. Now click on launch instance.
A new screen will open up.
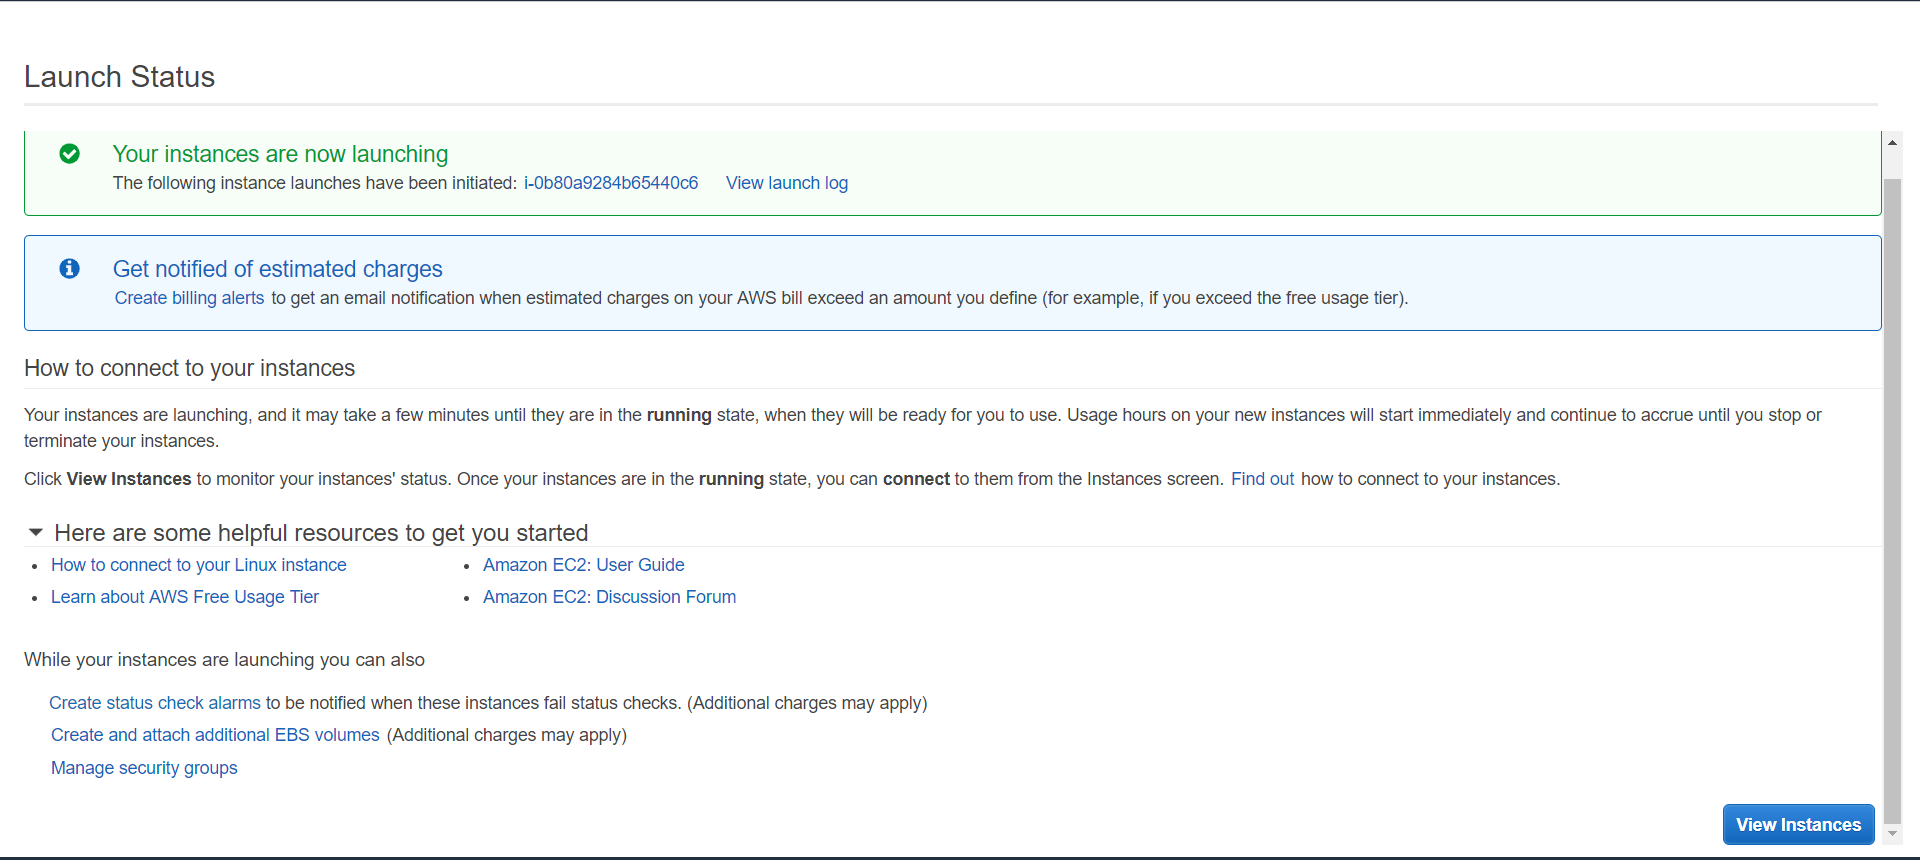
Click View Instance
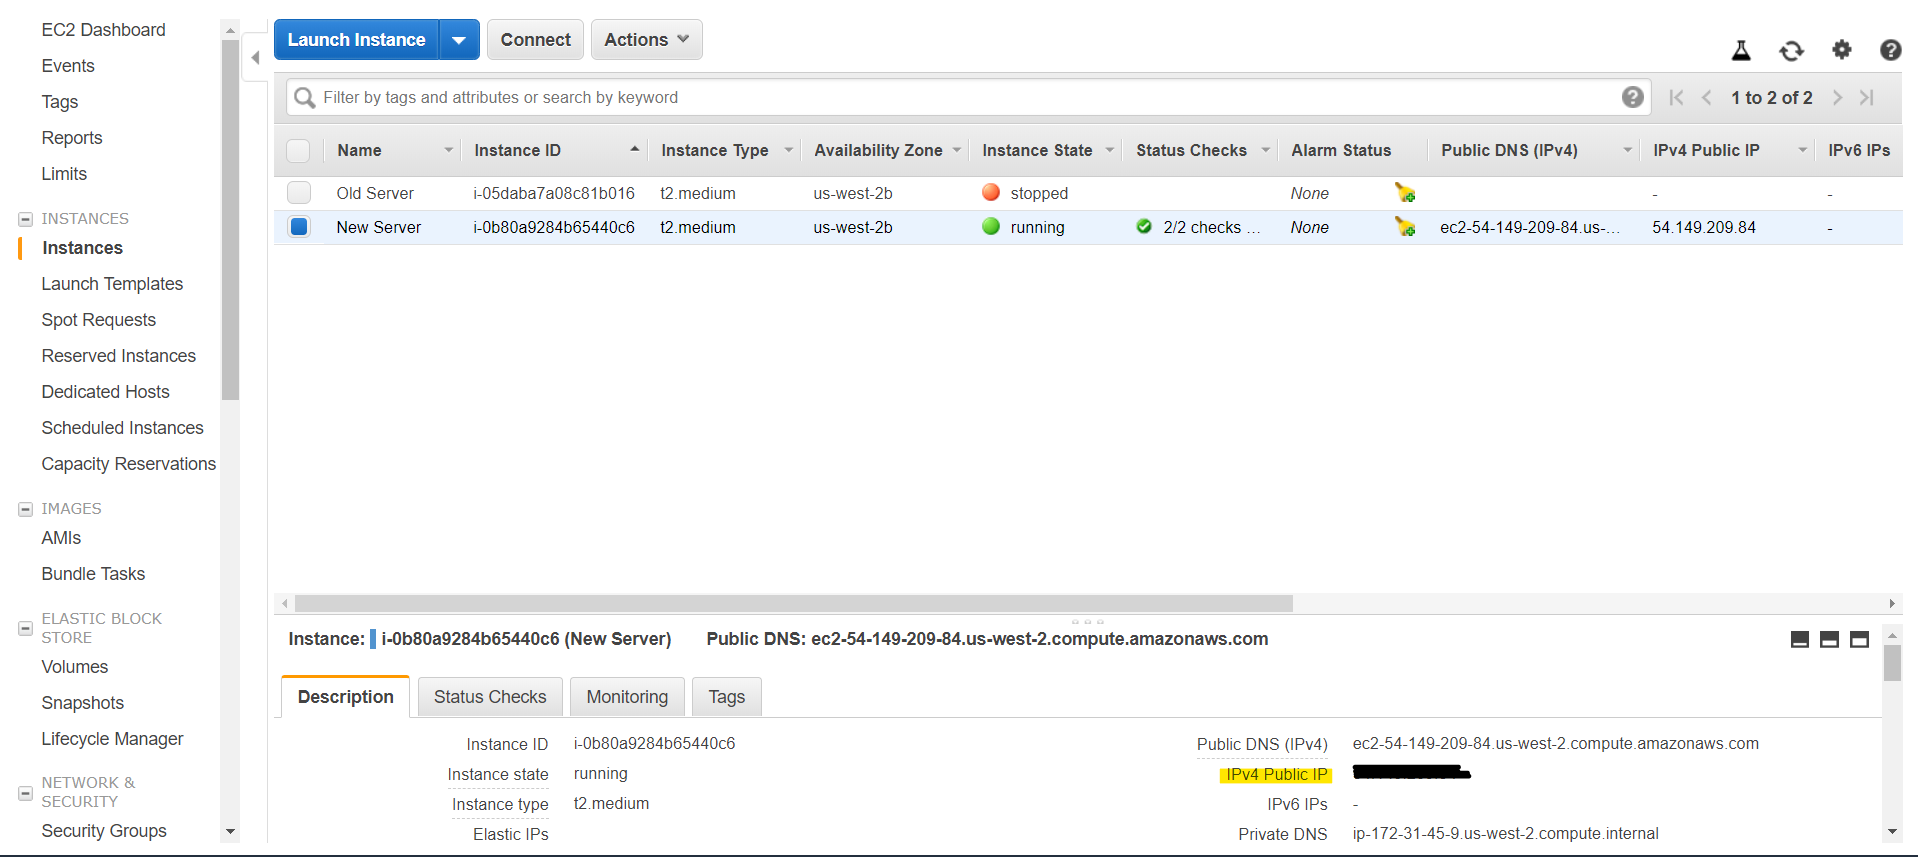
In status check, you can see that it’s initializing:
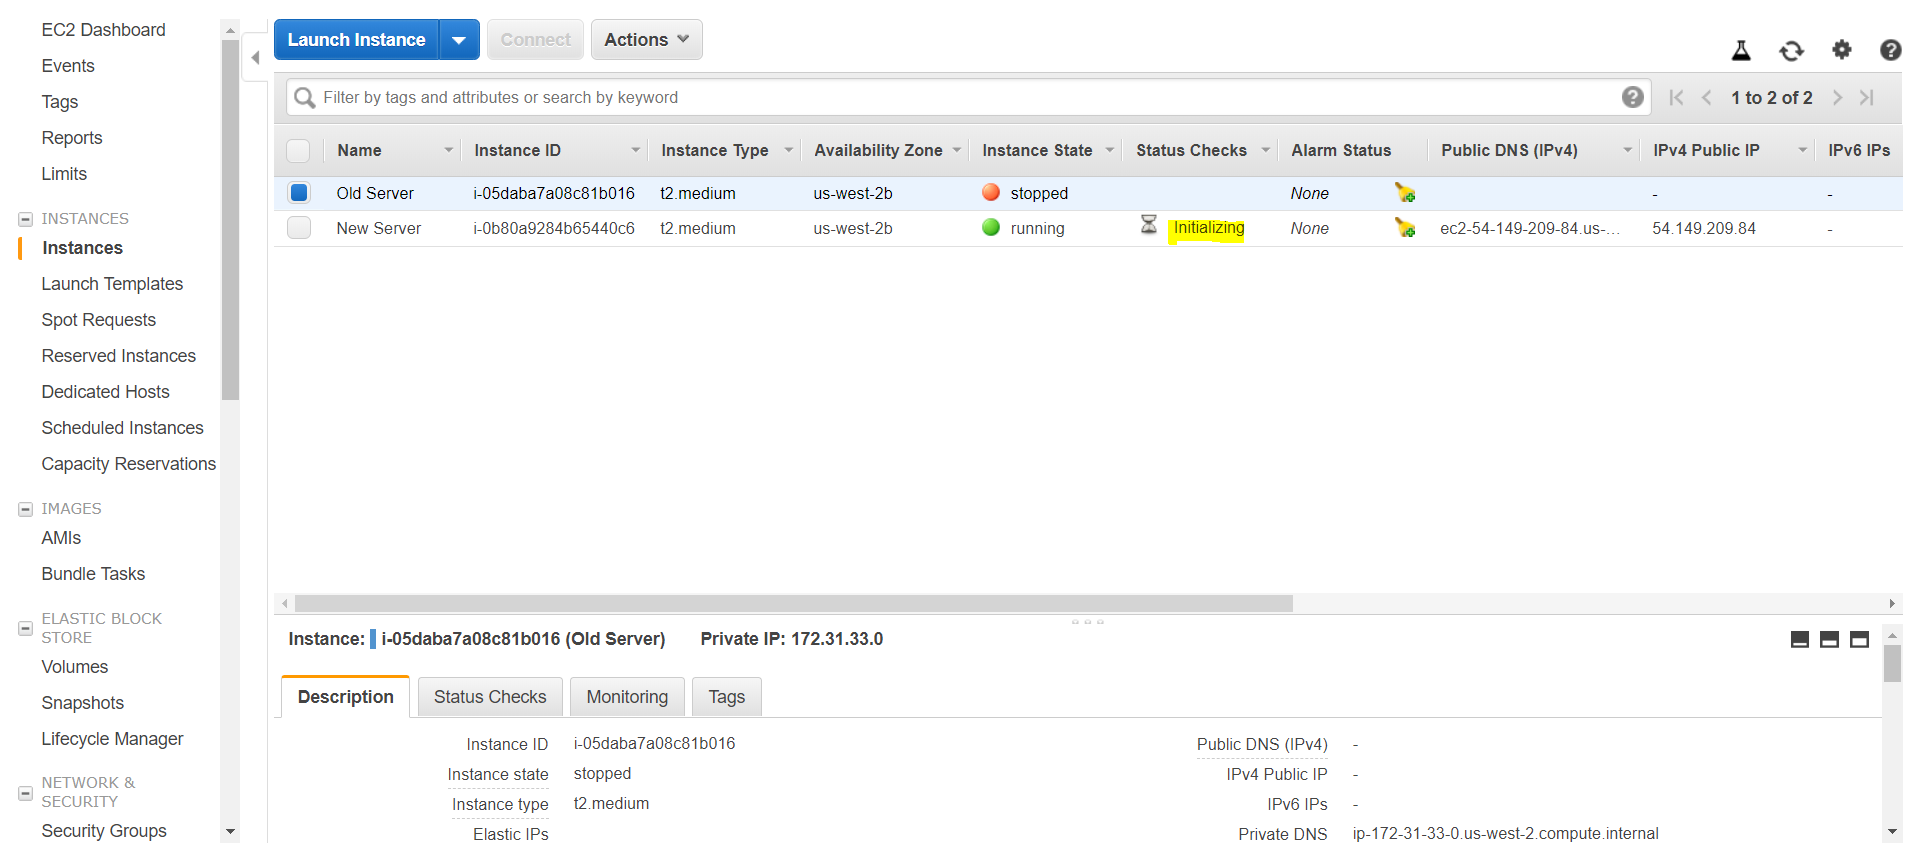
Ignore the old server. You might not see the name of your server. Now, navigate to the empty space and you will notice a pencil write icon. Click on it and name your server. You must wait for a while and then refresh the screen. Check your system status:
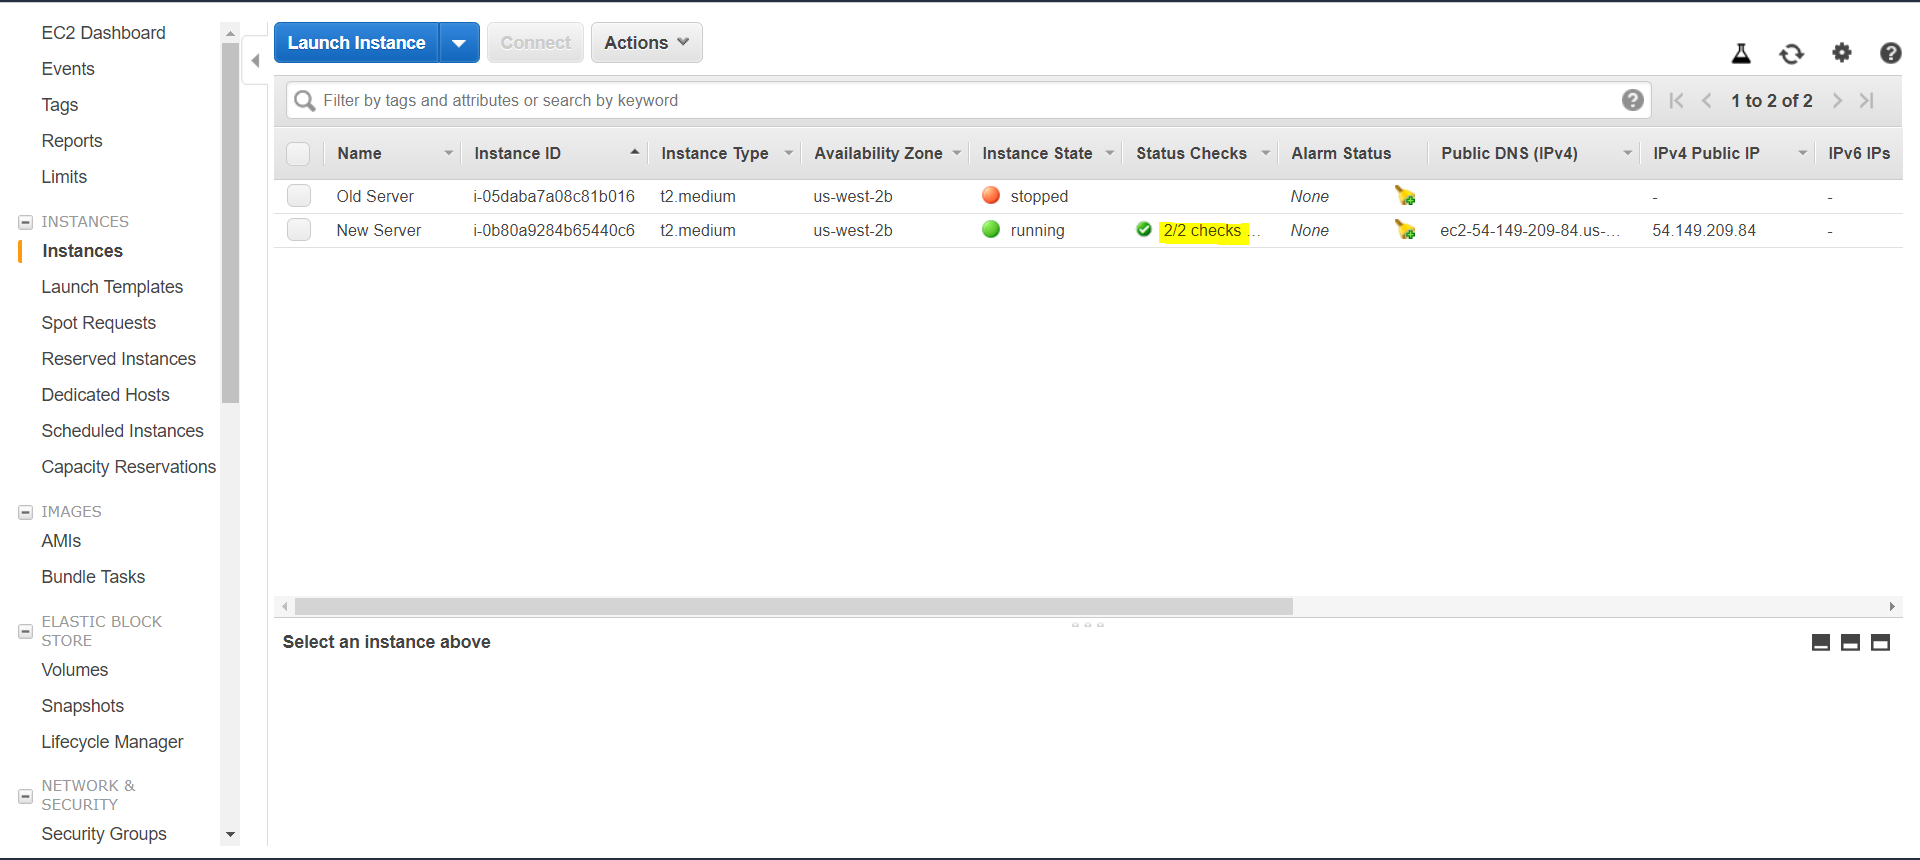
Now, you must connect to your server. Before, you do that make sure you have git installed, because we will use it to connect to our server. Now, select your new server:
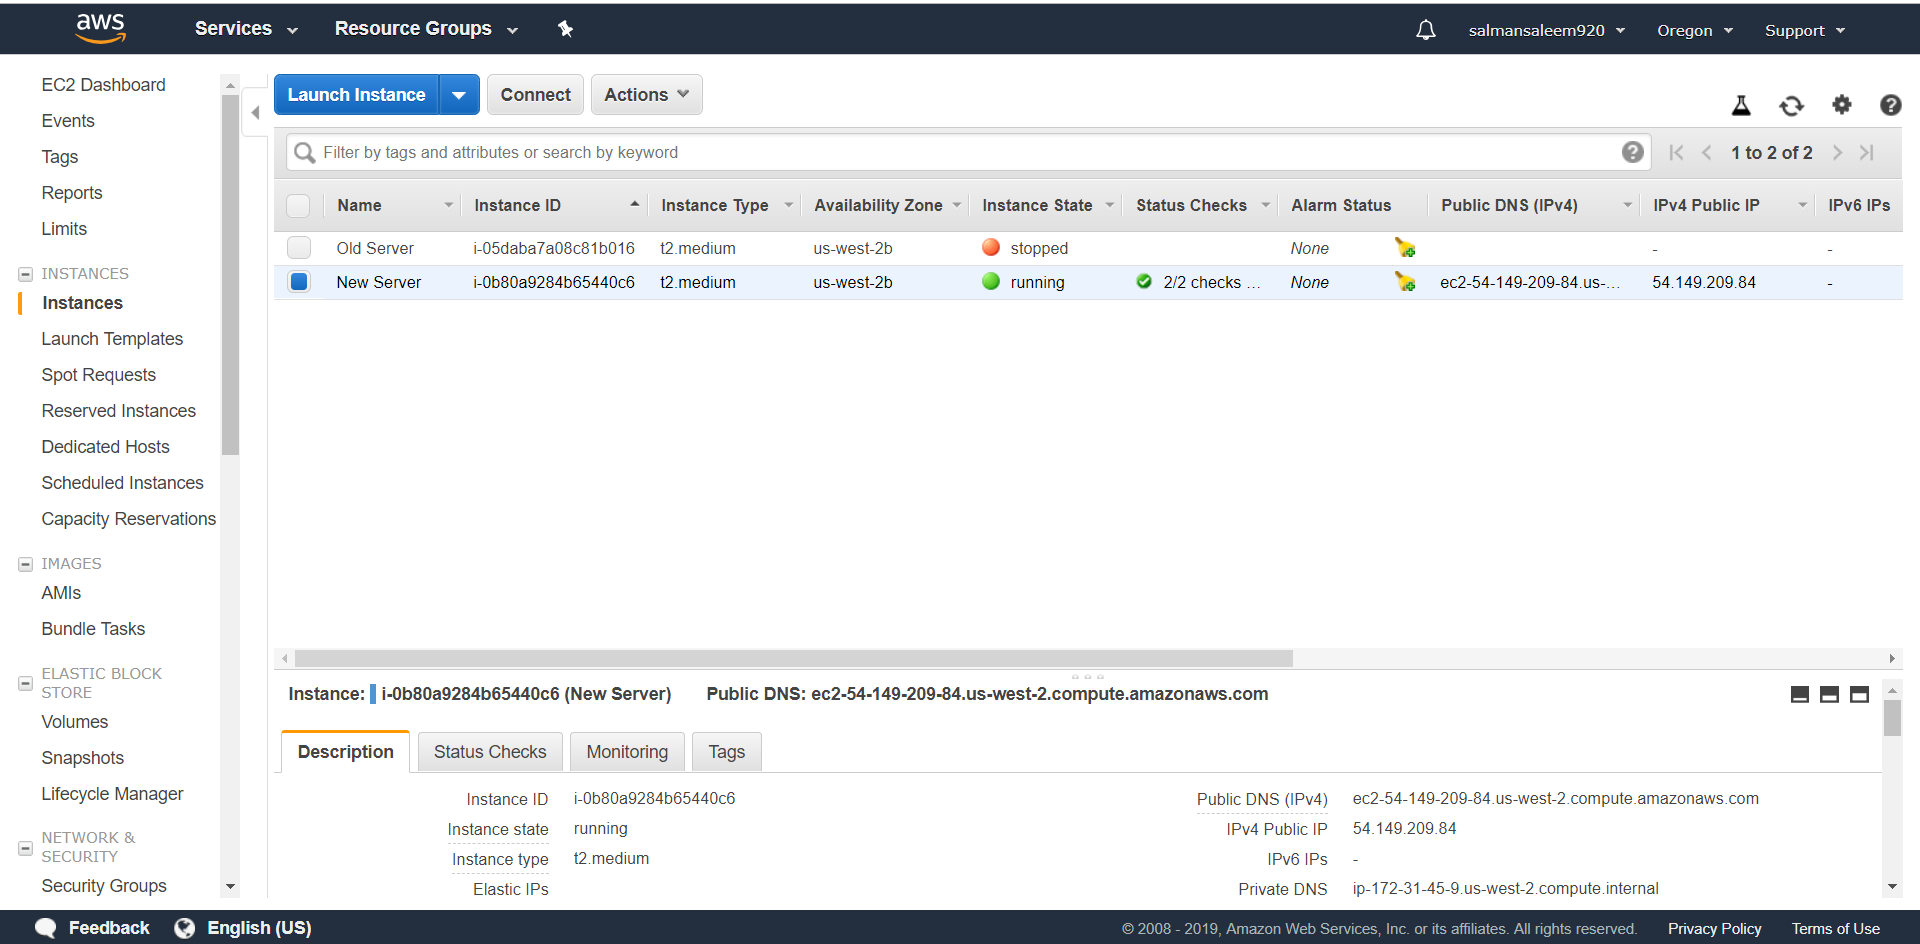
Click Connect.
Now that you know about how to connect to your new server, we will opt the easy way. Remember the key pair you downloaded earlier? Navigate to that folder. Assuming, you have git installed, right click in empty space and select git bash here option. Now copy the line, I underline just below the example which starts with ssh -I …….
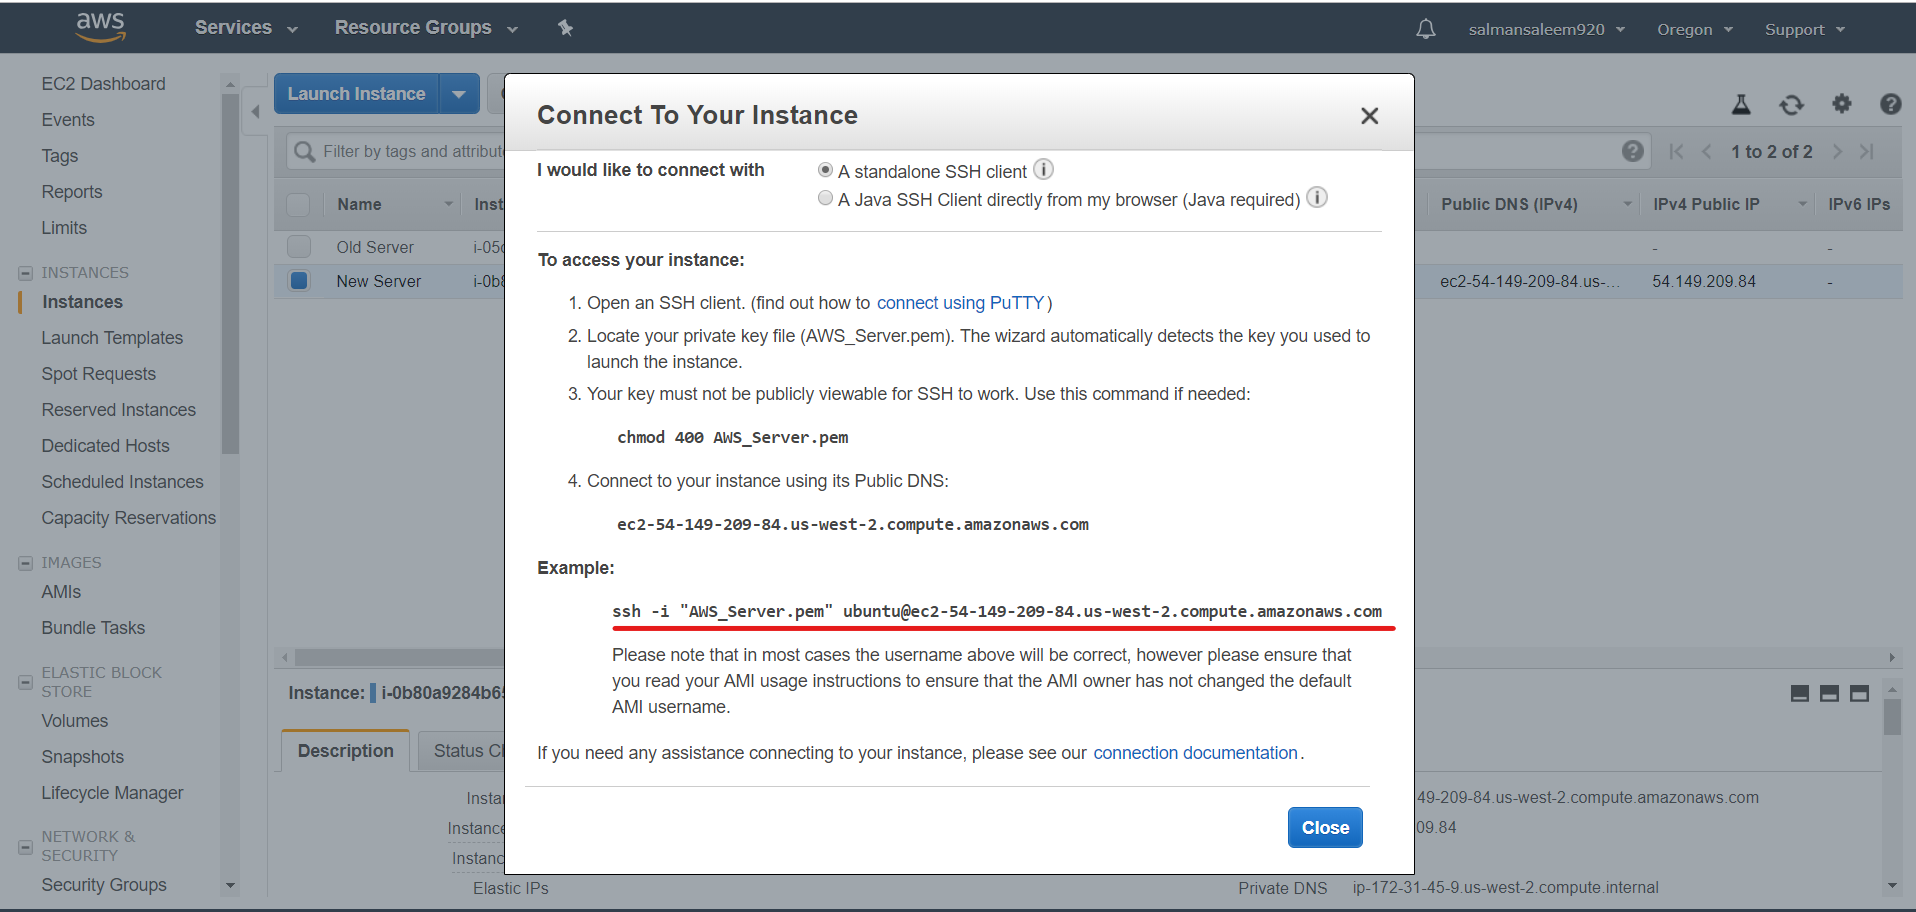
And paste it in git bash:
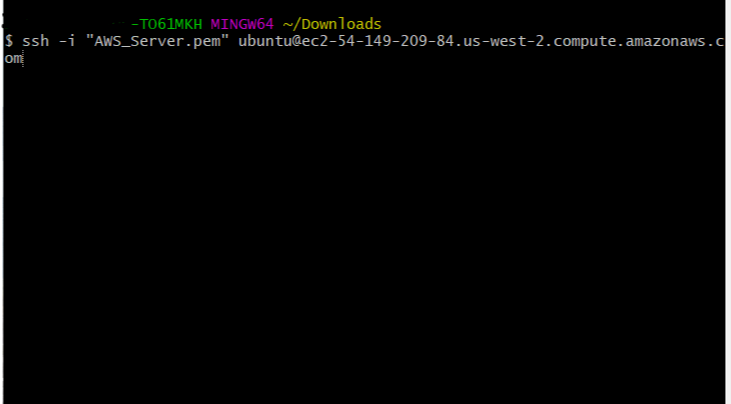
Press Enter. You will get a question: Are you sure you want to connect? Enter yes. Congrats, now you are on your server. But we must fulfill the requirement to make Magento work. Therefore, it is time to set up a PHP environment. Next, we will run a few commands on git to install the prerequisite tools.
Install Pre Requisite Tools on Server to Run Magento
You will have to execute the following code on the terminal to get the required tools for Magento installation on your server.
ls -al
This will show all the directories on the server.
sudo su
This will direct you to the home/ubuntu directory. It means that you have logged in as a root user.
apt-get update
This will update your server with the latest tools.
sudo apt-get install apache2 php libapache2-mod-php mysql-server php-mysql php-dom php-simplexml php-curl php-intl php-xsl php-mbstring php-zip php-xml composer
This code will install Apache (a web server software), PHP (latest version, currently its 7.2) along with necessary extra tools required for Magento, and MySQL server which will serve as a database.
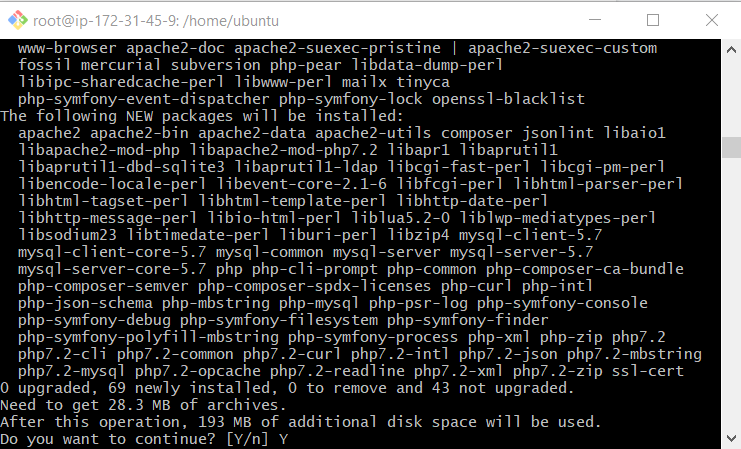
Press Y if asked do you want to continue? Once the installation is complete, you must create a database.
Now, install PHP gd extension
apt-get install php7.2-gd (can vary with PHP version)
Install PHP mcrypt extension
apt-get install php7.2-mcrypt (can vary with PHP version)

sudo a2enmod rewrite
Now Restart the Apache:
systemctl restart apache2
And then navigate
cd /etc/apache2/
sudo nano apache2.conf
Press ctrl+w and search indexes
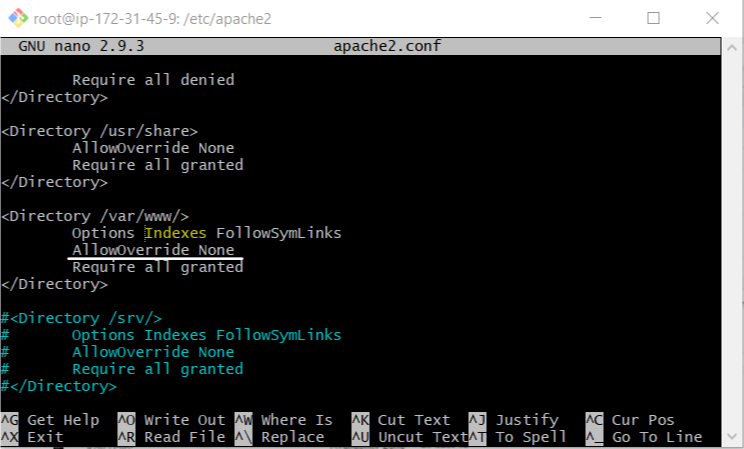
Replace ‘None’ word with ‘all’ like this:
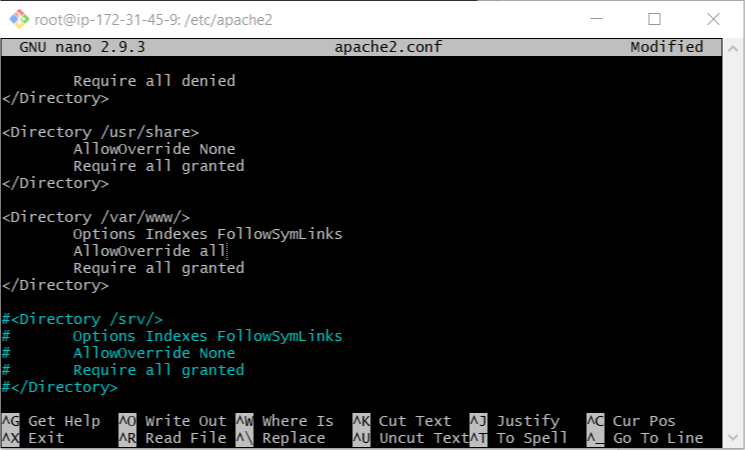
Press ctrl+x, press y and hit Enter.
Again Restart the Apache services:
systemctl restart apache2.service
Now go to the public root directory and clone Magento 2 from Github:
cd /var/www/html
git clone https://github.com/Magento/Magento2.git
cd Magento2
Now just install composer:
composer install
If you come across an error like this:
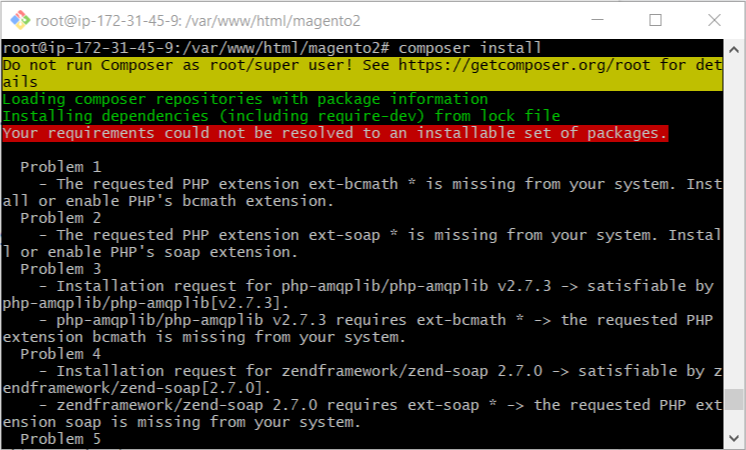
To resolve it, run these commands:
apt-get install php7.2-bcmath
composer install
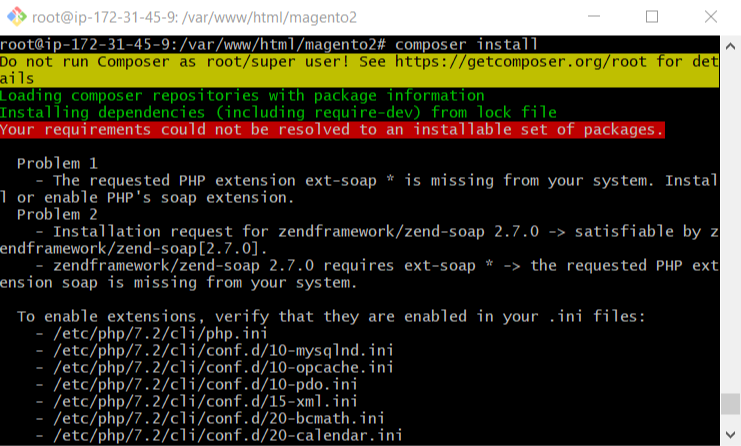
Now if the composer is still not getting installed as shown in the above screen, run:
sudo apt-get install php-soap
composer install
Now you have to change the permissions of the folder so that Magento setup can installed required files:
chmod -R 755 /var/www/html/Magento2/
chmod -R 777 /var/www/html/Magento2/var/
chmod -R 777 /var/www/html/Magento2/pub/
chmod -R 777 /var/www/html/Magento2/app/etc
chmod -R 777 /var/www/html/Magento2/generated
sudo service Apache2 restart
Otherwise, php extension will be missing.
Setup Database
Login MySQL by this command
mysql -u root -p
It will ask you a password. By default it’s none, so just press Enter. Now you are in MySQL terminal.
- show databases: shows you current table.
- create database Magento: it will create a database for Magento
- exit: it will exit from MySQL terminal
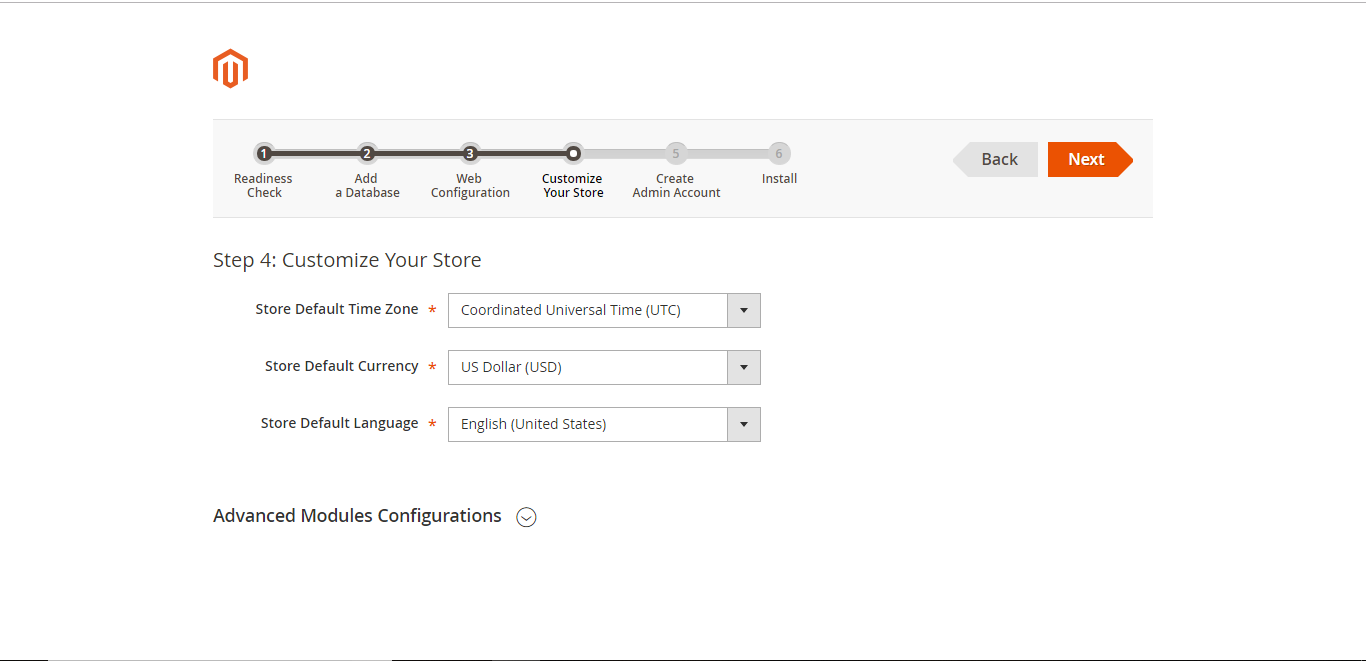
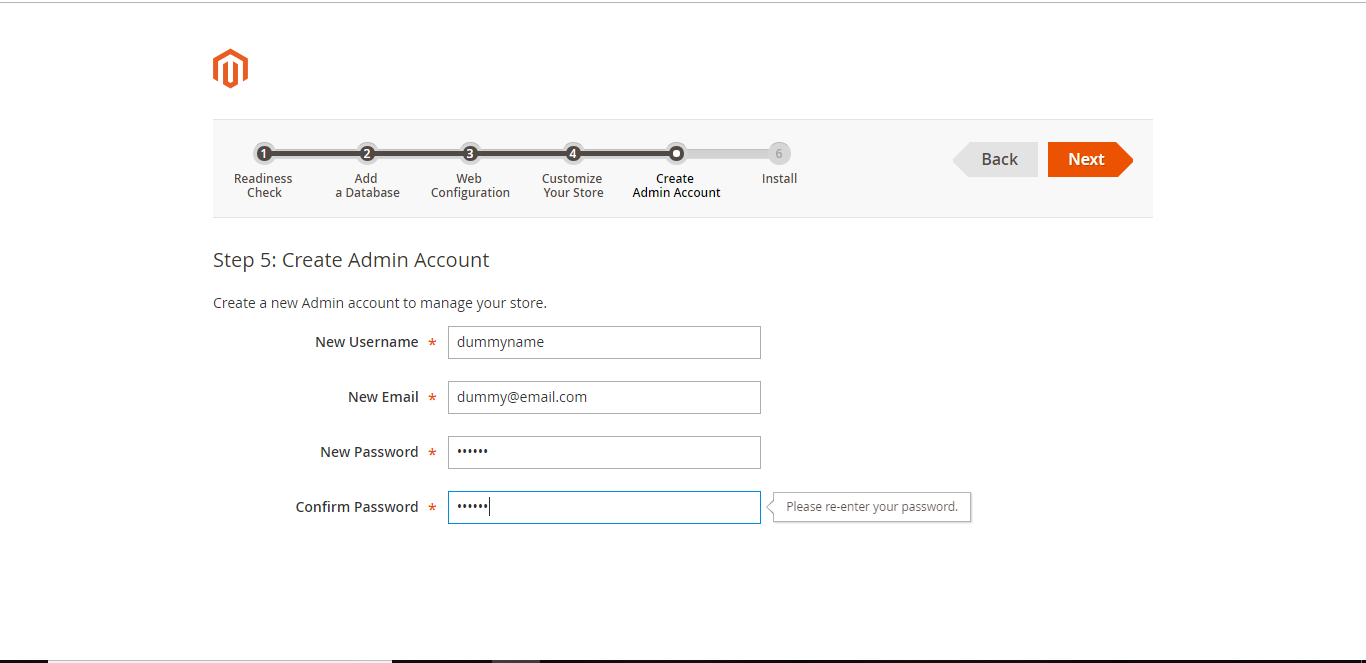
Install and Configure Magento on AWS
Navigate to your public IP address:
Copy and paste it your browser like xx.xxx.xxx.xx/Magento2/setup
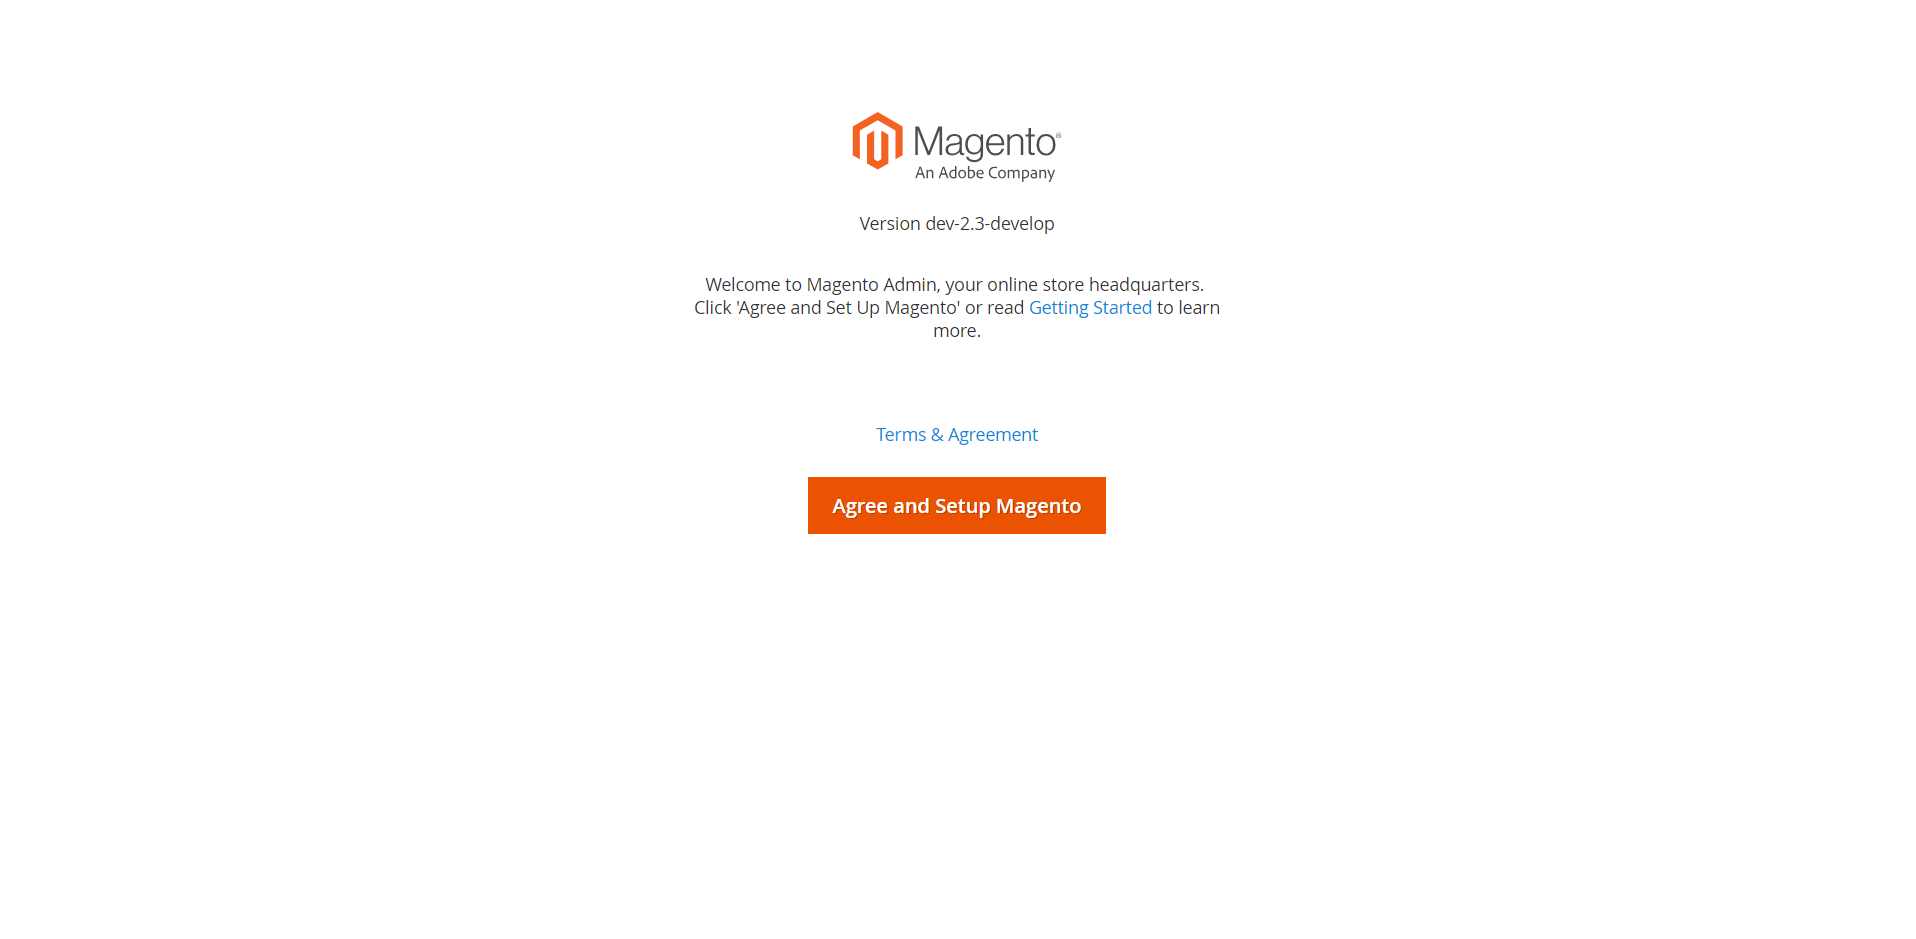
You will see the following screen. It means you are all set to setup your Magento on AWS.
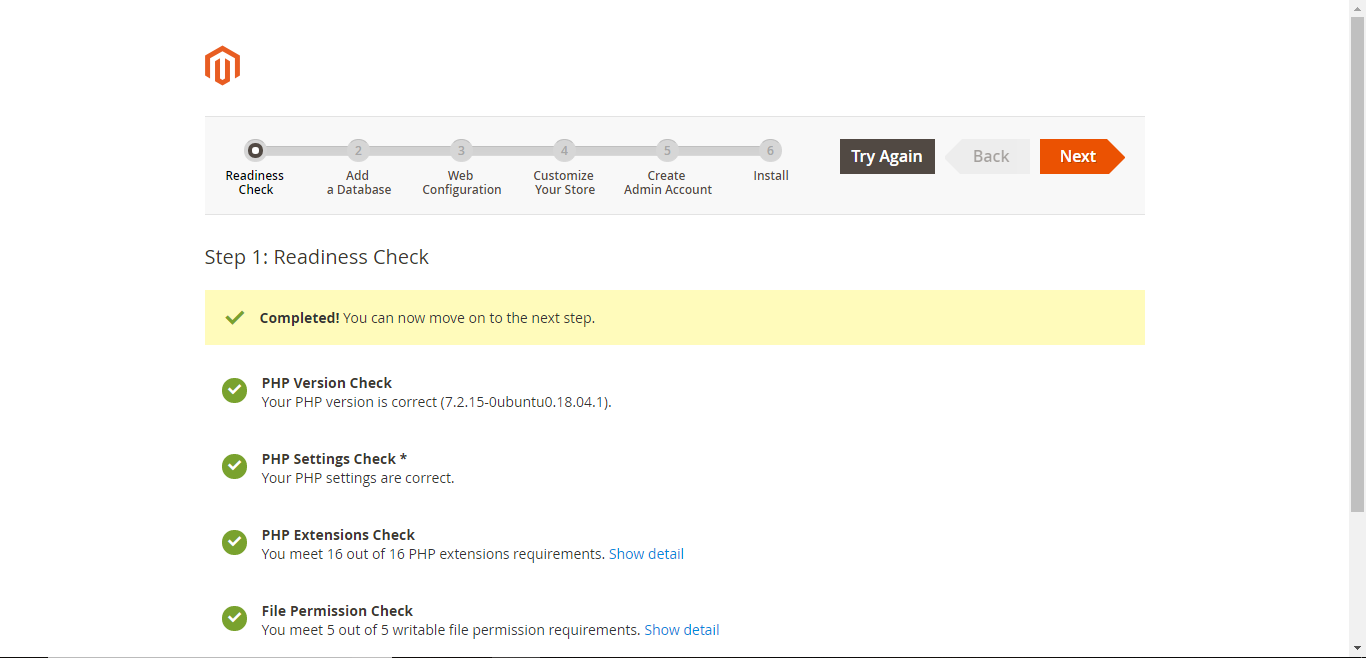
Now start intsalling Magento:


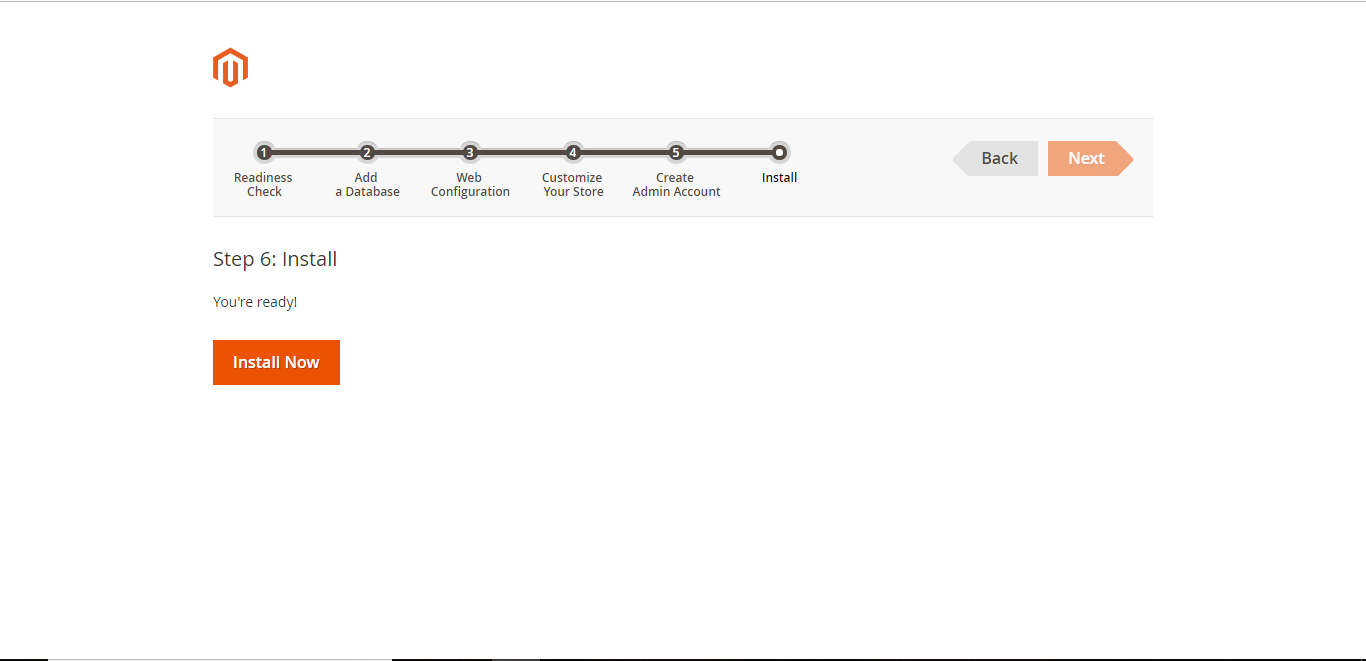
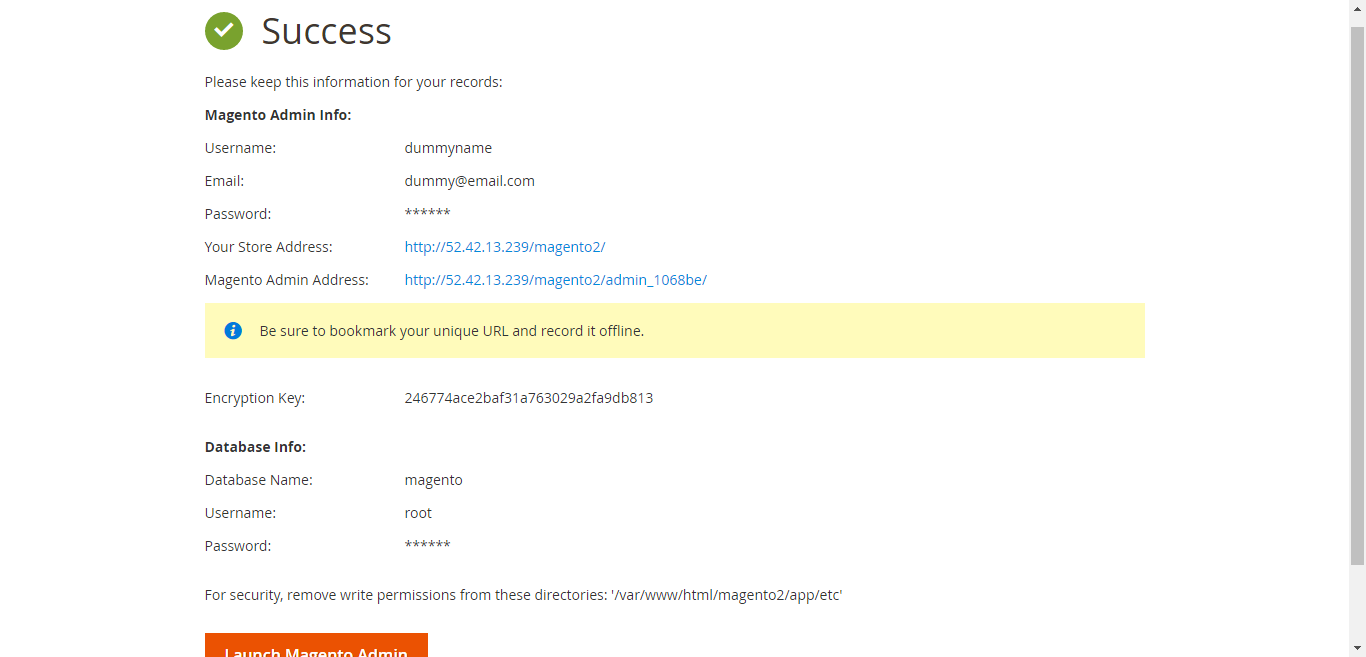
The above message indicated that you have successfully installed Magento on AWS.
Easier Way to Install Magento on AWS
The answer is:
Managed Magento Hosting
For now, you have spent ample time just to set up your Magento server. With every update rolling out for PHP or MySQL, there is no denying the fact that sometime you may face error(s) while setting up the environment. In the future, if Magento rolls out any new update, you will have to update the server. You might think huh, that’s easy! Well, don’t deny the fact that there will be risk involved with your Magento application behaving abnormally, or there might be data loss.
For now, we have taken a simple, easy path to set up Magento on AWS server. Right.. But the journey doesn’t end here. There was no talk to secure your server or your site. There was no steps or methods defined to make your site load faster or optimize the performance of your website. Is it my fault that I did not discussed that? Nope, I can but then it wont look like an article but rather would look a book chapter.
Therefore, instead of going through all the hassle of setting up the server and managing it when it comes to security, performance and reliability, you should choose AWS hosting.
WHY? Here are the reasons.
A Choice From Multiple Renowned Infrastructure Providers
Cloudways provides multiple cloud platforms such as AWS, Google Cloud, and DO. Moreover, it enables you to deploy your Magento store in more than 40 locations across the globe.
ThunderStack- Performance Enhancer
The platform has the power of ThunderStack, that makes your Magento store lightening fast. The technology stack brings together the best of Apache and Nginx, along with Varnish, Memcached, and optional Redis. It ensures that your Magento website remains up and running in terms of performance, speed, and user experience.
Multiple One-Click Operations
With Cloudways hosting, you can manage your cloud servers and applications conveniently. Thanks to the easy-to-use, feature-rich console. You can carry out multiple tasks with just a few clicks, making the deployment process considerably quick and easy. You can launch a server, point a URL, install an SSL certificate, or clone your store with this one-click feature.
Auto-Scalability
Another amazing feature of Cloudways is auto-scalability – the ability to scale the resources whenever there is a need. It is easy to meet the hardware requirements of the ecommerce store with this platform, as you simply need to select the server size and deploy it.
Managed Server Security
Being a managed hosting platform, Cloudways provides unmatched security for your Magento store. It follows a multi-layered security approach, with fully- integrated Let’s Encrypt certificate authority and regular security updates.
Cost-Effective
Another feature that works in favor of this platform is its cost-effectiveness. Not only has a reasonable price tag, but also follows the pay-as-you-go model. The users only have to pay for the resources they consume.
Seamless Support
Seamless, round the clock, tech support comes as the additional advantage of having your Magento store run on Cloudways. Technical support is available 24×7 with Live Chat and Ticketing system.
Launching a Cloud Server with a Single Click
First, create an account on Cloudways. Once you have the account setup, launch your server on the platform.
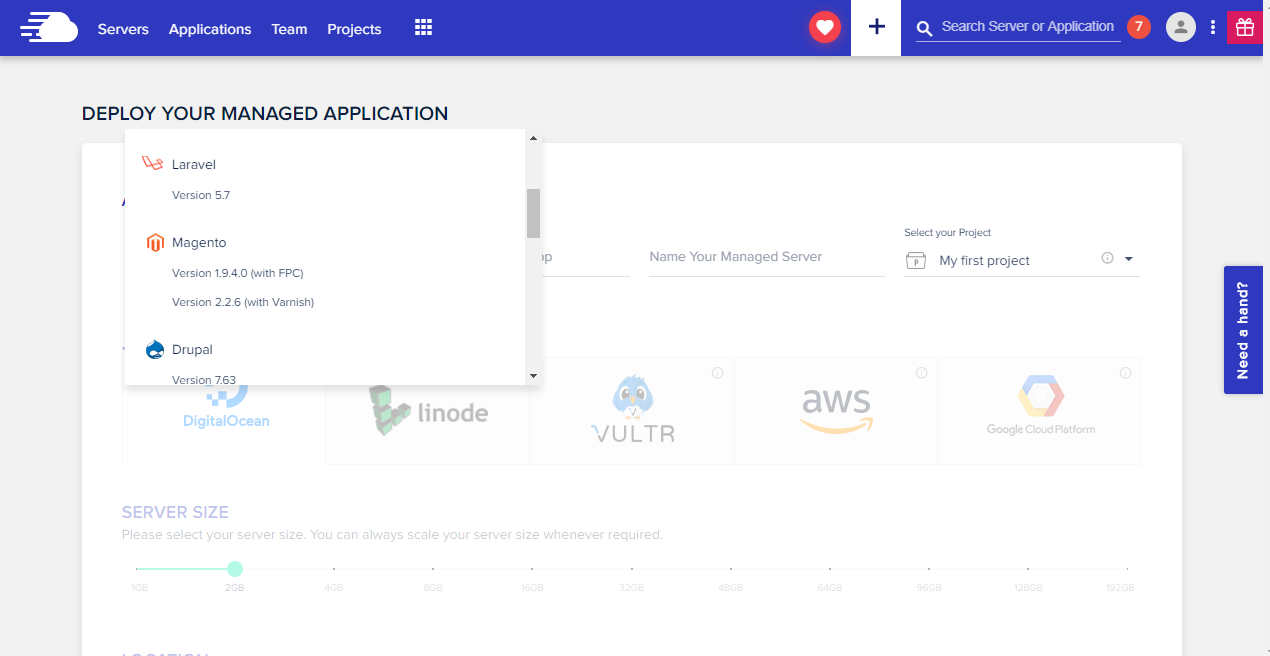
The best part about using Cloudways is that you get to choose from five different cloud hosting providers including AWS, Google Cloud, DigitalOcean, Linode, and Vultr.
Launch Your Magento Server
Click Add server for AWS Magento.
You can easily create a server within seconds with the point and click dashboard.
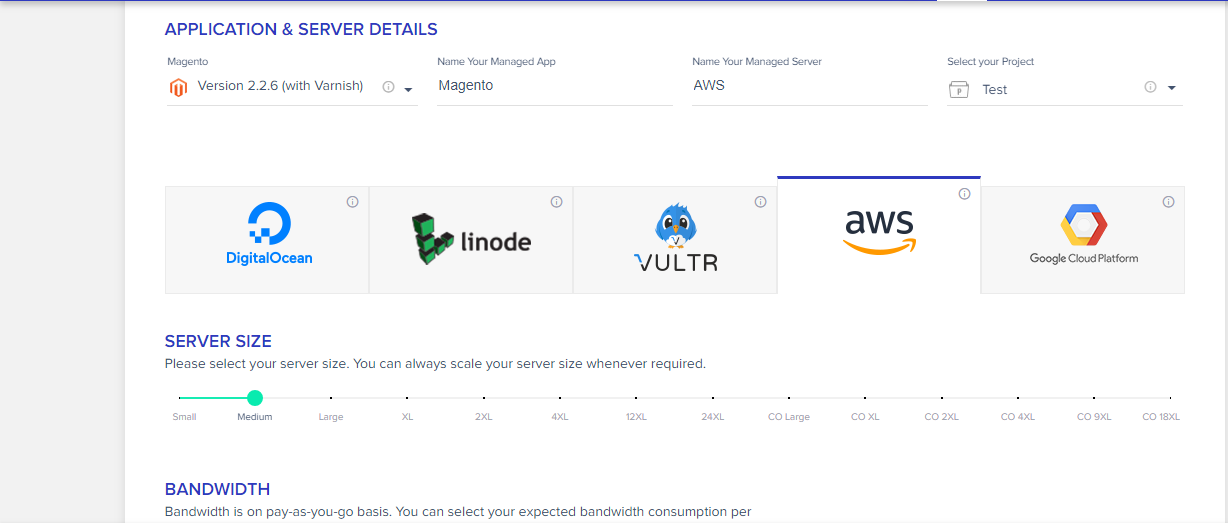
Next, select the location of the server that you want to launch. That’s it.
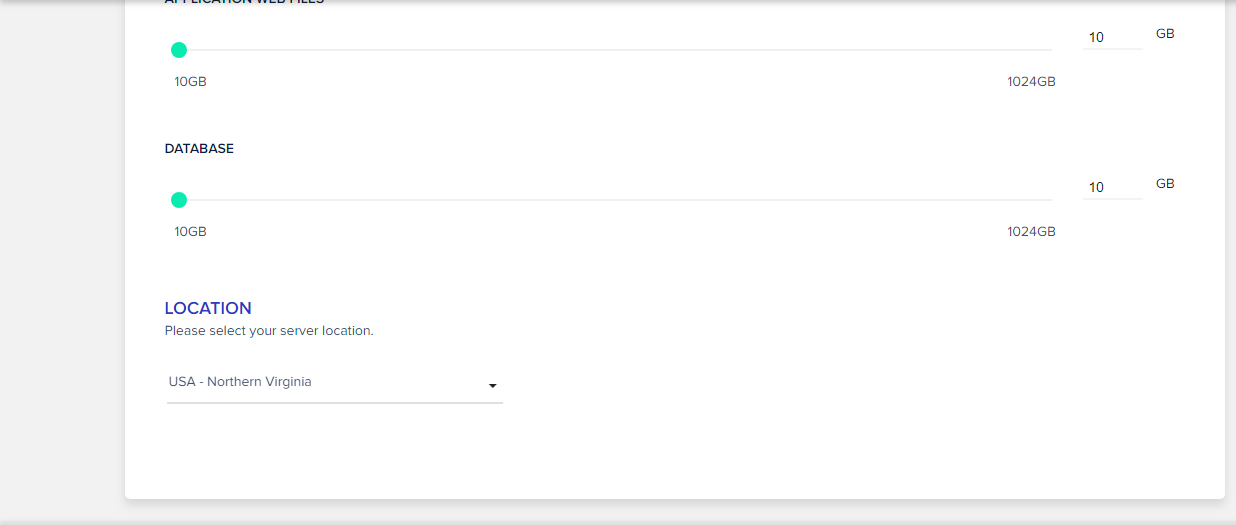
Easy right?
Ready to host your Magento store on Cloudways?
Cloudways is offering FREE $25 hosting credit on using Coupon Code: MGT25.
Final Words
That’s the beauty of using a managed cloud hosting solution for your Magento ecommerce store. No errors. No time wastage. No hassle. And, most importantly… no stress. With just a few clicks, you can successfully install Magento on AWS infrastructure. You know what? The AWS Magento hosting simply gets easier with Cloudways.
See: Install Magento 2 On Debian 9 from Scratch


