
A Module is a part of a program which has one or more routines. A Module is a set of parts or units that can be used to construct a more complex structure. In MVC application, all the controllers and models have their separate folders. All files are combined together based on their functionalities and it is called Modules.
Custom module is required to add customized functionality to your Magento. In this tutorial, I will teach you how to create a module in Magento 2.
Before creating the module, it’s necessary to understand the differences in directory structure between the two versions of Magento. In the Magento 2 directory structure, code pools are removed from the file structure. In Magento 1, you can create modules in app/code/local but in Magento 2 you can create a module in app/code.
To learn more about Magento 1 module, you can go to ‘How to Create a Magento 1.9 Custom Module.’
Create Module in Magento 2
- Create Directories
- Configuration of Module
- Registration of Module
- Front End Router File
- Create Controller
- Create Block
- Frontend layout File
- Frontend Template File
- Module Activation
Create Directories
To create a module in Magento 2, create the directories as shown below:
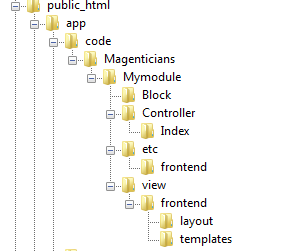
Magenticians: Namespace of Module
Mymodule: Name of module.
Block: Contain PHP files
Controller: Controls the flow of application execution.
Index: Module controller name and it contains the action file.
Etc: Configuration file of module will be placed here.
Etc/Frontend: Router file will be placed here.
View/Frontend: Layout and Templates Folder will be created here.
View/Frontend/Layout: Contain XML file.
View/Frontend/Templates: Contain .phtml file.
Configuration of Module
Now configure your module. Create module.xml file in app/code/Magenticians/Mymodule/etc and put the following code in this file:
<?xml version="1.0"?>
<config xmlns:xsi="http://www.w3.org/2001/XMLSchema-instance" xsi:noNamespaceSchemaLocation="urn:magento:framework:Module/etc/module.xsd">
<module name="Magenticians_Mymodule" setup_version="2.0.0" />
</config>
Registration of Module
Registration of Module is required. To do this, go to app/code/Magenticians/Mymodule and create registration.php. Put the following code in it:
<?php
\Magento\Framework\Component\ComponentRegistrar::register(
\Magento\Framework\Component\ComponentRegistrar::MODULE,
'Magenticians_Mymodule',
__DIR__
);
Front End Router File
The front name in the router file will be used to access the module through the URL. Create routes.xml in app/code/Magenticians/Mymodule/etc/frontend. Put the following code in it:
<?xml version="1.0"?>
<config xmlns:xsi="http://www.w3.org/2001/XMLSchema-instance" xsi:noNamespaceSchemaLocation="urn:magento:framework:App/etc/routes.xsd">
<router id="standard">
<route id="mymodule" frontName="mymodule">
<module name="Magenticians_Mymodule" />
</route>
</router>
</config>
Create Controller
To create controller class for each action, you have to create separate files for each. Now we will create Index.php file in app/code/Magenticians/Mymodule/Controller/Index. Put the following code in it:
<?php
namespace Magenticians\Mymodule\Controller\Index;
class Index extends \Magento\Framework\App\Action\Action
{
/**
* @var \Magento\Framework\View\Result\PageFactory
*/
protected $resultPageFactory;
/**
* @param \Magento\Framework\App\Action\Context $context
* @param \Magento\Framework\View\Result\PageFactory resultPageFactory
*/
public function __construct(
\Magento\Framework\App\Action\Context $context,
\Magento\Framework\View\Result\PageFactory $resultPageFactory
)
{
$this->resultPageFactory = $resultPageFactory;
parent::__construct($context);
}
/**
* Default customer account page
*
* @return void
*/
public function execute()
{
return $this->resultPageFactory->create();
}
}
?>
Create Block
As the block contains PHP view classes, so now we will create Mymodule.php file in app/code/Magenticians/Mymodule/Block. Put the following code in it:
<?php
namespace Magenticians\Mymodule\Block;
class Mymodule extends \Magento\Framework\View\Element\Template
{
public function __construct(
\Magento\Backend\Block\Template\Context $context,
array $data = []
)
{
parent::__construct($context, $data);
}
public function getMymodule()
{
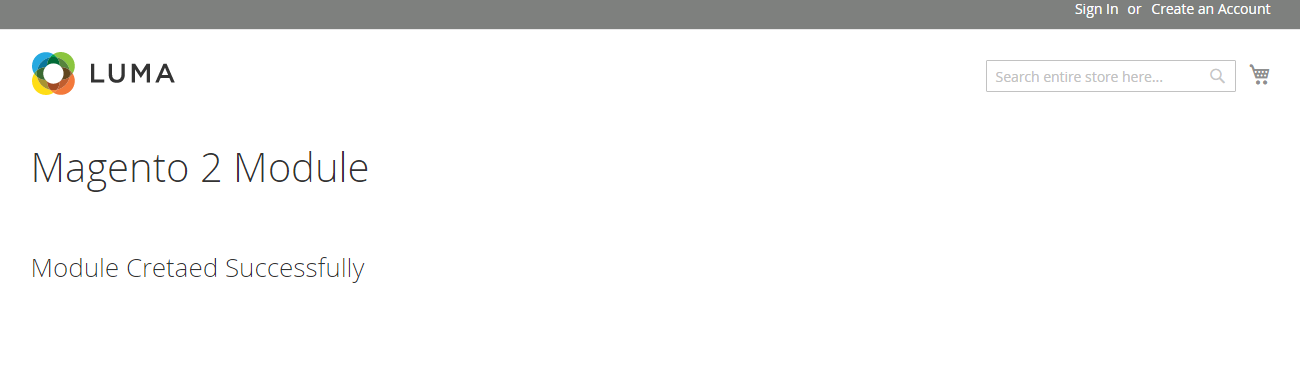
return 'Module Created Successfully';
}
}
?>Frontend layout File
Create mymodule_index_index.xml in app/code/Magenticians/Mymodule/view/frontend/layout. This (mymodule_index_index.xml) file is a frontend layout file in which I will write the title for this page and give the template file name in the Block class. Put the following code in it:
<?xml version="1.0"?>
<page xmlns:xsi="http://www.w3.org/2001/XMLSchema-instance" layout="1column" xsi:noNamespaceSchemaLocation="urn:magento:framework:View/Layout/etc/page_configuration.xsd">
<head>
<title>
Magento 2 Module
</title>
</head>
<body>
<referenceContainer name="content">
<block class="Magenticians\Mymodule\Block\Mymodule" name="mymodule" template="Magenticians_Mymodule::mymodule.phtml" />
</referenceContainer>
</body>
</page>
Frontend Template File
Now create a template file which will be used to call block function. Create mymodule.phtml in app/code/Magenticians/Mymodule/view/frontend/templates. Put the following code in it:
<h2>
<?php echo $block->getMymodule(); ?>
</h2>
Module Activation
All done! Now just activate the module by running the commands in your Magento’s root directory:
1- Check the status of your module:
php bin/magento module:status
2- If your module is in the disabled list then just run this command to enable it otherwise move to step 3 :
php bin/magento module:enable Magenticians_Mymodule
3- Now upgrade the setup:
php bin/magento setup:upgrade
4- At last, clean the cache:
php bin/magento cache:clean
php bin/magento cache:flush
Launch the browser, enter your store URL , and add /mymodule or /mymodule/index/index at the end of URL.
Final Words
Custom module is required to add custom functionality to your Magento store. After following this tutorial you should be able to create a module in Magento 2. If you have any confusion or want to add something to the tutorial, simply use the comment section below!


