
A Model is an important part of MVC (Model-View-Controller) pattern as it represents the data of the application. In the same way, Models have a very useful role in Magento as well. Since editing Model from the core files is not a good practice, you should instead rewrite Model in Magento 2!
Hence, in this tutorial, I am going to teach you how to override models in Magento 2. What you need is a custom module to do that, so let’s begin.
Steps to Follow
- Create Directories
- Configuration of Module
- Registration of Module
- Override di.xml
- Override Product.php
- Launch SSH and Run Commands
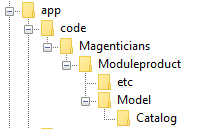
Create Directories
In the root directory of your store, create the following directories in the same manner shown below:
Configuration of Module
Create module.xml in app/code/Magenticians/Moduleproduct/etc and add the following code in it:
<?xml version="1.0"?>
<config xmlns:xsi="http://www.w3.org/2001/XMLSchema-instance" xsi:noNamespaceSchemaLocation="urn:magento:framework:Module/etc/module.xsd">
<module name="Magenticians_Moduleproduct" setup_version="1.0.1">
</module>
</config>
Registration of Module
Create registration.php in app/code/Magenticians/Moduleproduct and add the following code in it:
<?php

\Magento\Framework\Component\ComponentRegistrar::register(
\Magento\Framework\Component\ComponentRegistrar::MODULE,
'Magenticians_Moduleproduct',
__DIR__
);
Override di.xml
Create di.xml in app/code/Magenticians/Moduleproduct/etc in order to specify which model to override by using <preference for=””> and <preference type=””>.
Add the following code in it: The purpose of creating this file is to override di.xml file
<?xml version="1.0"?>
<config xmlns:xsi="http://www.w3.org/2001/XMLSchema-instance" xsi:noNamespaceSchemaLocation="urn:magento:framework:ObjectManager/etc/config.xsd">
<preference for="Magento\Catalog\Model\Product" type="Magenticians\Moduleproduct\Model\Catalog\Product" />
</config>
<preference for=””> Which Model to override.
<preference type=””> Where to override.
Override Product.php
Now create Product.php in app/code/Magenticians/Moduleproduct/Model/Catalog and add the following code in i
<?php
namespace Magenticians\Moduleproduct\Model\Catalog;
class Product extends \Magento\Catalog\Model\Product
{
public function getName()
{
return $this->_getData(self::NAME) . ' + Demo Text';
}
public function getSku()
{
return "123-Demo";
}
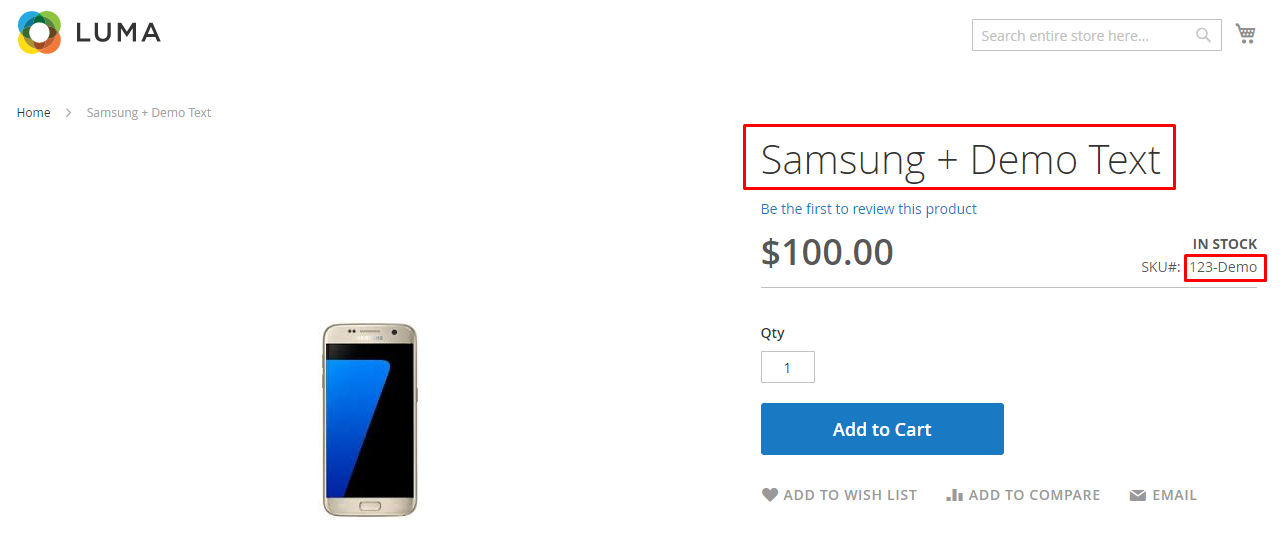
}In the code above, I have overriden the product name and product SKU.
Launch SSH and Run Commands
Run the following commands in the Magento 2 root directory:
php bin/magento module:enable Magenticians_Moduleproduct
php bin/magento setup:upgrade
php bin/magento setup:di:compile
php bin/magento cache:clean
php bin/magento cache:flush
Now it’s time to check results! Go to the product page and you should see this:
Looking for the most reliable hosting platform?
Then, do check out Managed Magento hosting and avail Free Trial for 3 Days.
Conclusion
After the implementation of all the steps above, you should be able to override Model in Magento 2. You can override more Models with the same approach depending on your requirements. If you still have any confusion related to this tutorial, just leave a comment below!
Related Reading


