
I have received several queries from the readers about Magento override of blocks. This is a valid question as editing the core files is not a recommended practice. Today’s tutorial is an attempt to answer these questions.
I am going to discuss how to override Magento 2 blocks, but before starting the tutorial, let me answer a crucial question: what is a block?
Defining a Magento Block
The PHP classes used to connect (or create a link between) layout and templates are called Blocks. As a class, it is a set of methods that handle and controls the Magento UI Blocks. It has the following features:
- A block can have more blocks (nested blocks).
- A block can be placed on different pages and within other blocks.
Now how would you rewrite a Magento 2 block?
To illustrate the process, I will override the Magento 2 Contact Form block. For this, I need to create a custom module to override Magento 2 block. If you are not familiar with the process, I highly recommend you check out this guide: How to Create a Module in Magento 2.
Let’s begin!
Create Directories
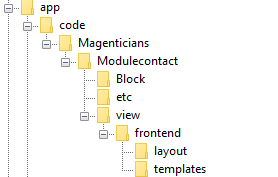
Configure Module
Create module.xml in app/code/Magenticians/Modulecontact/etc and add the following code to it:
<?xml version="1.0"?>
<config xmlns:xsi="http://www.w3.org/2001/XMLSchema-instance" xsi:noNamespaceSchemaLocation="urn:magento:framework:Module/etc/module.xsd">
<module name="Magenticians_Modulecontact" setup_version="1.0.1">
</module>
</config>
Register the Module
Create registration.php in app/code/Magenticians/Modulecontact and add this code to it:
<?php
\Magento\Framework\Component\ComponentRegistrar::register(
\Magento\Framework\Component\ComponentRegistrar::MODULE,
'Magenticians_Modulecontact',
__DIR__
);
Override di.xml File
Now I will override di.xml file. For this create di.xml in app/code/Magenticians/Modulecontact/etc and add this code to it:
<?xml version="1.0"?>
<config xmlns:xsi="http://www.w3.org/2001/XMLSchema-instance" xsi:noNamespaceSchemaLocation="urn:magento:framework:ObjectManager/etc/config.xsd">
<preference for="Magento\Contact\Block\ContactForm" type="Magenticians\Modulecontact\Block\ContactForm" />
</config>
As you can see in the <preference for=””> tag,I have mentioned the block I want to override. Similarly, in <preference type=””> , I have mentioned where I would override it.
Override Contact Form
It’s time to actually override contact form.
Create ContactForm.php in app/code/Magenticians/Modulecontact/Block and add this code in it:
<?php
namespace Magenticians\Modulecontact\Block;
use Magento\Framework\View\Element\Template;
class ContactForm extends \Magento\Contact\Block\ContactForm{

public function getText()
{
return "Override Text";
}
}
As you can see in the above code snippet, I have created a function getText().
The block is now overridden. However, to display its output at the frontend, I would need a template file. To do so, I will override two files, form.phtml and contact_index_index.xml. But before that, I would override the contact_index_index.xml
Override contact_index_index.xml
This is the Magento 2 layout xml file. To overriide it, create contact_index_index.xml in app/code/Magenticians/Modulecontact/view/frontend/layout and add this code to it:
<?xml version="1.0"?>
<page xmlns:xsi="http://www.w3.org/2001/XMLSchema-instance" layout="1column" xsi:noNamespaceSchemaLocation="urn:magento:framework:View/Layout/etc/page_configuration.xsd">
   <body>
      <referenceBlock name="contactForm" remove="true"/>
       <referenceContainer name="content">
           <block class="Magento\Contact\Block\ContactForm" name="customContactForm" template="Magenticians_Modulecontact::form.phtml" />
       </referenceContainer>
   </body>
</page>
In the above code snippet, I have added <referenceBlock name=”contactForm” remove=”true”/> to remove the original contact form so that I can show only the new overridden Magento Contact Form block.
Override form.phtml
Go to vendor/magento/module-contact/view/frontend/templates from the root directory of your store and copy the form.phtml file to app/code/Magenticians/Modulecontact/view/frontend/templates. Now you just need to update the file by adding this line:
<?php echo $block->getText(); ?>
The final form.phtml will looks like this:
<?php
/**
* Copyright © 2013-2017 Magento, Inc. All rights reserved.
* See COPYING.txt for license details.
*/
// @codingStandardsIgnoreFile
?>

<form class="form contact"

     action="<?php /* @escapeNotVerified */ echo $block->getFormAction(); ?>"

     id="contact-form"

     method="post"

     data-hasrequired="<?php /* @escapeNotVerified */ echo __('* Required Fields') ?>"

     data-mage-init='{"validation":{}}'>

   <fieldset class="fieldset">
       <legend class="legend"><span><?php /* @escapeNotVerified */ echo __('Write Us') ?></span></legend><br />
       <div class="field note no-label"><?php /* @escapeNotVerified */ echo __('Jot us a note and we’ll get back to you as quickly as possible.') ?></div>
<div class="field note no-label"><?php echo $block->getText(); ?></div>
       <div class="field name required">
           <label class="label" for="name"><span><?php /* @escapeNotVerified */ echo __('Name') ?></span></label>
           <div class="control">
               <input name="name" id="name" title="<?php /* @escapeNotVerified */ echo __('Name') ?>" value="<?php echo $block->escapeHtml($this->helper('Magento\Contact\Helper\Data')->getPostValue('name') ?: $this->helper('Magento\Contact\Helper\Data')->getUserName()) ?>" class="input-text" type="text" data-validate="{required:true}"/>
           </div>
       </div>
       <div class="field email required">
           <label class="label" for="email"><span><?php /* @escapeNotVerified */ echo __('Email') ?></span></label>
           <div class="control">
               <input name="email" id="email" title="<?php /* @escapeNotVerified */ echo __('Email') ?>" value="<?php echo $block->escapeHtml($this->helper('Magento\Contact\Helper\Data')->getPostValue('email') ?: $this->helper('Magento\Contact\Helper\Data')->getUserEmail()) ?>" class="input-text" type="email" data-validate="{required:true, 'validate-email':true}"/>
           </div>
       </div>
       <div class="field telephone">
           <label class="label" for="telephone"><span><?php /* @escapeNotVerified */ echo __('Phone Number') ?></span></label>
           <div class="control">
               <input name="telephone" id="telephone" title="<?php /* @escapeNotVerified */ echo __('Phone Number') ?>" value="<?php echo $block->escapeHtml($this->helper('Magento\Contact\Helper\Data')->getPostValue('telephone')) ?>" class="input-text" type="text" />
           </div>
       </div>
       <div class="field comment required">
           <label class="label" for="comment"><span><?php /* @escapeNotVerified */ echo __('What’s on your mind?') ?></span></label>
           <div class="control">
               <textarea name="comment" id="comment" title="<?php /* @escapeNotVerified */ echo __('What’s on your mind?') ?>" class="input-text" cols="5" rows="3" data-validate="{required:true}"><?php echo $block->escapeHtml($this->helper('Magento\Contact\Helper\Data')->getPostValue('comment')) ?></textarea>
           </div>
       </div>
       <?php echo $block->getChildHtml('form.additional.info'); ?>
   </fieldset>
   <div class="actions-toolbar">
       <div class="primary">
           <input type="hidden" name="hideit" id="hideit" value="" />
           <button type="submit" title="<?php /* @escapeNotVerified */ echo __('Submit') ?>" class="action submit primary">
               <span><?php /* @escapeNotVerified */ echo __('Submit') ?></span>
           </button>
       </div>
   </div>
</form>
As you can see I have added <?php echo $block->getText(); ?> under <div class=”field note no-label”> in order to display it clearly and prominently.
Run Commands
Everything is now in place and the final step requires you to run the following commands. For this go back to the root folder and then run these commands:
php bin/magento module:enable Magenticians_Modulecontact
php bin/magento setup:upgrade
php bin/magento setup:di:compile
bin/magento setup:static-content:deploy -f
php bin/magento cache:clean
php bin/magento cache:flush
The Result of the Overridden Block
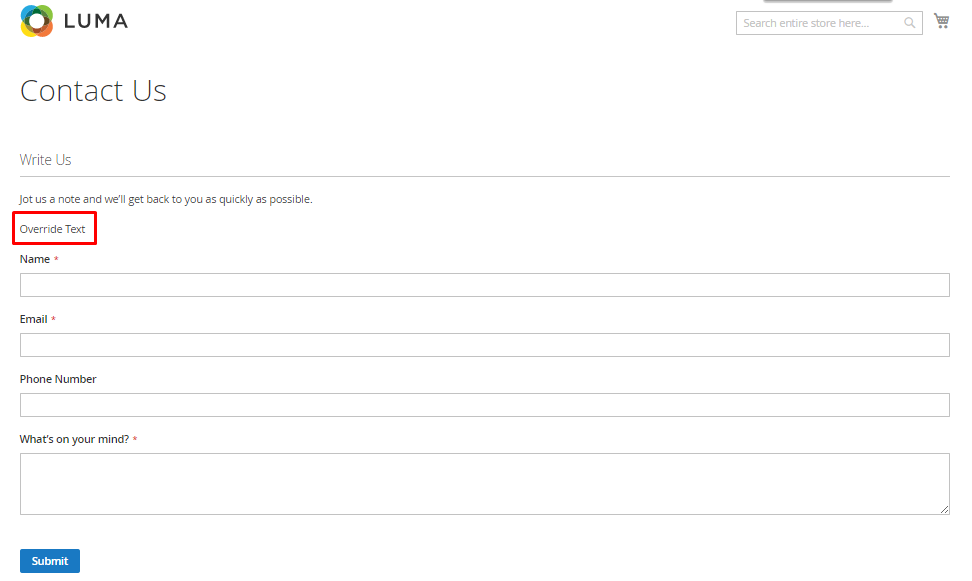
Go to the store’s frontend and go to the contact form. In the following screenshot, you can see the text “Override Text”. This indicates I have successfully overridden the Magento 2 Contact Form block.
Final Words
After going through this Magento override block guide, you should be able to override Magento 2 blocks without any issues. You can override other Magento blocks with a similar approach and utilize them according to your needs. Want to discuss something regarding this guide? Just use the comment section below and I will get back to you!
Related Reading


