Magento 2 Tutorials 
How to Use Magento 2 Layouts, Blocks and Templates
- Syed Muneeb Ul Hasan
- January 1, 2019
In this guide, I’m going to explain the concepts of Magento 2 layouts, blocks and templates and how to use them.
The xml file and structure represented by two types of hierarchy of elements that are block and containers are called layout.
The PHTML (PHP) files which are used to add or customize the front page of a store are called templates. Layout and themes are used to build a theme in Magento 2.
The PHP classes that are used to connect or create a link between layout and templates are called Blocks. Here’s an example how the block looks like:
<block class="Magento\Framework\View\Element\Template" name="customline" template="Magento_Search::customline.phtml" />
class: The attribute which used to define the class of block for the template file.
name: The attribute which is used to identify a block.
template: Used to define the source and name of PHTML file which is used to customize the front page.
Now let’s implement the blocks, layouts, and templates in Magento 2!
Enable Template Path Hints
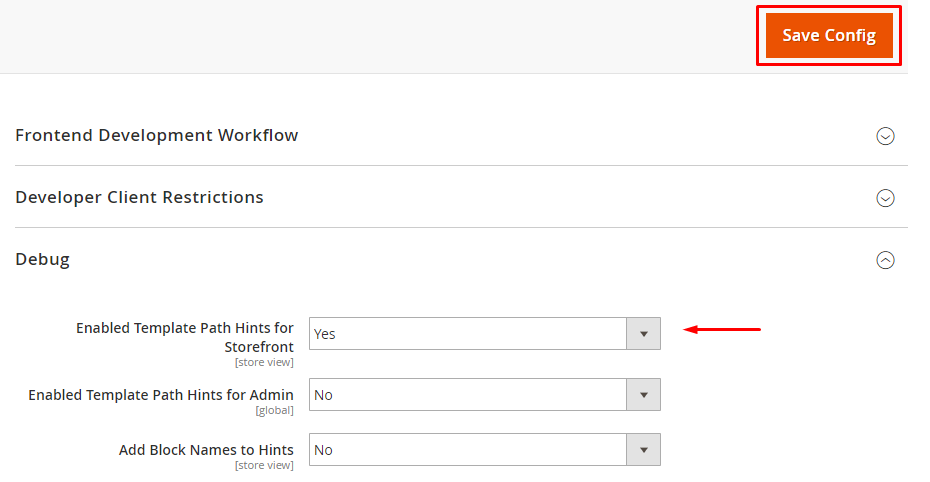
Open the Admin panel of your store and navigate to STORES → Configuration → ADVANCED → Developer. Then unfold the Debug section and select Yes from Enabled Template Path Hints for Storefront drop down. Now just click on Save Config.
After enabling the template hints, go to the homepage where you can see the template hints:
![]()
Here, you can identify the location of the Search Box:
public_html/vendor/magento/module-search/view/frontend/templates/form.mini.phtml
Now you have to create a custom theme to use blocks, layouts, and templates in Magento 2.
Create Directories
Create the directories in the same way as shown below:

Theme Configuration and Registration
To configure the theme, create theme.xml in app/design/frontend/Magenticians/Mytheme and paste the following code in it:
<theme xmlns:xsi="http://www.w3.org/2001/XMLSchema-instance" xsi:noNamespaceSchemaLocation="urn:magento:framework:Config/etc/theme.xsd">
   <title>Mytheme</title> <!-- your theme's name -->
   <parent>Magento/blank</parent> <!-- the parent theme, in case your theme inherits from an existing theme -->
   <media>
       <preview_image>media/preview.jpg</preview_image> <!-- the path to your theme's preview image -->
   </media>
</theme>
Note: Don’t forget to upload the theme preview image (preview.jpg) in app/design/frontend/Magenticians/Mytheme/media.
To register the theme, create registration.php in app/design/frontend/Magenticians/Mytheme and paste the following code in it:
<?php
\Magento\Framework\Component\ComponentRegistrar::register(
       \Magento\Framework\Component\ComponentRegistrar::THEME, 'frontend/Magenticians/Mytheme', __DIR__
);
Run Commands
Launch the SSH terminal and run the following commands in your Magento 2 root directory:
rm -rf var/di/* var/generation/* var/cache/* var/log/* var/page_cache/* var/session/* var/view_preprocessed/* pub/static/*
php bin/magento setup:upgrade
php bin/magento setup:di:compile
php bin/magento setup:static-content:deploy -f
php bin/magento cache:clean
php bin/magento cache:flush
Apply the Custom Theme
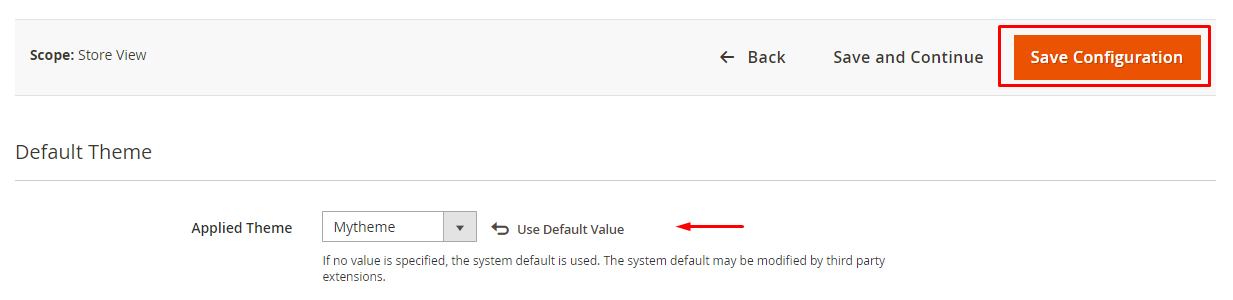
Navigate to CONTENT → Configuration from the Admin panel of your store, then click on Edit from your selected option in which you want to apply your custom theme.

Now select Mytheme from Applied Theme drop down and click on Save Configuration.
Add Magento 2 Layout File
Now create default.xml in app/design/frontend/Magenticians/Mytheme/Magento_Search/layout and paste the following code in it:
<?xml version="1.0"?>
<page xmlns:xsi="http://www.w3.org/2001/XMLSchema-instance" xsi:noNamespaceSchemaLocation="urn:magento:framework:View/Layout/etc/page_configuration.xsd">
   <body>
       <referenceContainer name="header-wrapper">
           <block class="Magento\Framework\View\Element\Template" name="customline" template="Magento_Search::customline.phtml" />
       </referenceContainer>
   </body>
</page>
Add Template File
Now create customline.phtml in app/design/frontend/Magenticians/Mytheme/Magento_Search/templates and paste the following code in it:
<div class="block" style="float: right;">
   <?php echo __('Custom Line'); ?>
</div>
Note: At last, run all the commands again which I have executed before.
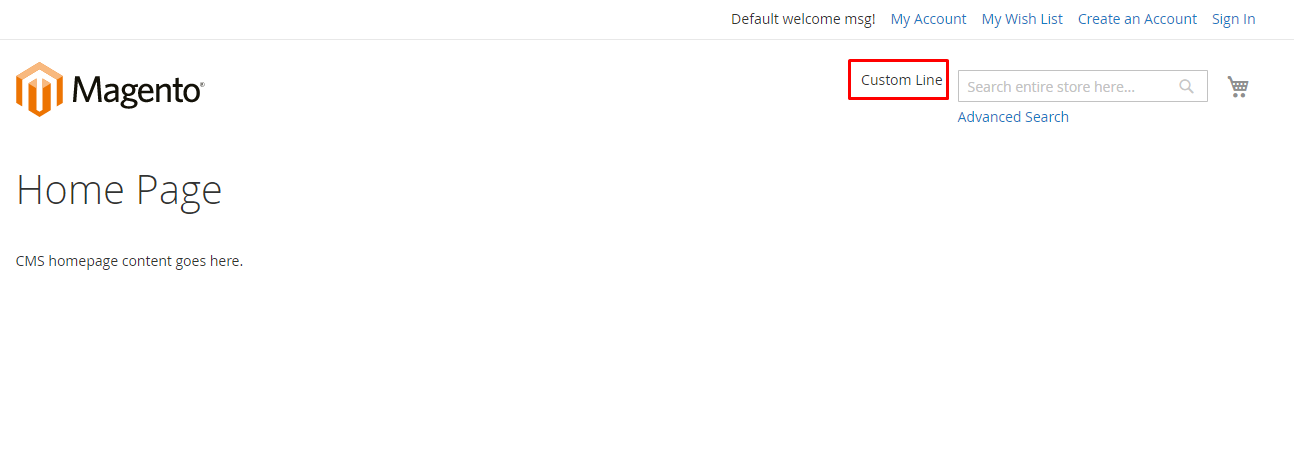
Go to the homepage of Magento 2 and you will see the expected output:
Hosting Can Break Or Make Your Online Store!
A managed cloud hosting is the lethal combination for any Magento store.
Final Words
After following this guide, you should now be able to use Magento 2 Layouts, Blocks and Templates. Explore more block, layouts, and templates to customize your Magento 2 store according to your need if you want. And if you want to discuss and have any confusions regarding this guide, simply use the comment box below!


