Magento 2 Tutorials 
How To Add Header and Footer to Magento 2 Checkout Page
- Syed Muneeb Ul Hasan
- January 15, 2018
The header and footer are very important part of any Magento store design. These two areas are used to display navigation and links to related and useful pages of the store. At the checkout page, these areas are used to present additional links to related products on the store. This greatly increases the average users’ time on the store and the probability of increased sales.
I received a lot of queries about implementing headers and footers at Magento 2 checkout page. This tutorial is written to help you add these two areas to the checkout page.
Important: Before going further, create a custom theme as editing Magento core files is not a good approach. To learn more about the process, follow this article on creating a custom magento 2 theme.
Create the Custom Theme
Create a theme.xml file in app/design/frontend/Magenticians/Mytheme and add this code to it:
<theme xmlns:xsi="http://www.w3.org/2001/XMLSchema-instance" xsi:noNamespaceSchemaLocation="urn:magento:framework:Config/etc/theme.xsd">
<title>Mytheme</title>
<parent>Magento/blank</parent>
<media>
<preview_image>media/preview.jpg</preview_image>
</media>
</theme>
Next, create a registration.php file in app/design/frontend/Magenticians/Mytheme and add this code to it:
<?php
\Magento\Framework\Component\ComponentRegistrar::register(
\Magento\Framework\Component\ComponentRegistrar::THEME, 'frontend/Magenticians/Mytheme', __DIR__
);
Now upload your theme preview image (named as preview.jpg) in app/design/frontend/Magenticians/Mytheme/media
Now create default.xml file in app/design/frontend/Magenticians/Mytheme/Magento_Theme/layout and add this code in it:
<page xmlns:xsi="http://www.w3.org/2001/XMLSchema-instance" xsi:noNamespaceSchemaLocation="urn:magento:framework:View/Layout/etc/page_configuration.xsd">
<body>
<referenceBlock name="logo">
<arguments>
<argument name="logo_file" xsi:type="string">images/mytheme-logo.png</argument>
<argument name="logo_img_width" xsi:type="number">200</argument>
<argument name="logo_img_height" xsi:type="number">200</argument>
</arguments>
</referenceBlock>
</body>
</page>
Now upload the theme’s logo (named as mytheme-logo.png) in app/design/frontend/Magenticians/Mytheme/web/images
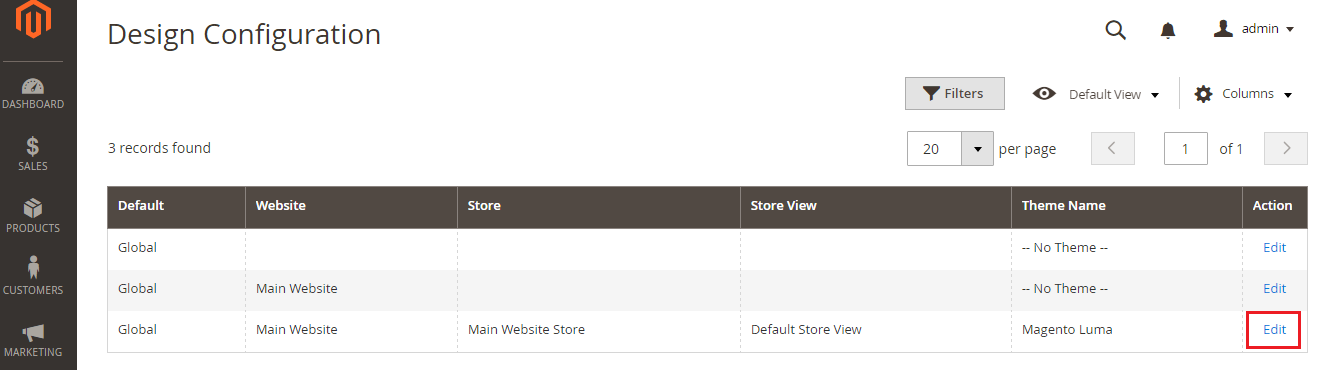
Now go to the admin panel of the store and navigate to Content → Configuration. Click Edit as shown below:
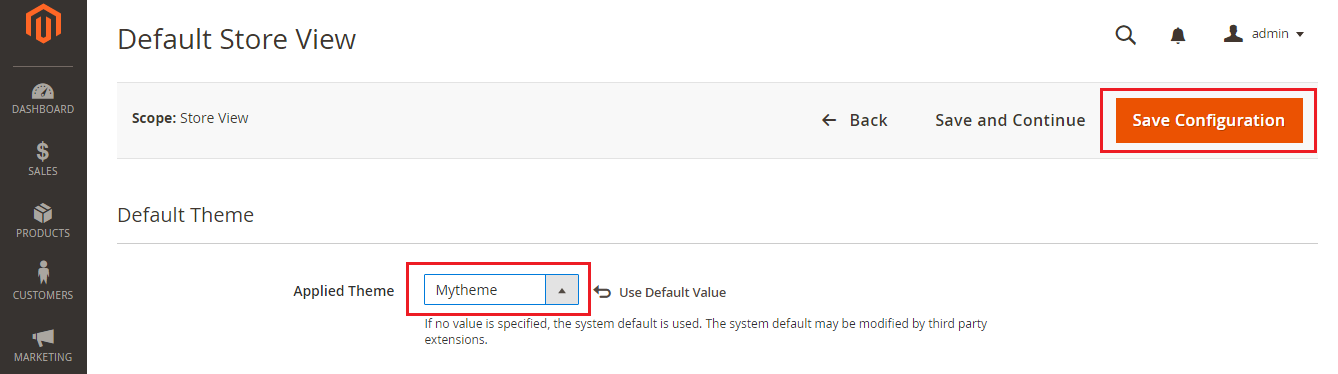
Go to the Applied Theme drop-down menu and select Mytheme. Next, click the Save Configuration button to apply the custom theme on the store.
Add Header and Footer to the Checkout Page
Create checkout_index_index.xml file in app/design/frontend/Magenticians/Mytheme/Magento_Checkout/layout and add this code in it:
<?xml version="1.0"?>
<page xmlns:xsi="http://www.w3.org/2001/XMLSchema-instance" layout="1column" xsi:noNamespaceSchemaLocation="urn:magento:framework:View/Layout/etc/page_configuration.xsd">
<body>
    <referenceBlock name="minicart" remove="false" />
    <referenceContainer name="header.panel" remove="false" />
    <referenceBlock name="top.search" remove="false" />
    <referenceBlock name="catalog.compare.link" remove="false" />
    <referenceBlock name="catalog.topnav" remove="false"/>
    <referenceContainer name="footer-container"  remove="false"/>
</body>
</page>
Now create customcss.css in app/design/frontend/Magenticians/Mytheme/web/css. Open the file in your text editor and add this code in it:
.action-auth-toggle
{
display: block;
}
To integrate the above created CSS file in the custom theme, open the default.xml file (located in app/code/Magenticians/Mytheme/Magento_Theme/layout). Add the following code in it:
<head>
        <css src="css/customcss.css" />
</head>
At this point, the default.xml file will look like this:
<page xmlns:xsi="http://www.w3.org/2001/XMLSchema-instance" xsi:noNamespaceSchemaLocation="urn:magento:framework:View/Layout/etc/page_configuration.xsd">
<head>
        <css src="css/customcss.css" />
</head>

<body>
<referenceBlock name="logo">
<arguments>
<argument name="logo_file" xsi:type="string">images/mytheme-logo.png</argument>
<argument name="logo_img_width" xsi:type="number">200</argument>
<argument name="logo_img_height" xsi:type="number">200</argument>
</arguments>
</referenceBlock>
</body>
</page>
Run CLI Commands
Launch the SSH terminal and use the following command to go to the root directory of the store.
cd public_html
Next, run the following commands:
rm -rf var/di/* var/generation/* var/cache/* var/log/* var/page_cache/* var/session/* var/view_preprocessed/* pub/static/*
php bin/magento setup:upgrade
php bin/magento setup:static-content:deploy
php bin/magento cache:clean
php bin/magento cache:flush
It’s time to check the result. Go to the store’s checkout page and you will see the header and footer.


Note: You could see two sign in links in the above image. One of these links could be easily hidden through CSS.
Final Words
As you could see, adding a header and footer to Magento 2 checkout page is a simple task. If you are still confused, just leave a comment below and I will get back to you!


