
An attribute is the property of a product and can be highly useful for an e-commerce store’s functions. You can use it for multiple purposes like creating different types of products and changing their descriptions, and for better search functionality for your customers.
In this guide, you will learn how to create Magento attributes. I will show you the method for both Magento 1.x and Magento 2.x.
Let’s start!
Create Magento Attributes
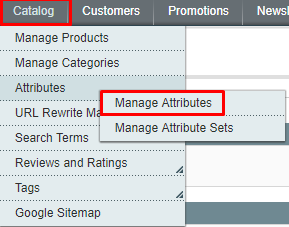
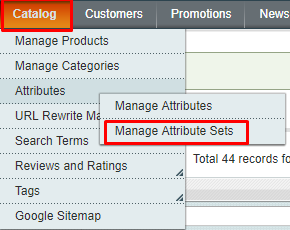
To create Magento Attributes, open the admin panel of your Magento store and then navigate to Catalog → Attributes → Manage Attributes:
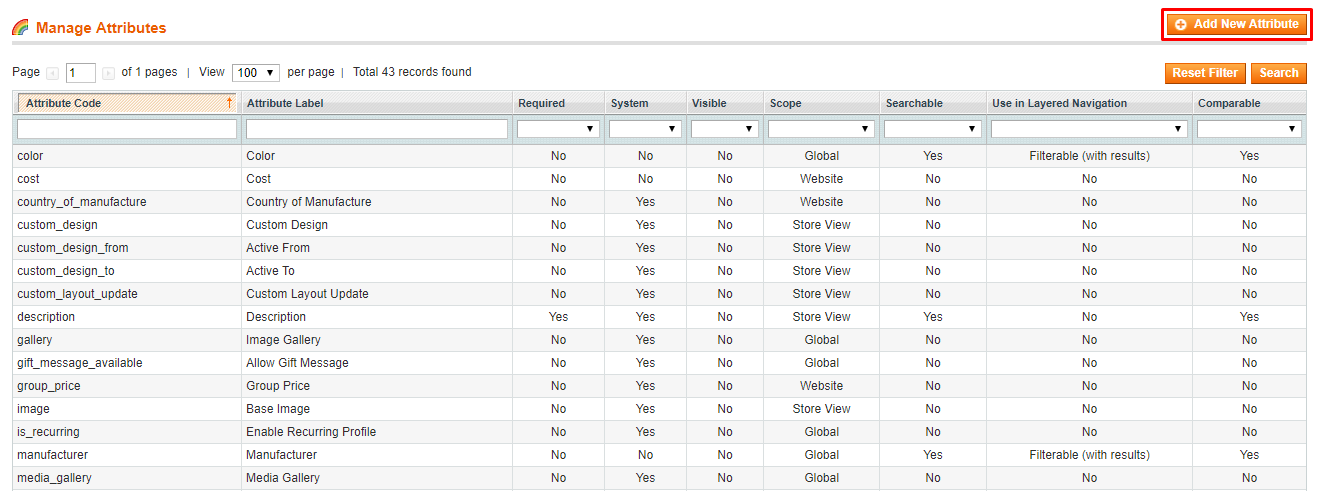
Here you will see the list of Magento Attributes. Click on Add New Attribute:
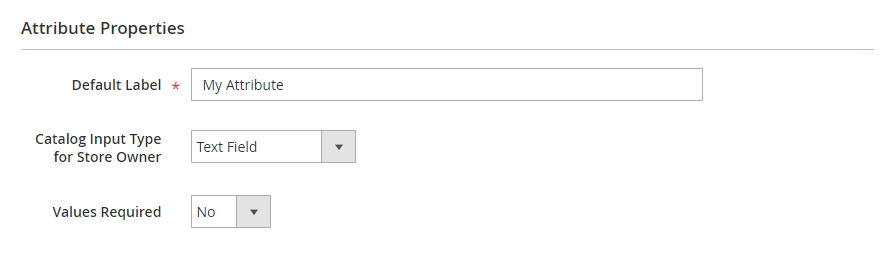
First of all, set the Attribute Properties:
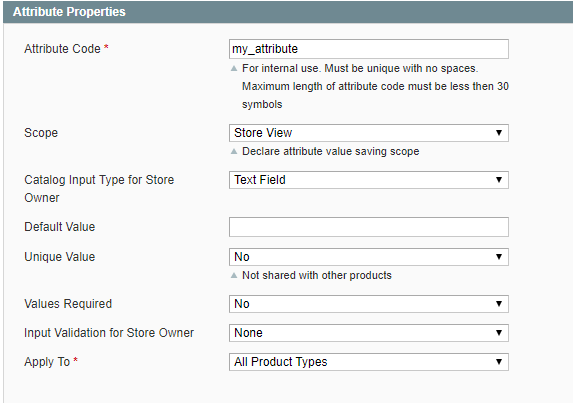
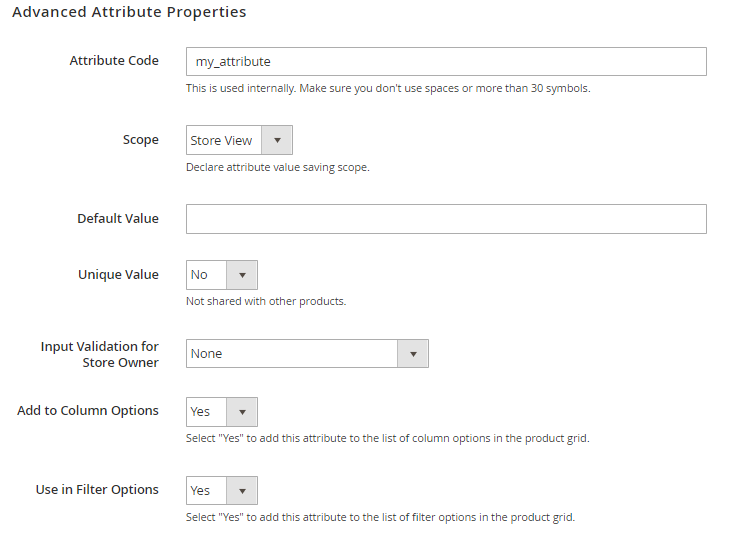
- Attribute Code: I have entered my_attribute. You can enter the code of your choice.
- Scope: It consists of three options: Store View, Website, Global. Select any one of your choice.
- Catalog Input Type for Store Owner: It also consists of multiple options. Choose any one according to your needs.
- Default value: With this, you can set a default value. When you create a product which has this attribute, it will give a default value for that product.
- Unique Value: If you select the option, Yes, then it means that each attribute value for product(s) must be different.
- Values Required: If you select Yes, then the attribute must have any value when you create a product.
- Input Validation For Store Owner: You can set the validation to the attribute field as a decimal number, integer, e-mail URL, letters, any alphanumeric values.
- Apply To: You can apply this attribute to all products; or can select any one of your choice.
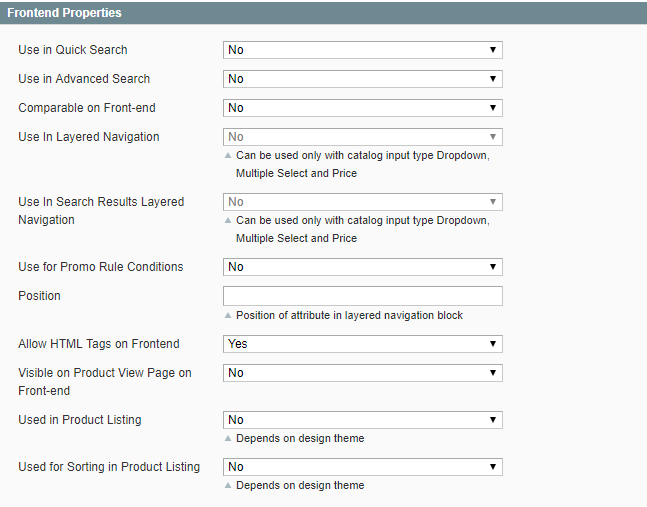
- Use in Quick Search: If you select Yes, the attribute values will become searchable.
- Use in Advanced Search: It is same as quick search. By selecting Yes, attribute values will become searchable in advanced search.
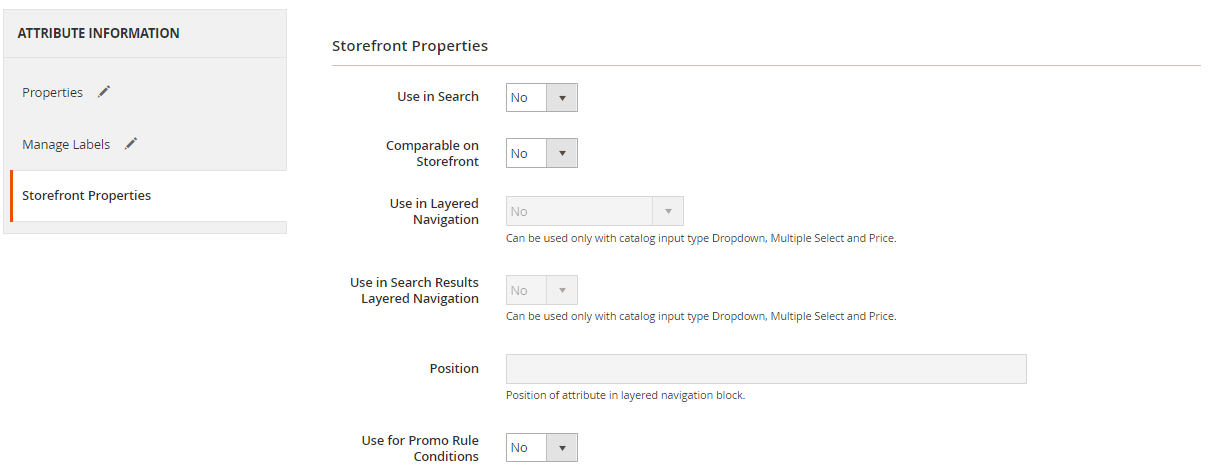
- Comparable on Front-end: If you select Yes, the attribute will become visible on compare box feature.
- Use in Layered Navigation: If you select Yes, the attribute will become filterable on the left or right side of a category page.
- Use in Search Results Layered Navigation: If you select Yes, the user can filter their search result by this attribute.
- Use for Promo Rule Conditions: If you select Yes, you will be able to create promo rule conditions using attributes.
- Position: It’s used for layered navigation. Here you can set the position of the attribute in the right or left hand side of your category filtering.
- Allow HTML Tags on Frontend: If you select Yes, you can add attribute values that have HTML tags.
- Visible on Product View Page on Front-end: If you select Yes, the attribute and its value will display on product pages at Additional Information section
- Used in Product Listing: If you select Yes, the attribute will display in the category page.
Click the Save Attribute button:
![]()
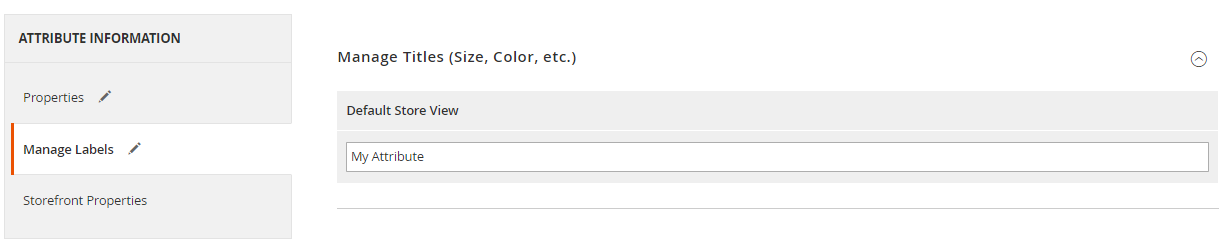
Here, you must enter the labels for your attribute which you will see in your Admin panel and your store’s frontend.

Click on Save Attribute button again:
![]()
Here you will see the attribute that you have just created is present in the list of Magento Attributes:

Create Magento Attribute Set
To create Magento Attribute Set, navigate to Catalog → Attributes → Manage Attribute Sets:
Then click on Add New Set button:
![]()
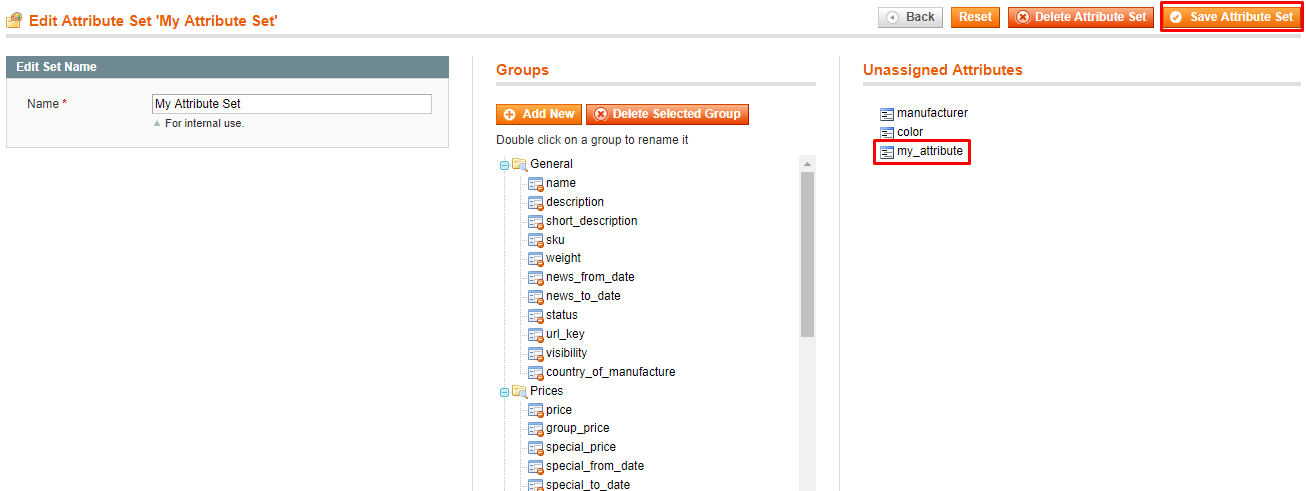
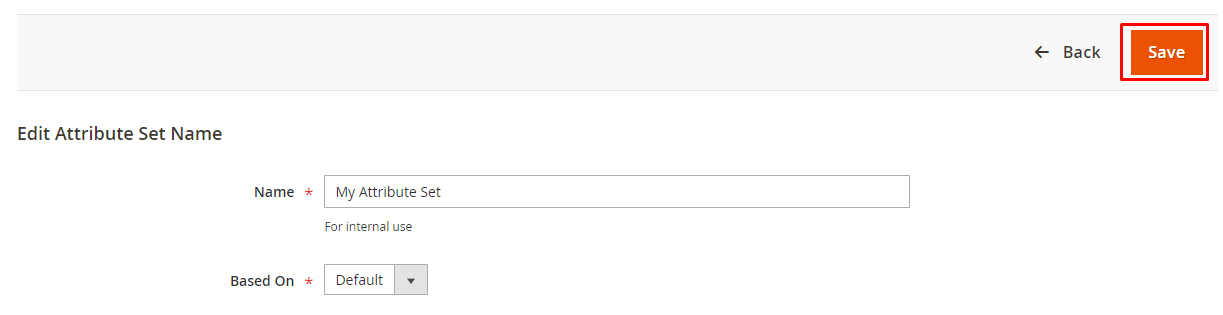
Here enter the name for your attribute set and select Default or any other attribute set from Based On dropdown menu. Hit the Save Attribute Set button:

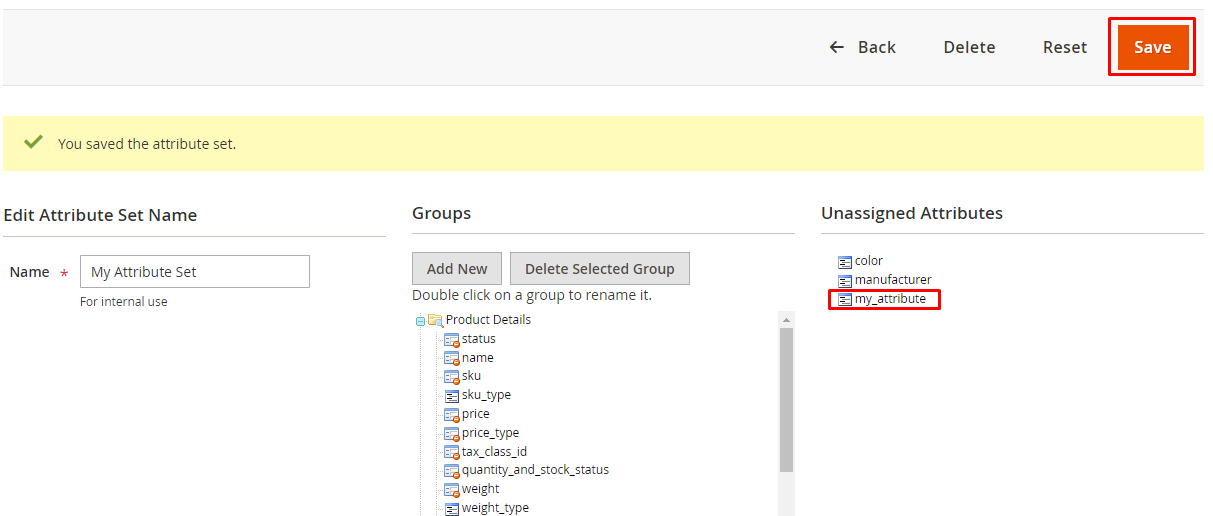
Here you will see the assigned attribute groups and unassigned attributes to your set. In unassigned, your created attribute my_attribute is present. You can drag it to any other unassigned attribute or attribute group of your choice.
To verify that you have successfully created Magento Attribute, go to Catalog → Manage Products and click on Add Product. Here you can see your attribute in Attribute Set field:

Create Magento 2 Attributes
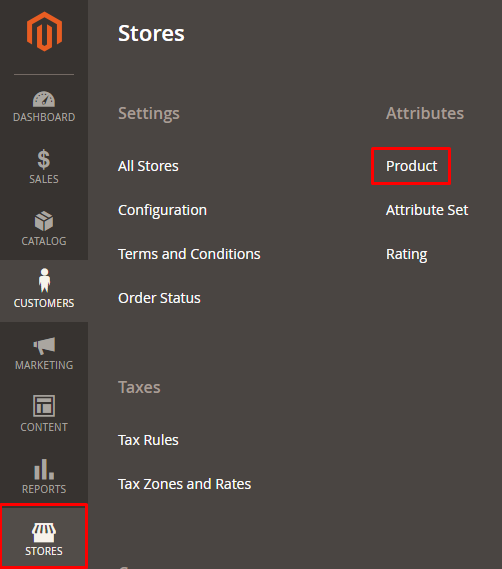
To create Magento 2 Attributes, navigate go to STORES → Product:
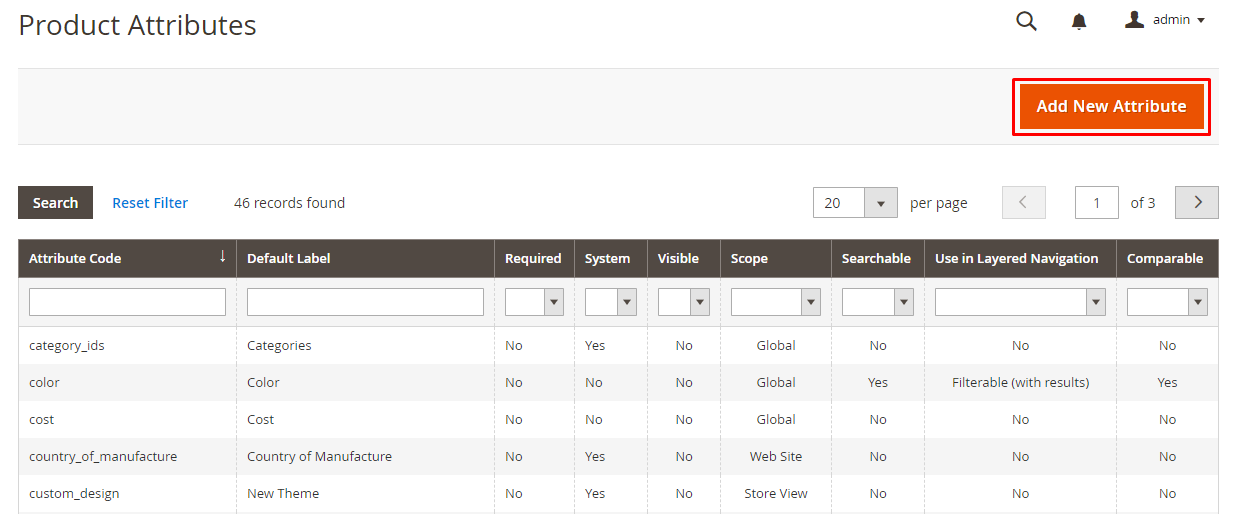
Here you will see the list of Magento 2 Attributes. Click on Add New Attribute button in the top right corner:
Now, navigate to Attribute Properties and Advanced Attribute Properties and set it according to your needs:
Now, move to Manage Labels section and enter the label for your attributes that you want to display on store’s front-end:
Navigate to Storefront Properties, and set it according to your needs:
Click on Save Attribute button:

Here you will see your created attribute is present in the list of Magento 2 Attributes:

Create Magento 2 Attribute Set
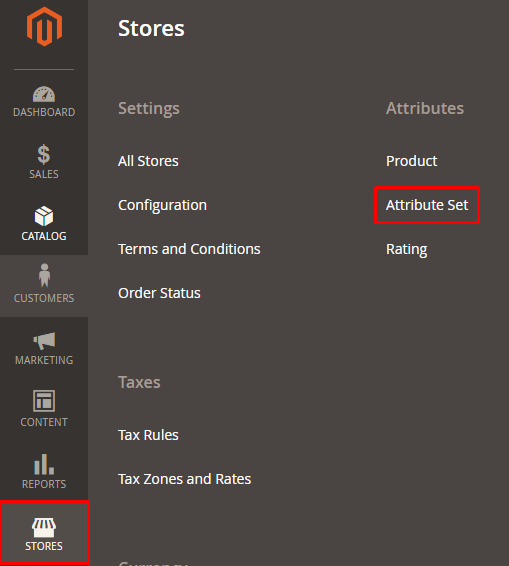
To create Magento 2 Attribute Set, navigate to STORES → Attribute Set:
Now create your Magento 2 attribute set following the same process as for Magento 1:
You can see your created Magento 2 attribute in Unassigned Attributes. You can drag it or any other attributes in the attribute groups of your choice.
To verify that you have successfully created Magento 2 Attribute Set, go to your product creation page and you will see your attribute:

Create Magento 2 Attribute and Attribute Set Programmatically
I have seen queries regarding how to create a Magento 2 attribute and attribute set programmatically. Hence, I’ll show you how to create one.
First, let’s configure the module. Create module.xml file in app/code/Magenticians/Mymodule/etc and add this code in it:
<?xml version="1.0"?>
            <config xmlns:xsi="http://www.w3.org/2001/XMLSchema-instance" xsi:noNamespaceSchemaLocation="urn:magento:framework:Module/etc/module.xsd">
            <module name="Magenticians_Mymodule" setup_version="1.0.0"></module>
</config>
Now to register the module create registration.php in app/code/Magenticians/Mymodule and add this code in it:
<?php
\Magento\Framework\Component\ComponentRegistrar::register(
   \Magento\Framework\Component\ComponentRegistrar::MODULE,
   'Magenticians_Mymodule',
   __DIR__
);
Create InstallData.php in app/code/Magenticians/Mymodule/Setup and add this code in it:
<?php
namespace Magenticians\Mymodule\Setup;
use Magento\Eav\Setup\EavSetup;
use Magento\Eav\Setup\EavSetupFactory;
use Magento\Framework\Setup\InstallDataInterface;
use Magento\Framework\Setup\ModuleContextInterface;
use Magento\Framework\Setup\ModuleDataSetupInterface;
use Magento\Catalog\Setup\CategorySetupFactory;
use Magento\Eav\Model\Entity\Attribute\SetFactory as AttributeSetFactory;

class InstallData implements InstallDataInterface
{
   private $eavSetupFactory;
   private $attributeSetFactory;
   private $attributeSet;
   private $categorySetupFactory;

   public function __construct(EavSetupFactory $eavSetupFactory, AttributeSetFactory $attributeSetFactory, CategorySetupFactory $categorySetupFactory )
       {
           $this->eavSetupFactory = $eavSetupFactory;
           $this->attributeSetFactory = $attributeSetFactory;
           $this->categorySetupFactory = $categorySetupFactory;
       }

   public function install(ModuleDataSetupInterface $setup, ModuleContextInterface $context)
   {
       $setup->startSetup();

               // TO CREATE ATTRIBUTE SET
       $categorySetup = $this->categorySetupFactory->create(['setup' => $setup]);

       $attributeSet = $this->attributeSetFactory->create();
       $entityTypeId = $categorySetup->getEntityTypeId(\Magento\Catalog\Model\Product::ENTITY);
       $attributeSetId = $categorySetup->getDefaultAttributeSetId($entityTypeId);
       $data = [
           'attribute_set_name' => 'MyCustomAttribute',
           'entity_type_id' => $entityTypeId,
           'sort_order' => 200,
       ];
       $attributeSet->setData($data);
       $attributeSet->validate();
       $attributeSet->save();
       $attributeSet->initFromSkeleton($attributeSetId);
       $attributeSet->save();

               // TO CREATE PRODUCT ATTRIBUTE
       $eavSetup = $this->eavSetupFactory->create(['setup' => $setup]);
           $eavSetup->addAttribute(
                   \Magento\Catalog\Model\Product::ENTITY,
               'text_my_custom_attribute',
               [
                   'type' => 'varchar',
                   'label' => 'My Custom Attribute Text',
                   'backend' => '',
                   'input' => 'text',
                   'wysiwyg_enabled'   => false,
                   'source' => '',
                   'required' => false,
                   'sort_order' => 5,
                   'global' => \Magento\Catalog\Model\ResourceModel\Eav\Attribute::SCOPE_STORE,
                   'used_in_product_listing' => true,
                   'visible_on_front' => false,
                   'attribute_set' => 'MyCustomAttribute',
           ]
       );

       $setup->endSetup();
   }
} ?>
In the code above, I have created an attribute set, and then created an attribute that I have assigned to the attribute set.
It’s time to connect your e-commerce store with an SSH terminal and then run these commands in the root directory of your store.
php bin/magento module:enable Magenticians_Mymodule
php bin/magento setup:upgrade
php bin/magento setup:di:compile
php bin/magento cache:clean
php bin/magento cache:flush
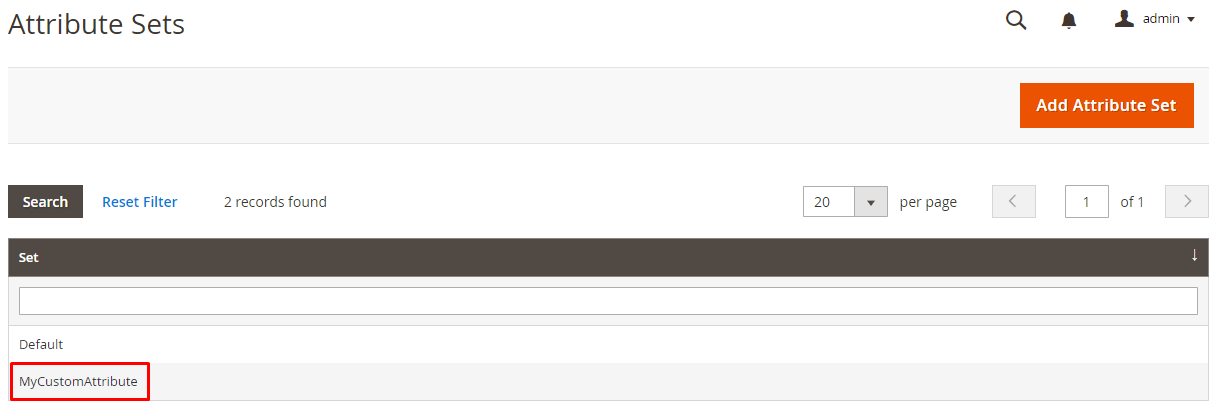
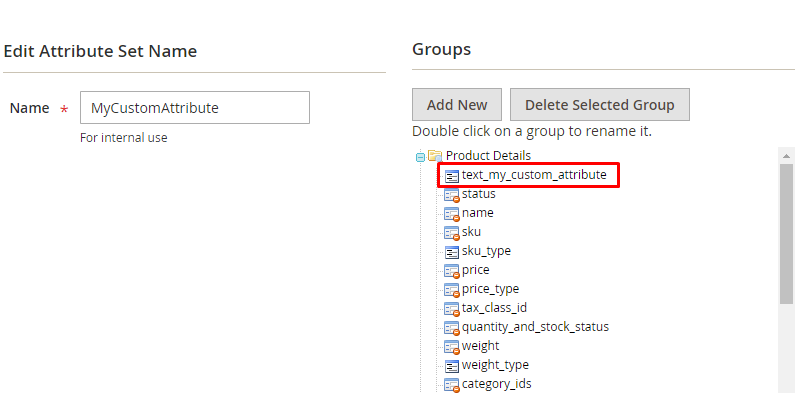
Now just check the result by going to STORES → Attribute Set, here you will see the new attribute set MyCustomAttribute:
And then click on MyCustomAttribute, here you will see attribute text_my_custom_attribute:
Final Words
I believe that after following this tutorial you should be able to create Magento attributes for both the versions, i.e. Magento 1.x and Magento 2.x.. If you still face any issues related to this guide, use the comment box below to share your suggestions, ideas, and issues. I will get back to you.
Also see: How to Configure Layered Navigation with Filterable Attributes in Magento 2
Frequently Asked Questions
Q1. Why create Magento attribute set based on the default attribute?
Suppose you have to create a few new Magento attributes for your products, and you also want to use default attributes. Creating a Magento attribute set using the default attribute will be a good idea. With it, you can also save your time.
Q2. Is it possible to select dropdown input control for my custom Magento attribute?
Yes, it’s possible! While creating a new Magento attribute, you have the option Catalog Input Type for Store Owner under Magento Attributes Properties section where you can select input type of your choice.


