Magento 2 Tutorials 
How to Create Custom Admin Menu in Magento 2
- Syed Muneeb Ul Hasan
- March 19, 2018

One important reason behind the success of Magento 2 is its excellent admin menu that offers a great mix of details to the users. However, there are times when store owners need to custom tailor the admin menu to fit their unique requirements.
Fortunately, Magento 2 allows the addition of custom admin menu items with ease. So, today in this guide, I am going to show you how to create a custom admin menu in Magento 2.
As always, following the best Magento development practices, I will create a custom module.
Configure the Module
To configure the custom module, create module.xml in app/code/Magenticians/Newmenu/etc and add the following to it:
<?xml version="1.0"?>
            <config xmlns:xsi="http://www.w3.org/2001/XMLSchema-instance" xsi:noNamespaceSchemaLocation="urn:magento:framework:Module/etc/module.xsd">
            <module name="Magenticians_Newmenu" setup_version="1.0.1"></module>
</config>
Register the Module
To register your module, create registration.php in app/code/Magenticians/Newmenu and add the following to the file::
<?php

\Magento\Framework\Component\ComponentRegistrar::register(
    \Magento\Framework\Component\ComponentRegistrar::MODULE,
    'Magenticians_Newmenu',
    __DIR__
);
Create Custom Admin Menu
Now to create the custom admin menu for the Magento 2 store, create menu.xml file in app/code/Magenticians/Newmenu/etc/adminhtml and add the following code in it:
<?xml version="1.0"?>

<config xmlns:xsi="http://www.w3.org/2001/XMLSchema-instance" xsi:noNamespaceSchemaLocation="urn:magento:module:Magento_Backend:etc/menu.xsd">

    <menu>

        <add id="Magenticians_Newmenu::first_menu"
             title="My Main Menu"
             module="Magenticians_Newmenu"
             sortOrder="20"
             resource="Magento_Backend::content" />

        <add id="Magenticians_Newmenu::second_menu"
             title="My Sub Menu"
             module="Magenticians_Newmenu"
             sortOrder="1"
             action="newmenu/index/index"
             parent="Magenticians_Newmenu::first_menu"
             resource="Magento_Backend::content" />

    </menu>
</config>
Now, here is a short description of the major variables in the above code:
id: The unique identifier of the custom admin menu.
title: The title that will be shown in the admin menu.
Module: in this case, Magenticians_Newmenu
sortOrder: Prioritize the placement of the custom admin menu.
resource: the rule to identify which admin users can access the custom admin menu.
Action: Set the link to the admin controller.
parent: Used to define the menu upon which the custom menu depends.
Launch the SSH Terminal
Launch the SSh terminal and go to the root directory of the Magneto 2 store. Now run the following commands:
php bin/magento setup:upgrade
php bin/magento setup:di:compile
php bin/magento cache:clean
php bin/magento cache:flush
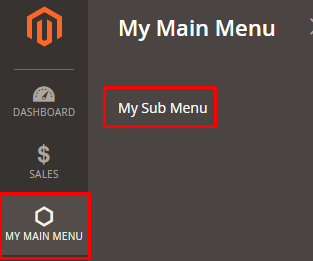
It’s time to check the output. Go to the admin panel of your Magento 2 store, and you will see the new admin menu MY MAIN MENU with the nested My Sub Menu in it:
Wrapping Up
After following this simple tutorial, I believe you can easily add custom admin menu to your Magento 2 store. Still facing any issues? Drop your query in the comment box below and I will get back to you!


