Magento 2 Tutorials 
Easiest Way to Install Google Tag Manager on Magento 2
- Syed Muneeb Ul Hasan
- February 6, 2017

Google Tag Manager, as the name suggests, is a tool by Google to manage tags on your website. It has many advantages and gives you a central account to manage and add all the third party tracking codes, snippets, and analytics javascripts. Not only that, but it also improves your agility and reduces dependency on your development team because marketers can now add scripts using the Google Tag Manager themselves.
You can easily add scripts and code snippets of tools like Google Analytics, Google Adwords, CrazyEgg, OptinMonster, Mouseflow, and any other script you can think of.
Google Tag Manager is particularly useful for Magento 2 as it reduces the need to install multiple extensions or edit your code, and this is why I recommend that you install GTM on your Magento stores.
In this tutorial I will highlight the easiest method to add Google Tag Manager tracking code on Magento 2 by using Mageplaza’s Google Tag Manager extension. After we have configured the extension, I will show you the steps to add Google Analytics tracking code via Google Tag Manager.
Steps for Google Tag Manager in Magento 2
- Install MagePlaza’s Google Tag Manager Extension
- Create Google Tag Manager Account
- Adding GTM code in Mageplaza Extension
- Verifying if GTM code is present on your website
- Adding Google Analytics via Google Tag Manager
Step 1: Install MagePlaza’s Google Tag Manager Extension
First, purchase the extension from here and download the zip file containing the extension files.
You can install this extension by following the usual Magento 2 extension installation method highlighted below:
1) Download the extension zip files.
2) Unzip the extension files.
3) Upload the extension files via FTP into Magento 2 root directory folder “app”
4) In Magento 2 admin, disable the cache under System -> Cache Management
5. On the command line use the following command:
php f bin/magento setup:upgrade
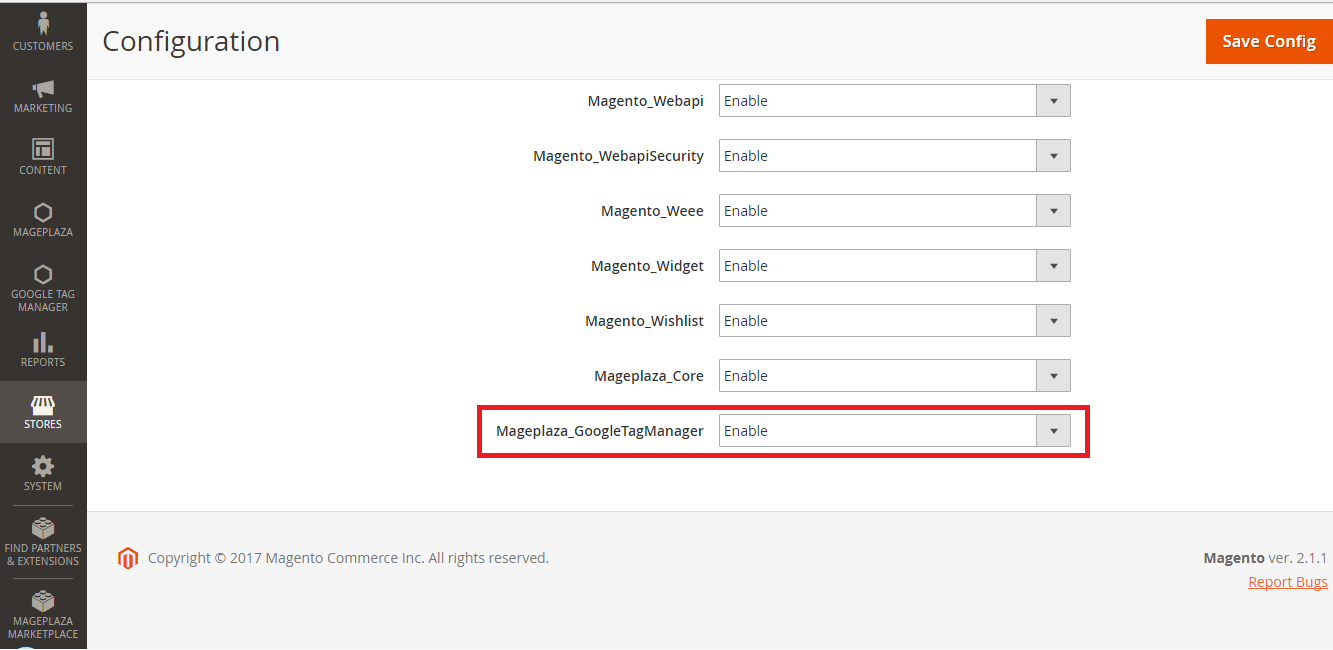
6) Now navigate to Magento 2 admin and open Stores -> Configuration -> Advanced -> Advanced and you will see the extension there.
Step 2: Create Google Tag Manager Account
Google Tag Manager is a free service by Google and you can create an account by visiting this link. You can use your Gmail account to sign-up for the service.
Once logged in, click on Create Account.

Name your account and select Web under container field.
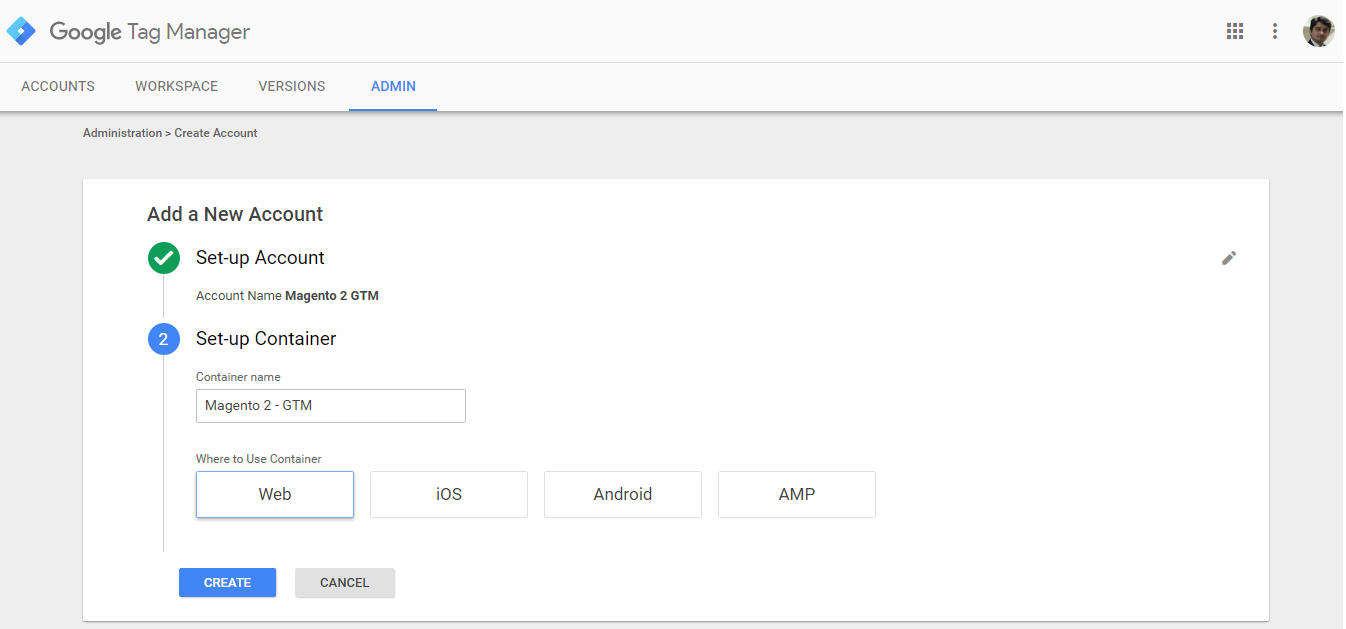
After you click create, you will be greeted with the terms of agreement. Once you have read them, just hit Yes to continue.
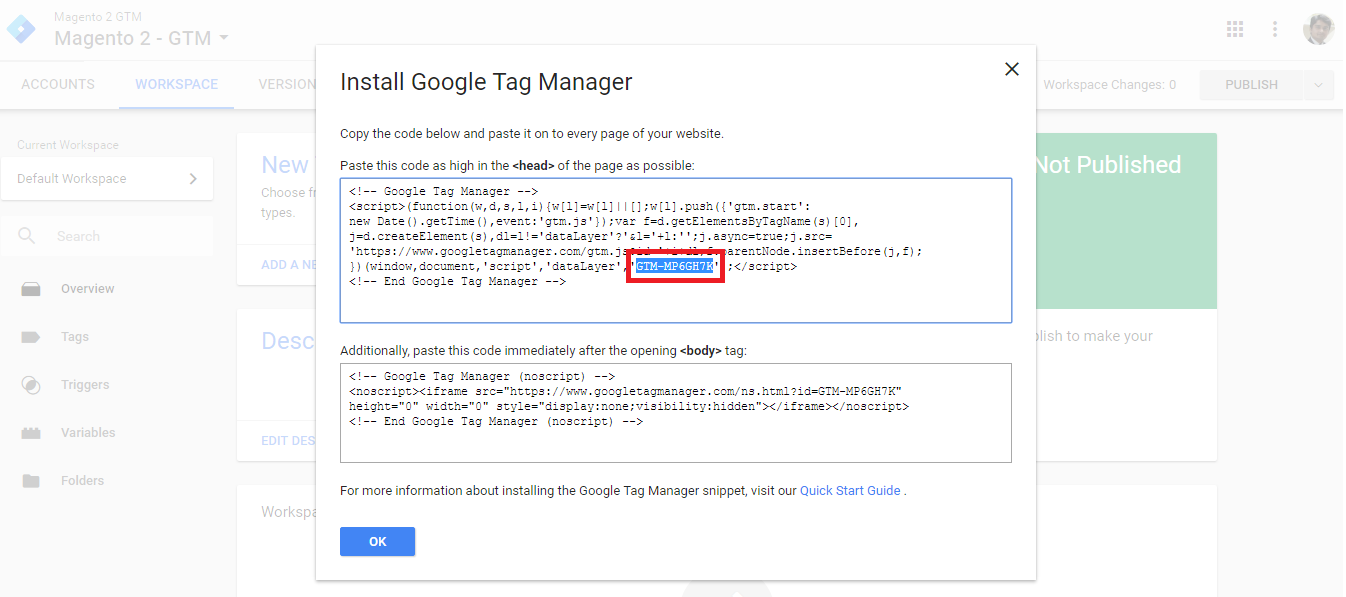
Finally, you will see a screen with javascript code. You just need to copy the GTM code as highlighted in the image below. We will use this code while configuring the Mageplaza’s Google Tag Manager Extension.
Step 3: Adding GTM code in Mageplaza Extension
In Magento 2 Admin Panel, navigate to Google Tag Manager -> Settings and add the GTM code that you copied previously into the Google Tag ID field.
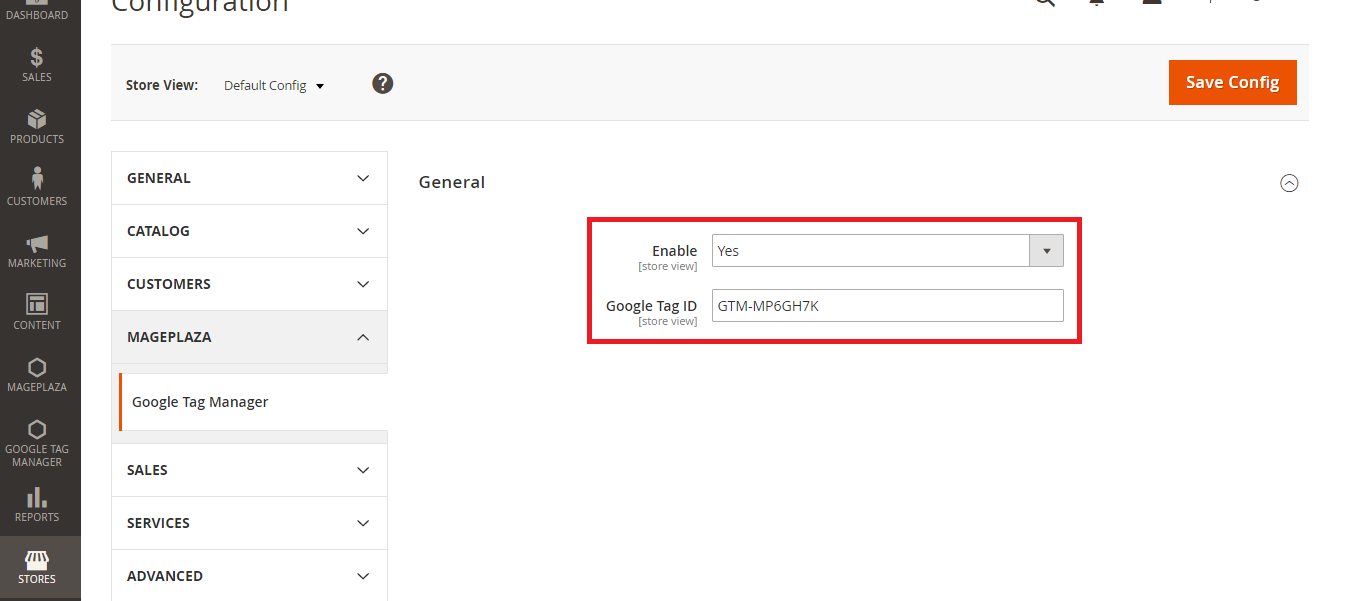
Finally, hit Save Config and refresh your cache.
Step 4: Verifying if GTM code is present on your website
The easiest way to verify that Google Tag Manager code is present on your website is to check the source code of your Magento 2 store frontend.
On the homepage of your website right click -> view page source and search for “Google Tag Manager.” If it has been added successfully, you will see something similar like in the image below:

Step 5: Adding Google Analytics via Google Tag Manager
Once you are done adding GTM on your Magento store, head back to your GTM account and follow the steps below to add Google Analytics easily.
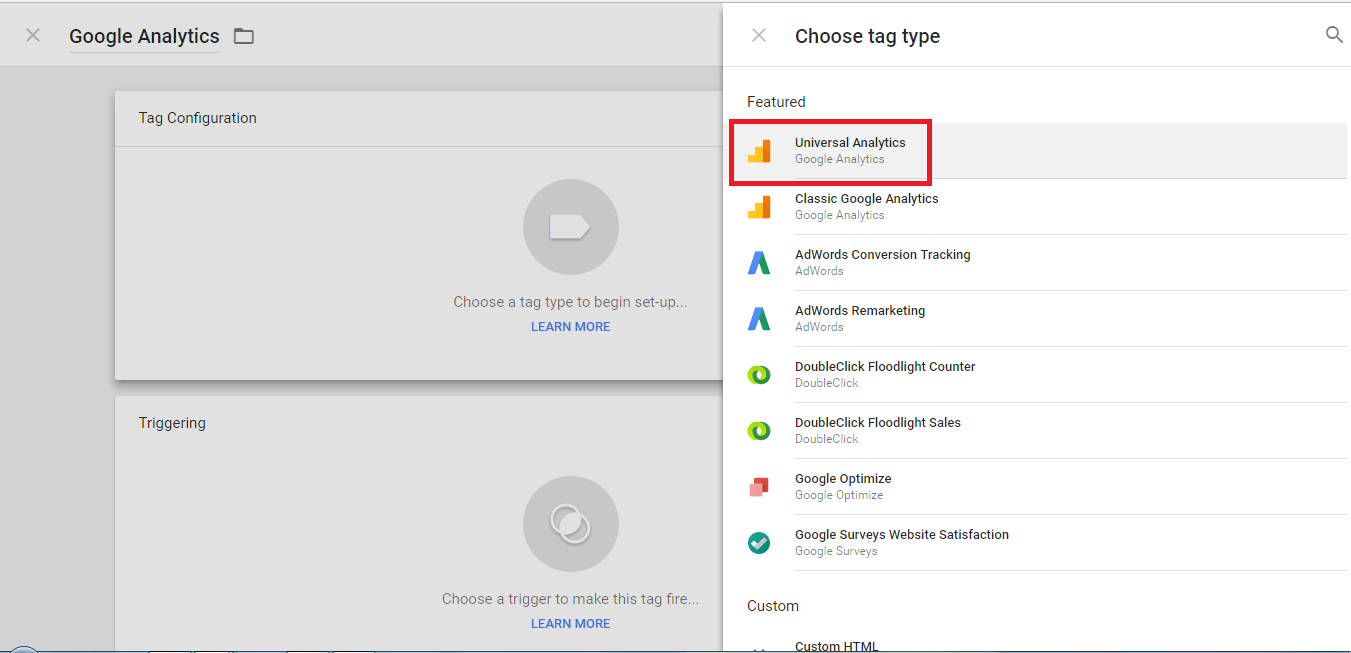
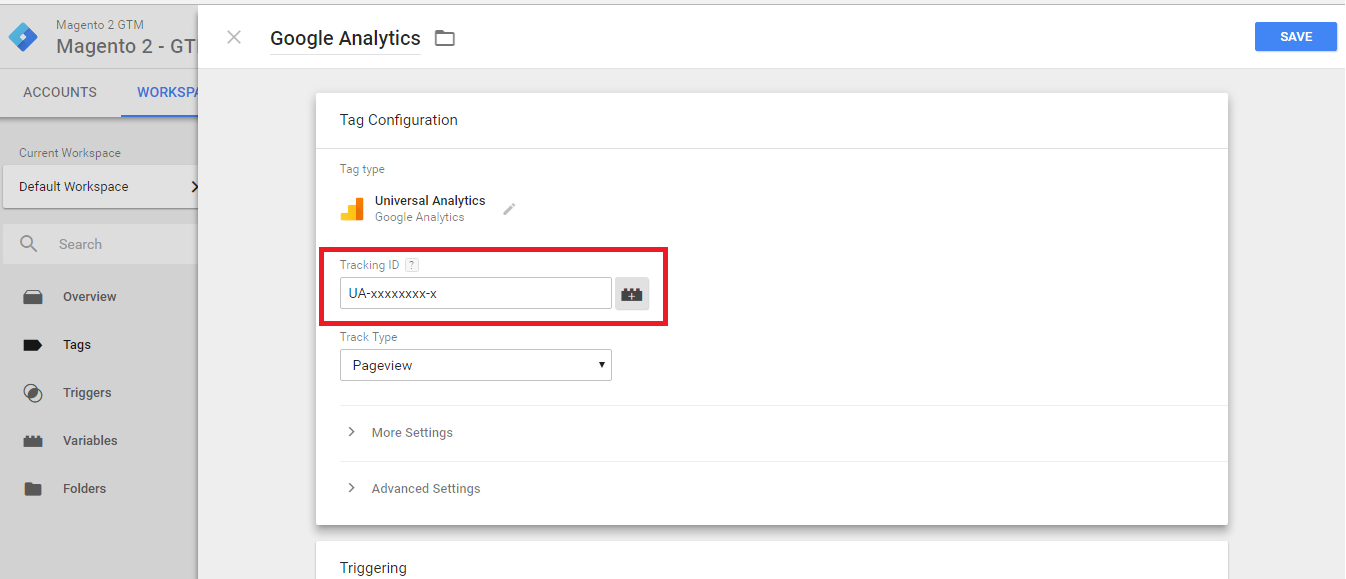
Under Tags -> New -> Name your Tag -> Tag Configuration -> Select Universal Analytics.
You will need your Google Analytics tracking ID which you can get from your Google Analytics Admin account. The ID is in this format: UA-xxxxxxxx-x
That is all it takes to configure Google Analytics via the Google Tag Manager. Adding other scripts via GTM is just as easy. Like I said, there are numerous benefits of adding GTM on your Magento 2 store, and some of them are as follows:
1) Central account to manage your scripts.
2) Version controlling your scripts.
3) Less time and effort required to add more scripts on Magento 2 store.
4) Reduces the number of extensions required on your Magento 2 store.
5) Debugging is easy.
6) Secure and free setup of scripts.
There are many more benefits that come to mind, but I think the mentioned points should have already convinced you on using Google Tag Manager on your Magento 2 store. If you have any questions about the process or you want to discuss anything, just leave your thoughts in the comment section below!


