Most Awaited Ebook Is HERE!
Let Us Take Care Of All Your M1 to M2 Migration Woes.

Disclaimer: Magenticians does not necessarily agree with the views expressed in this guest post. They are presented to bring to light all diverse views in the Magento and general ecommerce community.
Magento websites write various data and objects to its database when a customer visits your Magento store. It does this in order to provide a fast and smooth experience when they visit again.
These objects are mostly Magento core systems, PHP calls, and different blocks of information which can sometimes reduce the performance of your Magento store as well.
If you want to optimize the speed of your Magento store, one recommended solutions is to use the Memcached support built within Magento.
Let Us Take Care Of All Your M1 to M2 Migration Woes.
Memcached is an open-source, high-performance distributed memory caching system that is designed to speed up the dynamic database content of any web application. It caches data and objects to reduce the reading time of the database.
Memcached is generic in nature but intended for use in boosting up dynamic web apps by alleviating database load. Magento also supports Memcached for caching database objects, but it’s not configured by default and will require some changes to your local.xml file. We recommend you to configure Magento to use Memcached instead of Redis because Redis doesn’t support session locking.
If you want to use Memcached, you will need to install a Memcached extension for PHP. After installation, make sure that Memcached is running on your hosting server, and by default, it is configured to listen on localhost and port 11211. It is recommended because it would be a high-security risk by allowing any external sources access to Memcached directly if it is configured to listen on an external IP that isn’t firewalled.
Also, you will need to be sure that Memcached support is loaded into PHP. A view of phpinfo(); function can verify it. To do so, create a phpinfo.php file on the root of your server with the following code:
<?php
phpinfo();
?>
Now, browse it using your favorite web browser. Search for ‘Memcached’ in your browser and make sure it displays as follows:
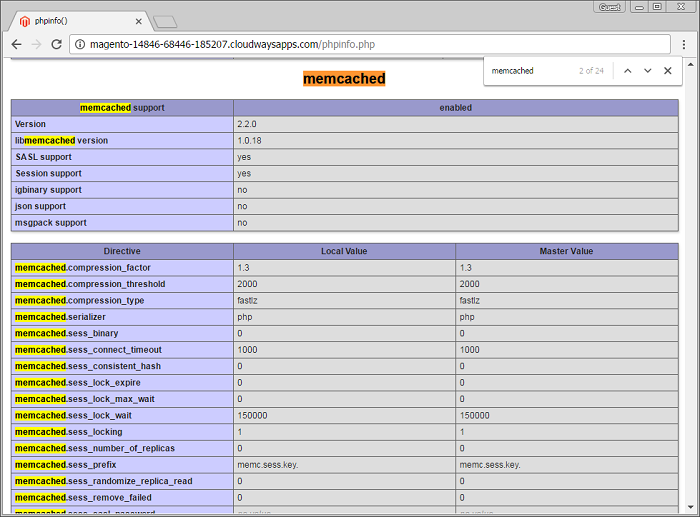
Remember one thing; if Memcached doesn’t show, restart your server. If it still doesn’t show up, make sure that you have installed the php-pecl-memcached extension correctly.
Finally, we are now going to configure Magento to use Memcached. You will have to add the following code to your local.xml file which can be found in Magento_Root/app/etc/ directory. This code will precede right after the <global> tag. An example of the code can also be found in Magento_Root/app/etc/local.xml.additional . Copy and paste the following code into local.xml file:
<cache>
<backend>memcached</backend><!-- apc / memcached / empty=file -->
<memcached><!-- memcached cache backend related config -->
<servers><!-- any number of server nodes can be included -->
<server>
<host><![CDATA[127.0.0.1]]></host>
<port><![CDATA[11211]]></port>
<persistent><![CDATA[1]]></persistent>
</server>
</servers>
<compression><![CDATA[0]]></compression>
<cache_dir><![CDATA[]]></cache_dir>
<hashed_directory_level><![CDATA[]]></hashed_directory_level>
<hashed_directory_umask><![CDATA[]]></hashed_directory_umask>
<file_name_prefix><![CDATA[]]></file_name_prefix>
</memcached>
</cache>
Now make sure that the above tags <host> and <port> are set to correct values. Usually, they are set to localhost (127.0.0.1) and 11211. Once it’s done, save the local.xml file and remove all files and folders from the Magento_Root/var/cache directory.
Finally, check your site and see if it’s working. If your Magento store fails to load, go back and check your local.xml file and hosting server’s Memcached configuration.